

Get started
Welcome to the start guide for Conference Manager.
This guide is structured to follow your event setup step by step. The first sections introduce the basics: how to log in and how to create your event.
From The event onwards, the sections follow the main tabs inside Conference Manager: The event, Website, Invite and remind, Participants, Questionnaire, Communication and, if available, Finance. This way, you can work through the guide while setting up your event directly in the system.

Use the buttons at the top to move between the different parts of the guide. We recommend going through the sections in order when setting up your first event.
Log in
Once you have been registered for Conference Manager, you will receive a welcome email with your login details.
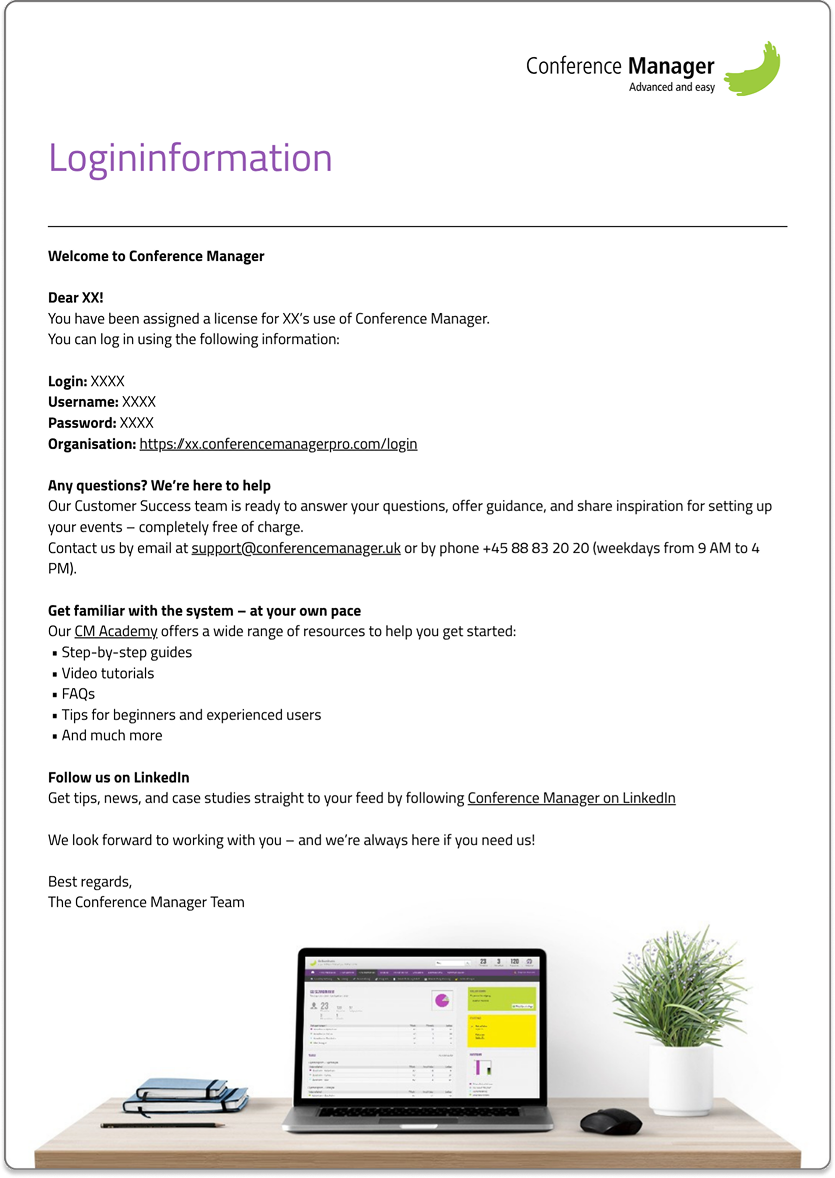
The welcome email contains the information you need to log in for the first time. You will receive a temporary password, which you will be asked to change after your first login.
You will also be asked to set up two-factor authentication, also known as 2FA. This adds an extra layer of security to your account for future logins.
Need help setting up 2FA? Read the guide on how to set up two-factor authentication with an authenticator app.
Create event
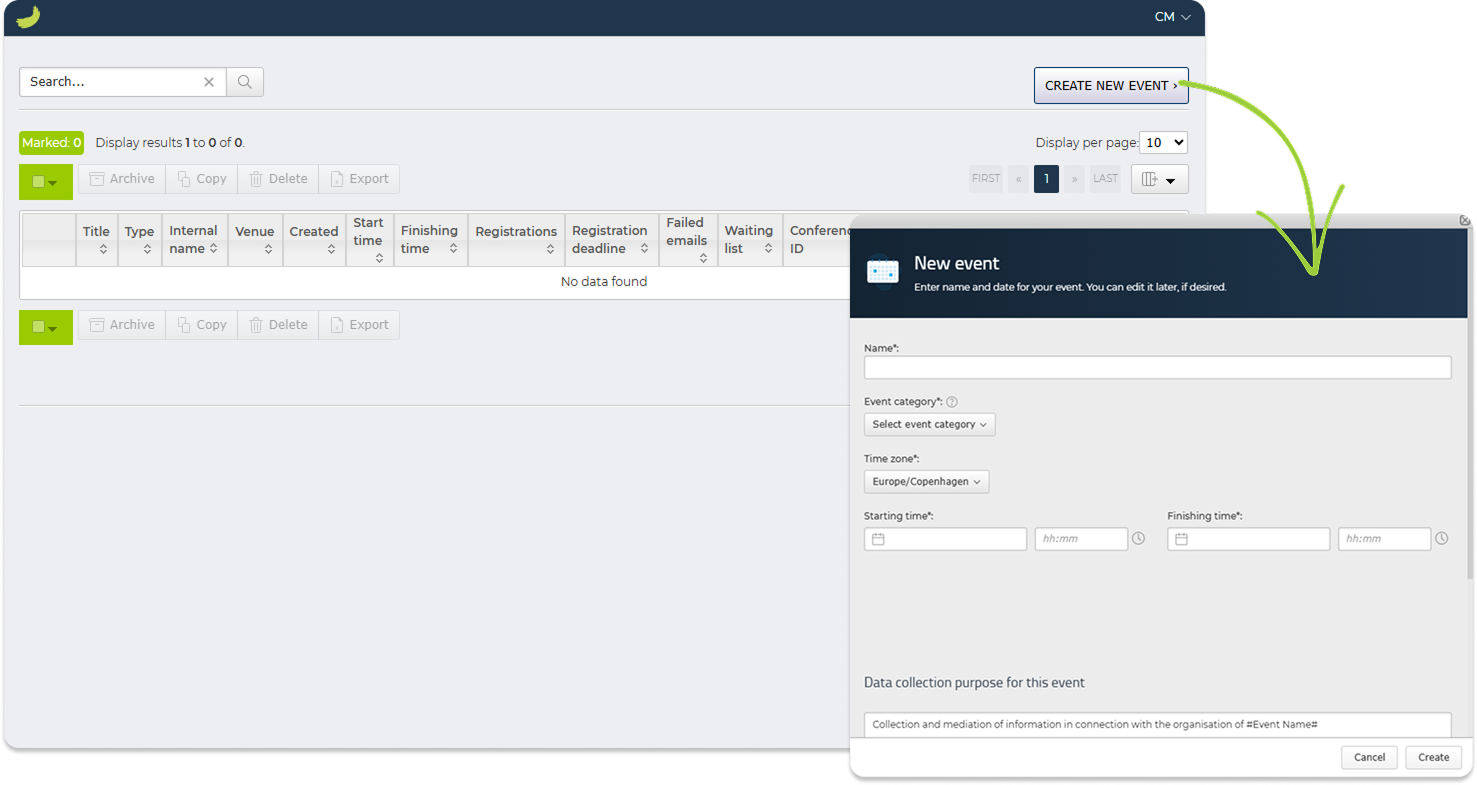
After logging in, you will see your event overview where you can create your first event. Click on Create new event and then fill out the details for your event.
Once you have created your event, you will be taken to the event dashboard.
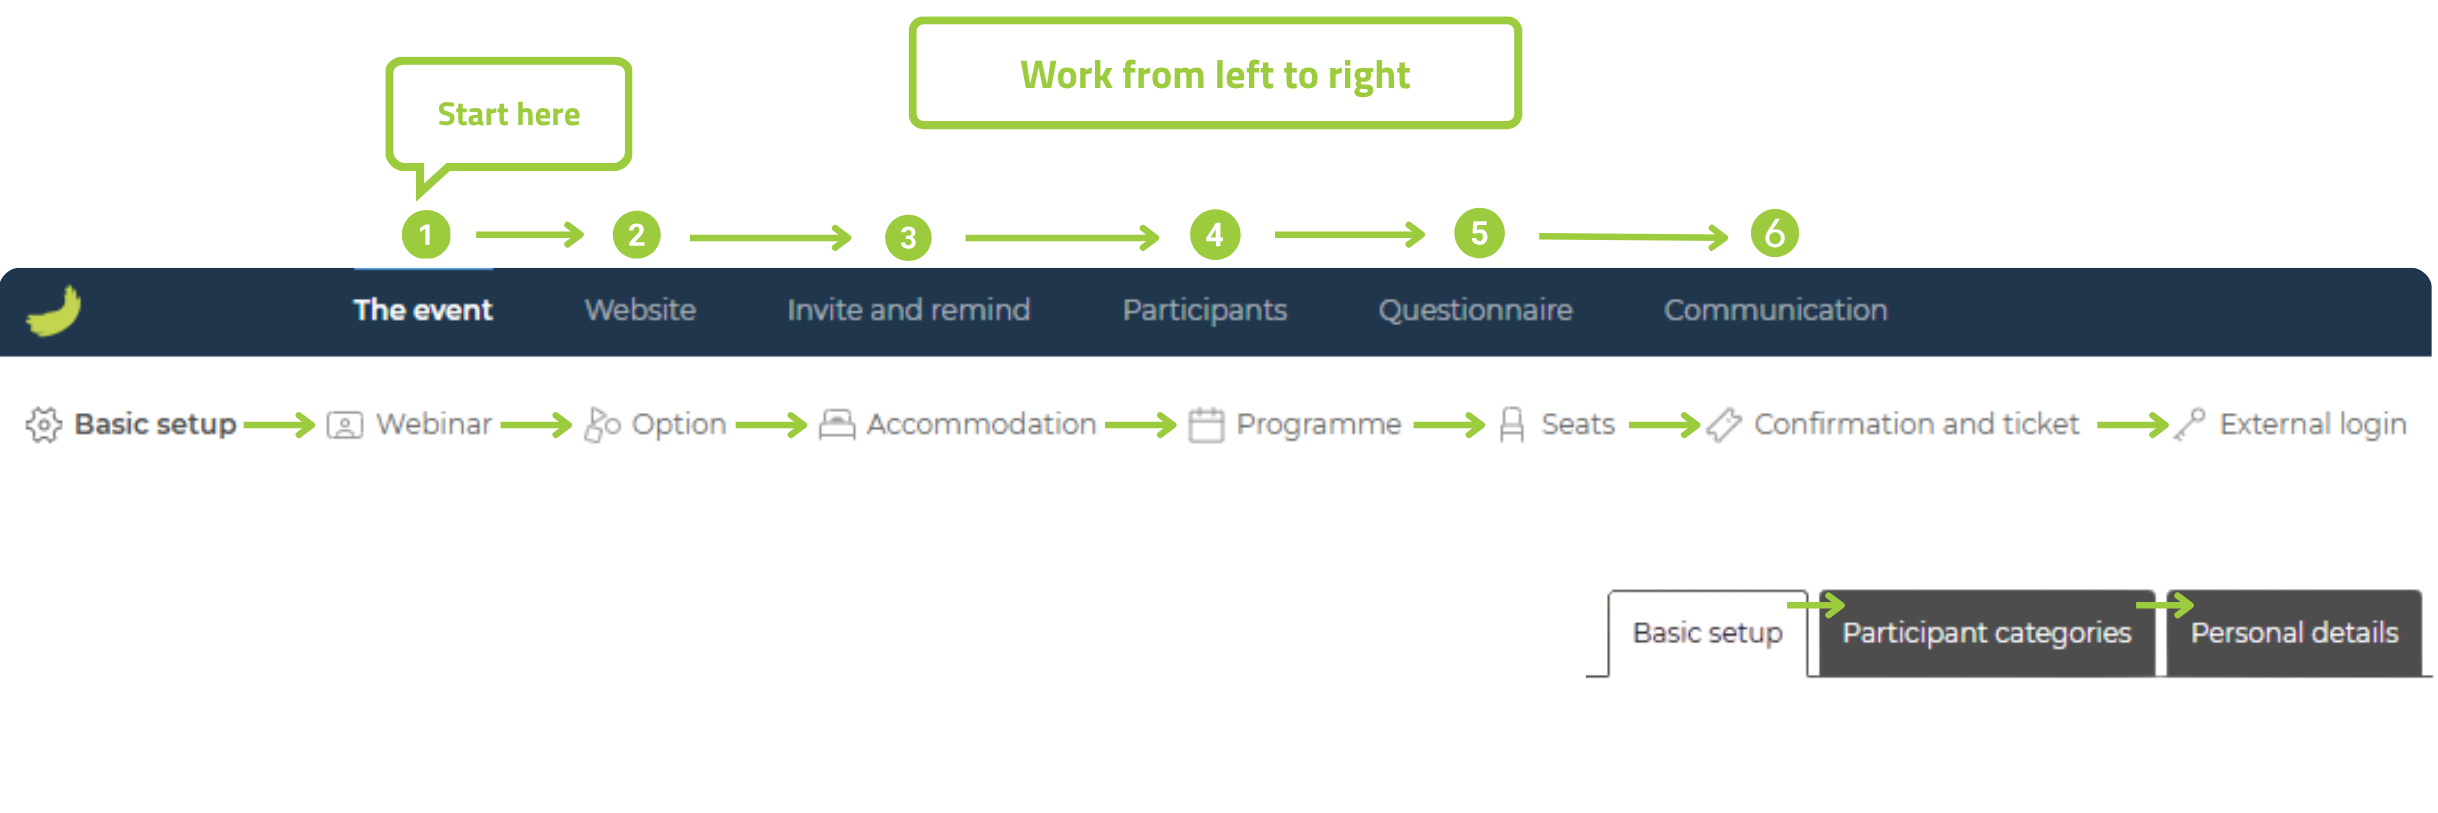
Recommended workflow: Work from left to right in each level of the setup — main tabs, sub-tabs and any additional tabs inside a section.
Start with the first relevant main tab and continue to the right. Inside each main tab, go through the sub-tabs from left to right. Some areas also contain an extra level of tabs, such as Basic setup, Participant categories and Personal details. Go through these from left to right too before moving on.
This helps ensure that all relevant settings are completed in a logical order before you continue with the rest of your event setup. If some tabs are not relevant for you, you can simply skip them and move on to the next one.
You can always return to the event overview by clicking the green brushstroke icon in the top-left corner.
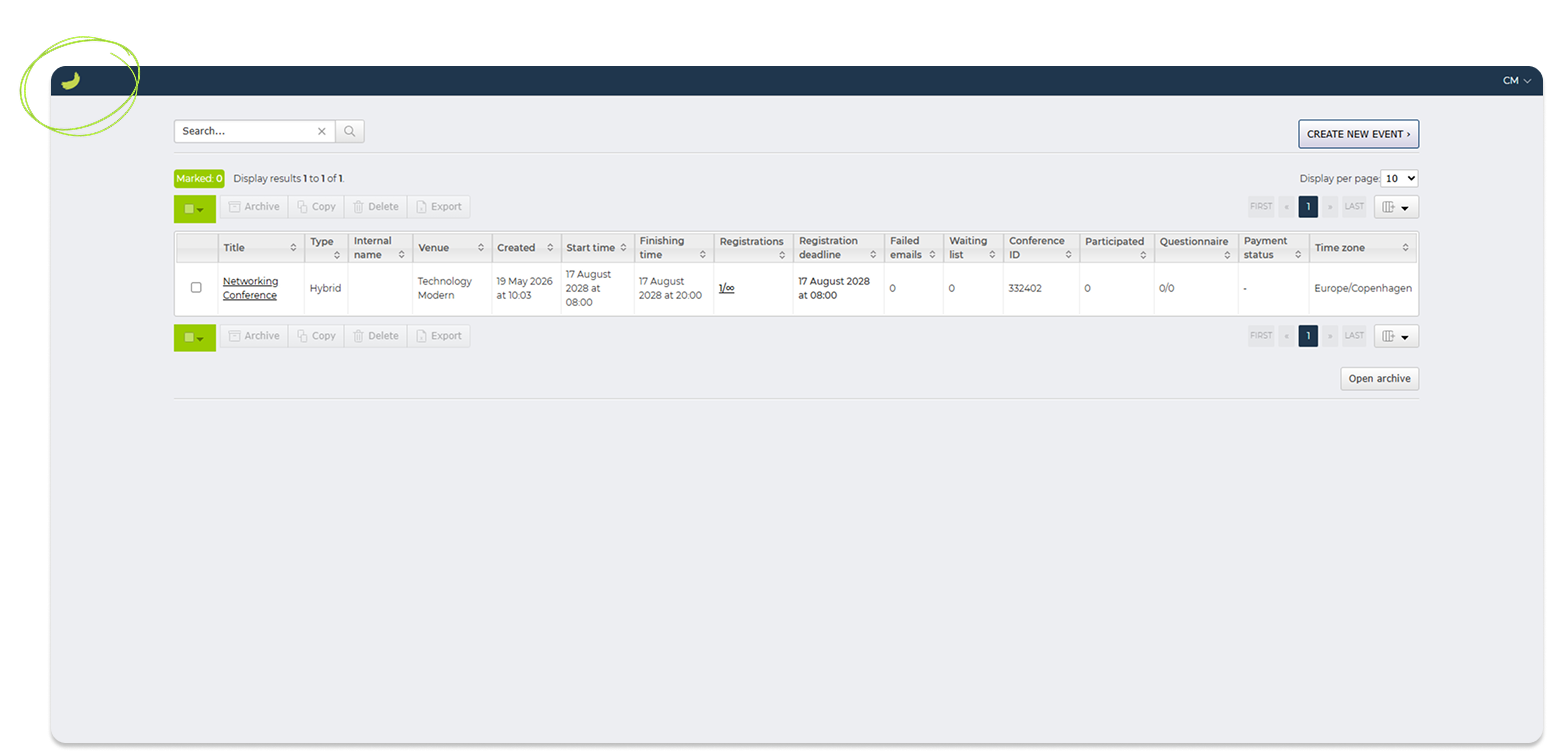
Your event will appear in the event overview. From here, you can open the event again and continue working on the setup whenever you need to.
The event
After creating your event, open the The event tab from the main menu.
This tab contains the main setup areas for your event. Here, you can configure the basic event settings, define participant categories, add options and accommodation, set up the programme, manage seats, create confirmations and tickets, and configure external login if needed.
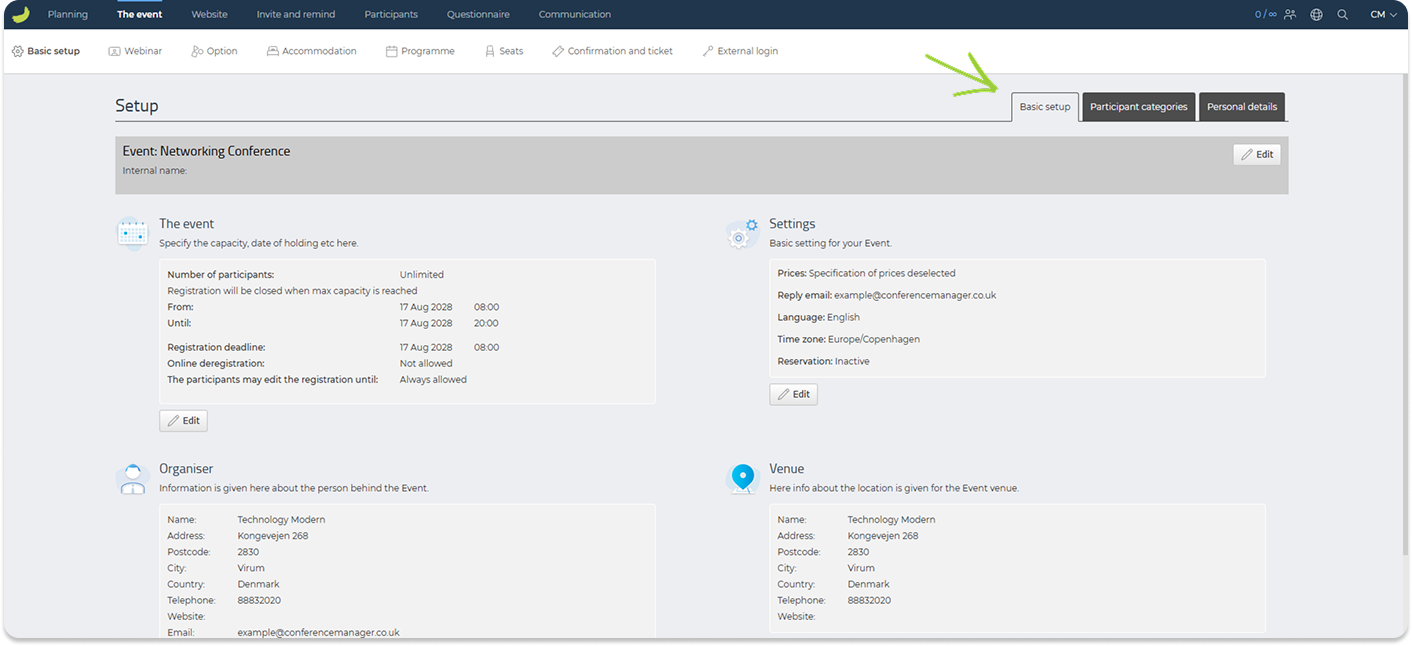
Basic setup
In The event → Basic setup, you manage the basic structure of your event.
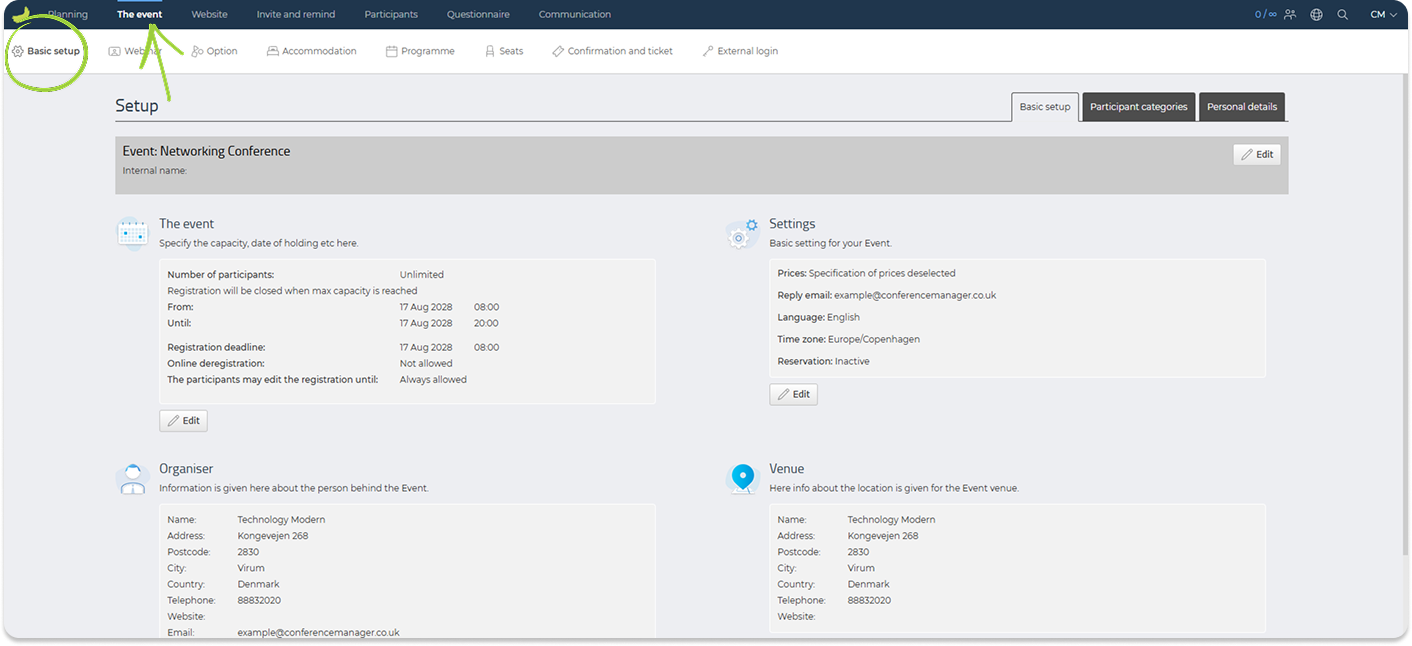
This section is divided into different sub-tabs:
- Basic setup
- Payment — only visible if prices are enabled for the event
- Participant categories
- Personal details

Go through each tab to make sure the event is set up correctly before continuing with the rest of the event setup.
Basic setup
In the Basic setup sub-tab, you can edit the main information about the event.
The page is divided into different sections. Click Edit in the section you want to update.
In The event, you can set the event capacity, sign-up dates, registration deadline, event start and finish time, deregistration rules, whether participants can edit their selections after registration, and whether a waiting list should be available when the event is fully booked.
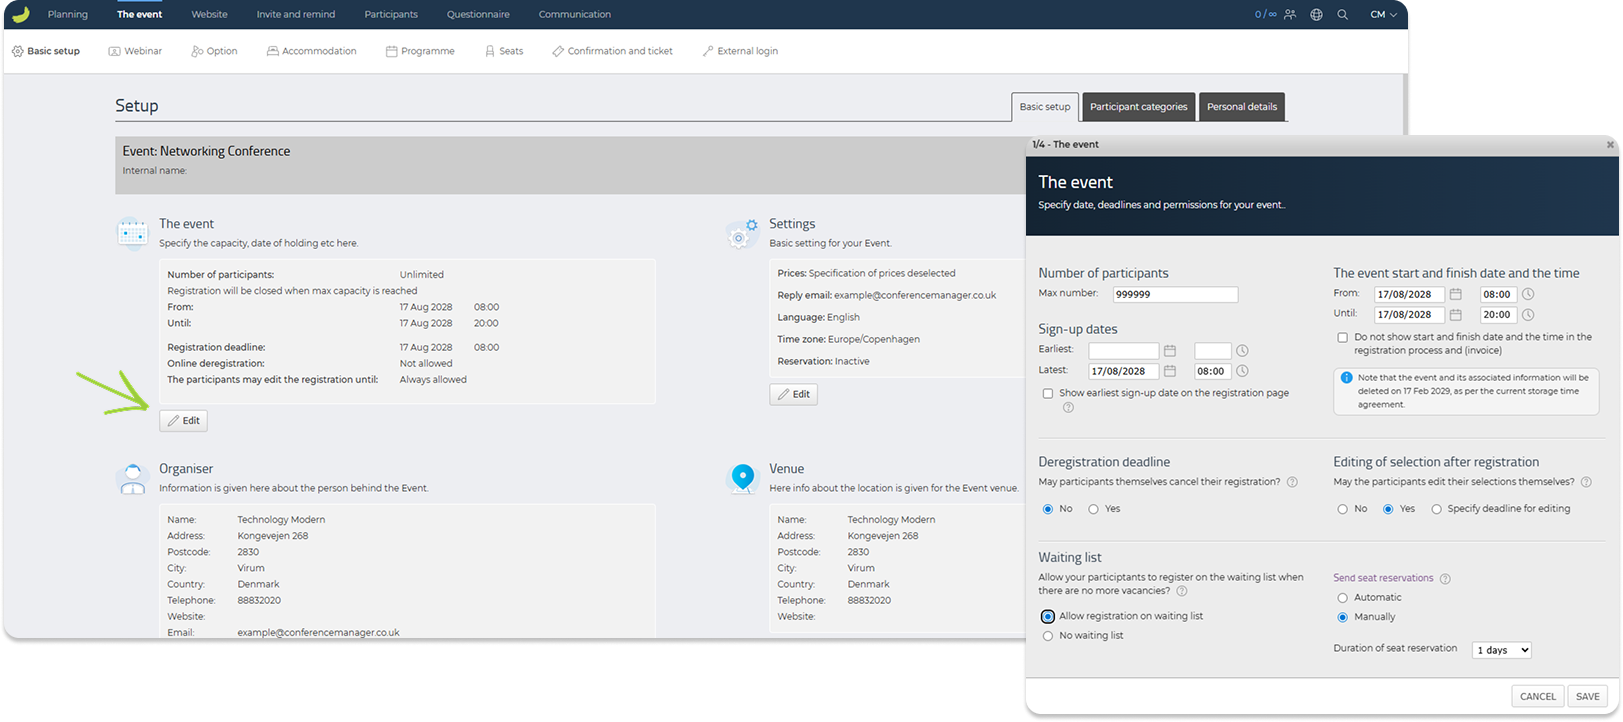
If the waiting list is enabled, participants can sign up even when there are no more available places. You can also choose how seat reservations should be handled, for example whether they should be sent automatically or manually, and how long a seat reservation should be valid.
You can manage waiting list participants under Participants → Other lists → Waiting list.
For a more detailed guide on the waiting list, see:
How to enable and manage the waiting list
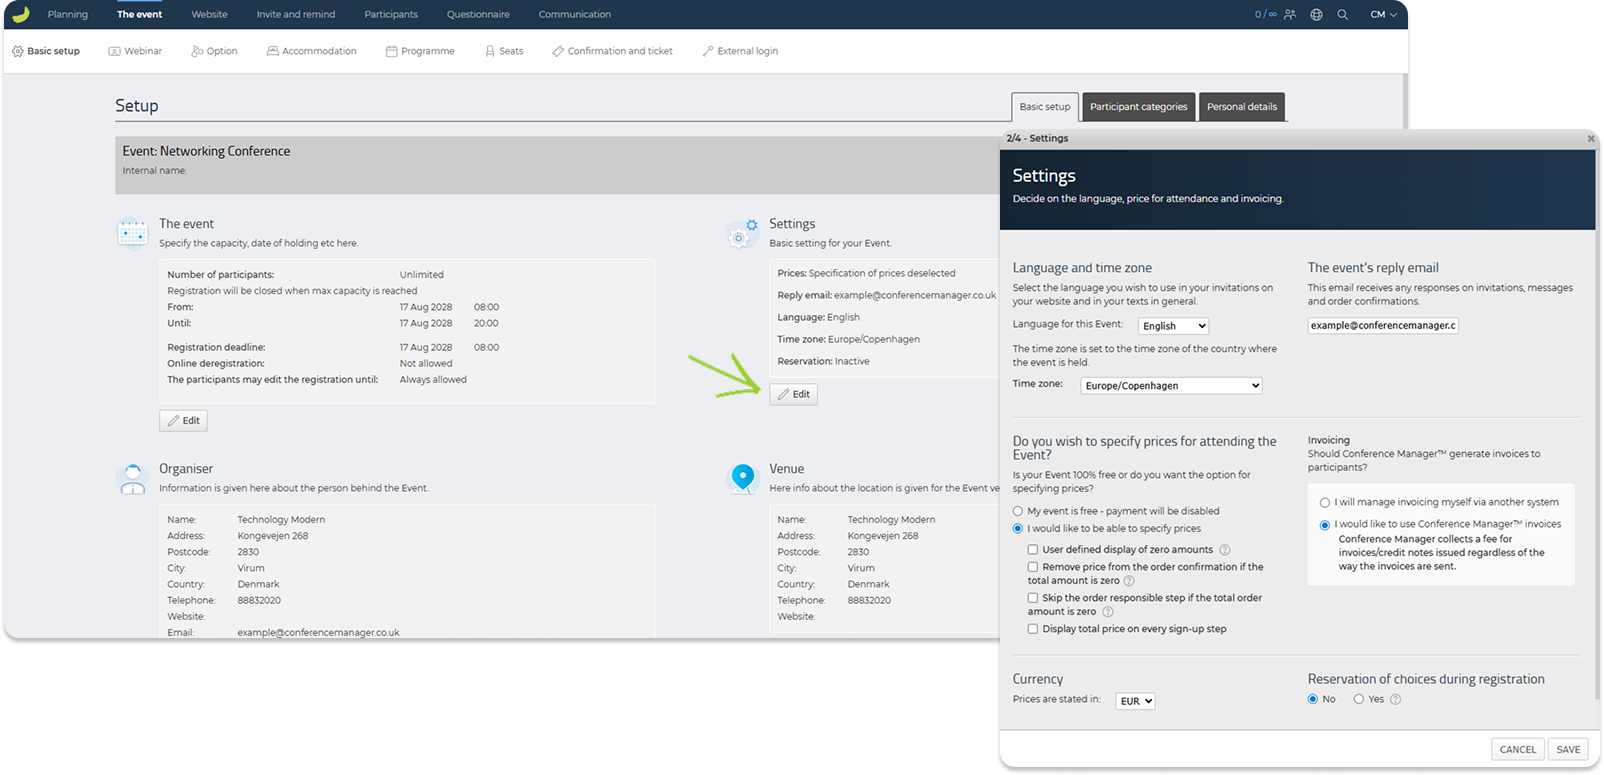
In Settings, you can choose the language and time zone for the event, enter the reply email used for participant responses, and decide whether the event should be free or have prices. If you choose to specify prices, you must also select the currency. When prices are enabled, the Payment tab becomes available.
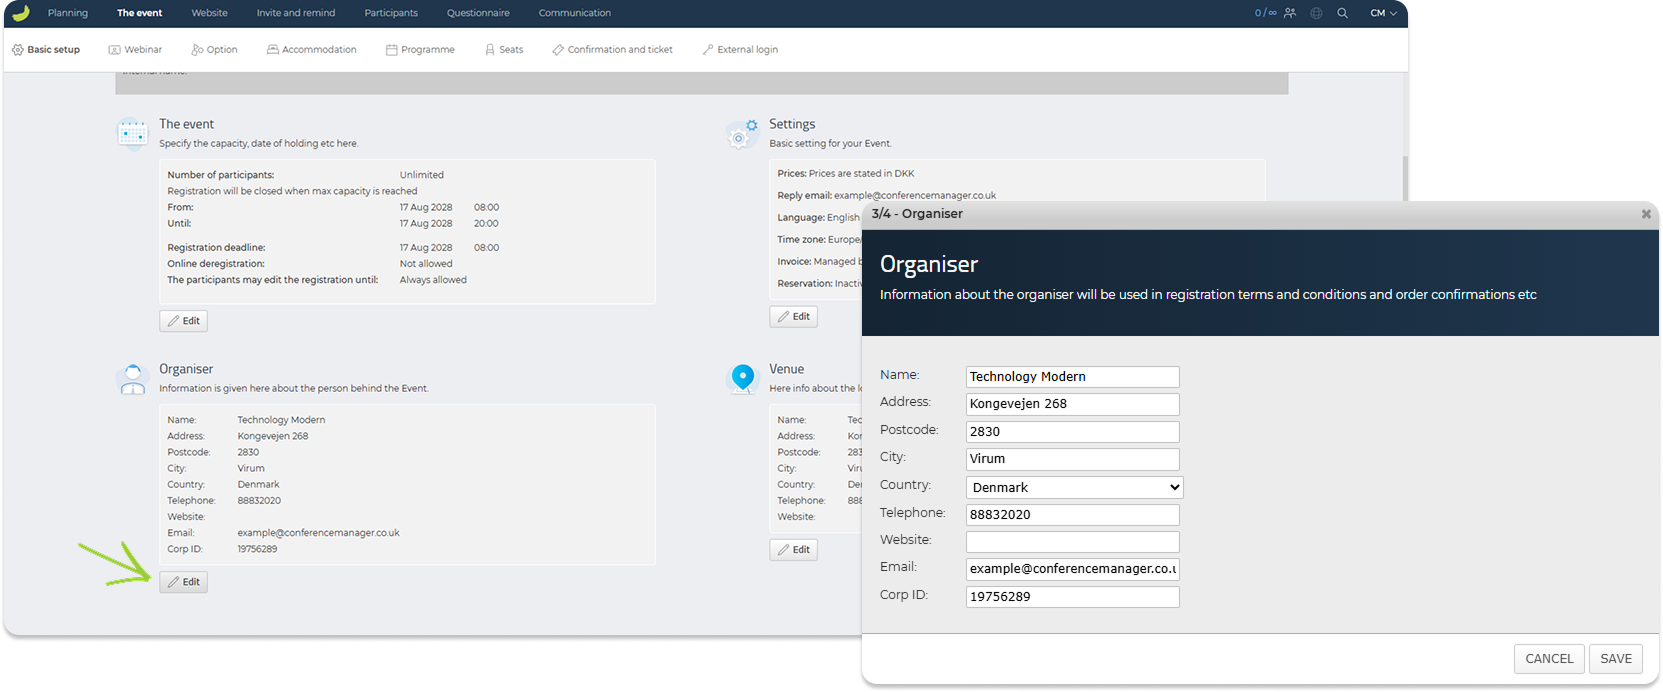
In Organiser, you can add or update information about the organiser of the event, such as name, address, phone number, website, and email.
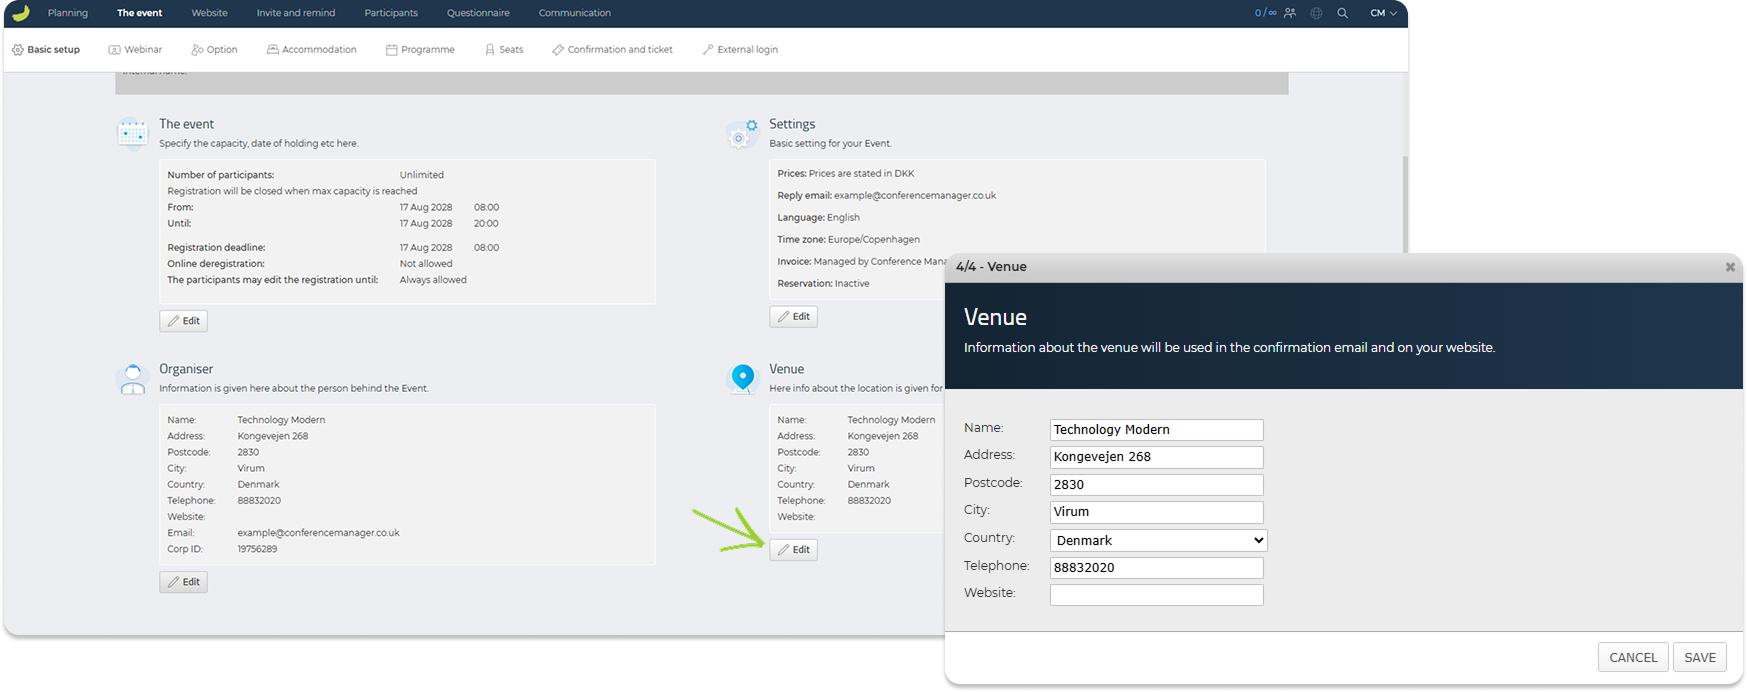
In Venue, you can add or update information about where the event takes place, including venue name, address, city, country, phone number, website, and email.
Payment
The Payment tab is only shown if prices have been enabled in Basic setup → Settings.
In this tab, you can review and configure the payment setup for your event, including payment options, VAT settings, administration fees, and other payment-related information.
If no payment options have been set up yet, click Add payment option.
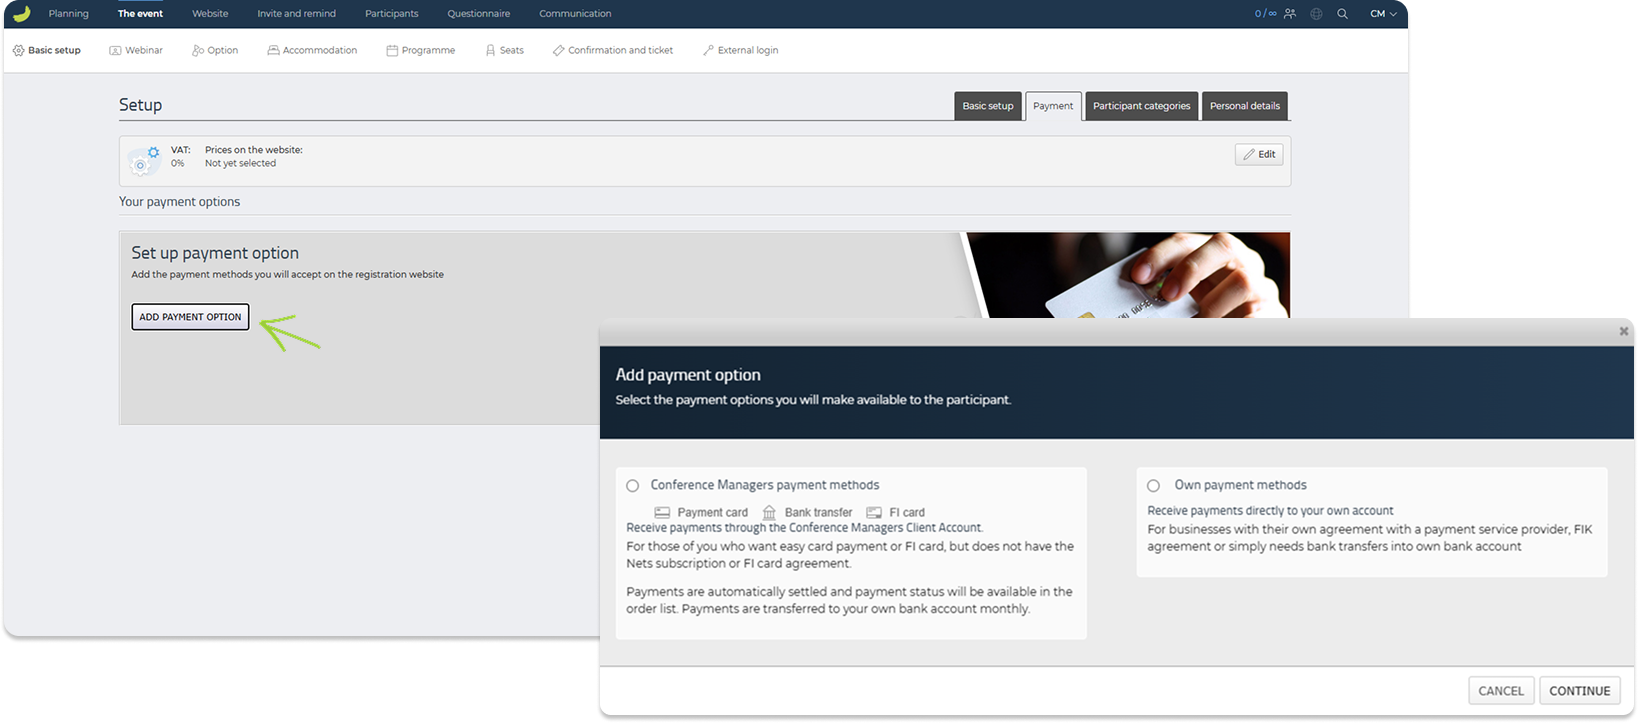
You can choose between:
Conference Manager’s payment methods
Use this if payments should be handled through the Conference Manager client account. Depending on your agreement, this may include payment card (including Apple Pay and Google Pay), bank transfer, and payment slip. Payouts are made according to the payment setup and agreement that apply to the event.
Own payment methods
Use this if you want to manage payments outside Conference Manager’s payment methods, for example through your own payment service provider, bank transfer setup, or a manual payment method such as cash payment.
You can also use the Edit button in the VAT section to configure VAT settings for the event (if you are using Conference Manager’s invoicing).

Here, you can define the VAT rate, choose whether the prices you enter are stated including or excluding VAT, and decide how prices should be displayed on the registration website.
For example, you can choose whether prices should be shown including VAT, excluding VAT, or whether participants should be allowed to switch between the two views during registration.
If the event is free, the Payment tab will not be visible.
Participant categories
Under Participant categories, you can create and manage the categories participants can register under.
A default category called Standard is available when you first enter this tab. You can edit this category, copy it, add more personal information fields, or create additional participant categories if your event has different participant types, prices, access rules, or registration flows.
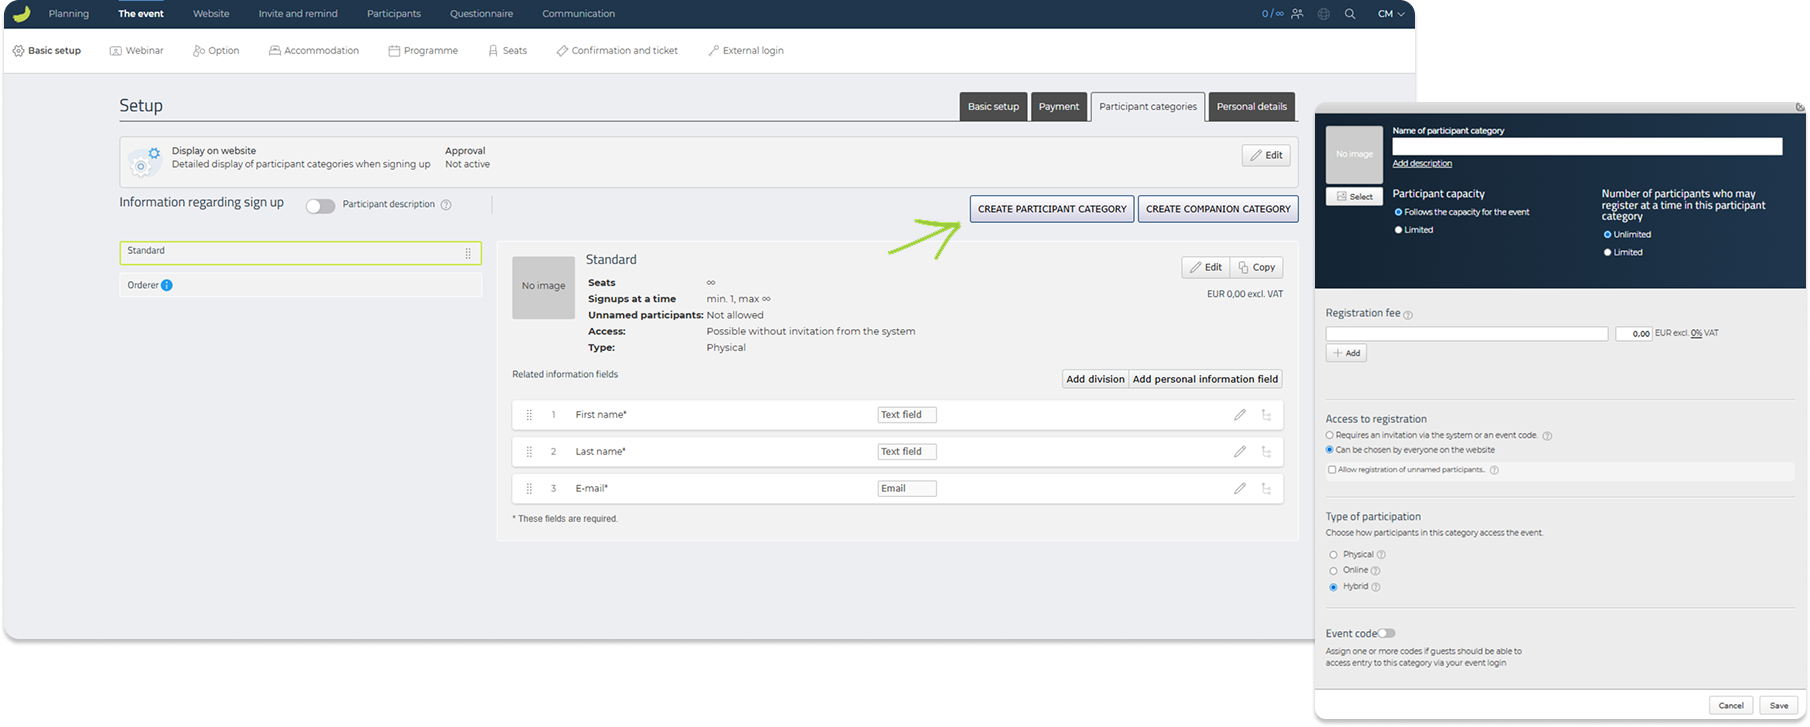
You can also create companion categories if participants should be able to register one or more companions as part of the same registration. This can be useful for guests, partners, colleagues, or other accompanying persons who should be connected to the main participant.
Click Edit on a participant category to update its settings. Here, you can define the category name, description, image, capacity, number of participants allowed per registration, registration fee, access settings, and type of participation.
Under Access to registration, you can decide whether the participant category should be available for everyone to choose on the website, or whether access should require an invitation or an event code.
If you use an event code for a participant category, you can create a direct registration link that includes the code. This link gives participants access to the specific participant category, which is useful if you want to share a registration link with a closed group or selected participants.
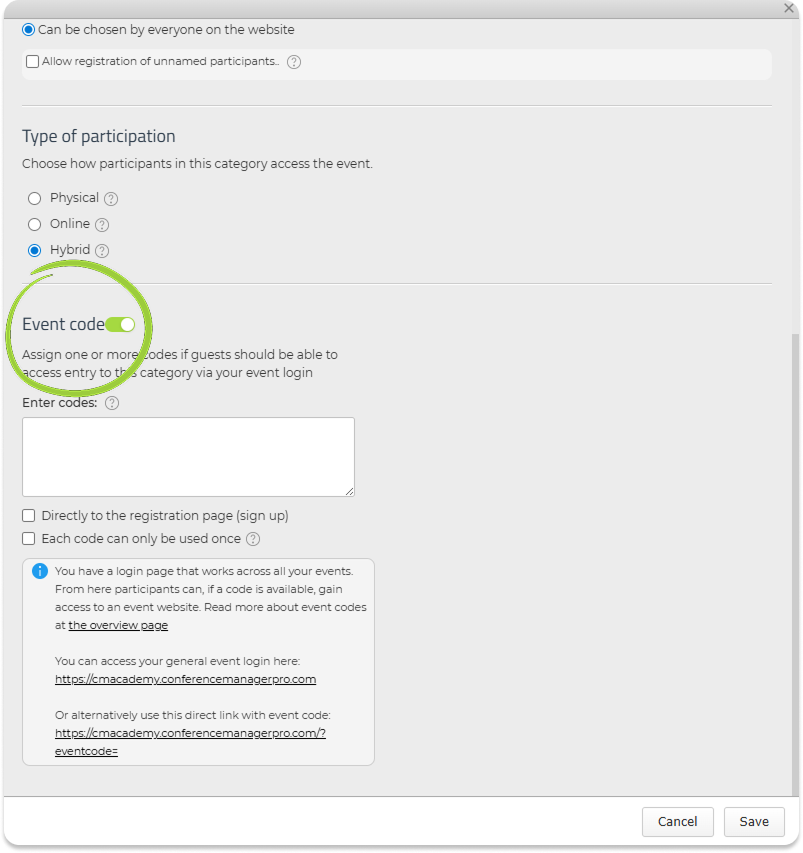
For a more detailed explanation of event codes and how they can be used for both event websites and participant categories, see:
What is an event code – and how is it used?
In each participant category, you can manage the information fields connected to the category. These fields define what information participants must provide when registering, such as name, email, company, address, or other custom fields.
You can click the general Edit button at the top of the Participant categories tab to adjust the overall participant category settings.
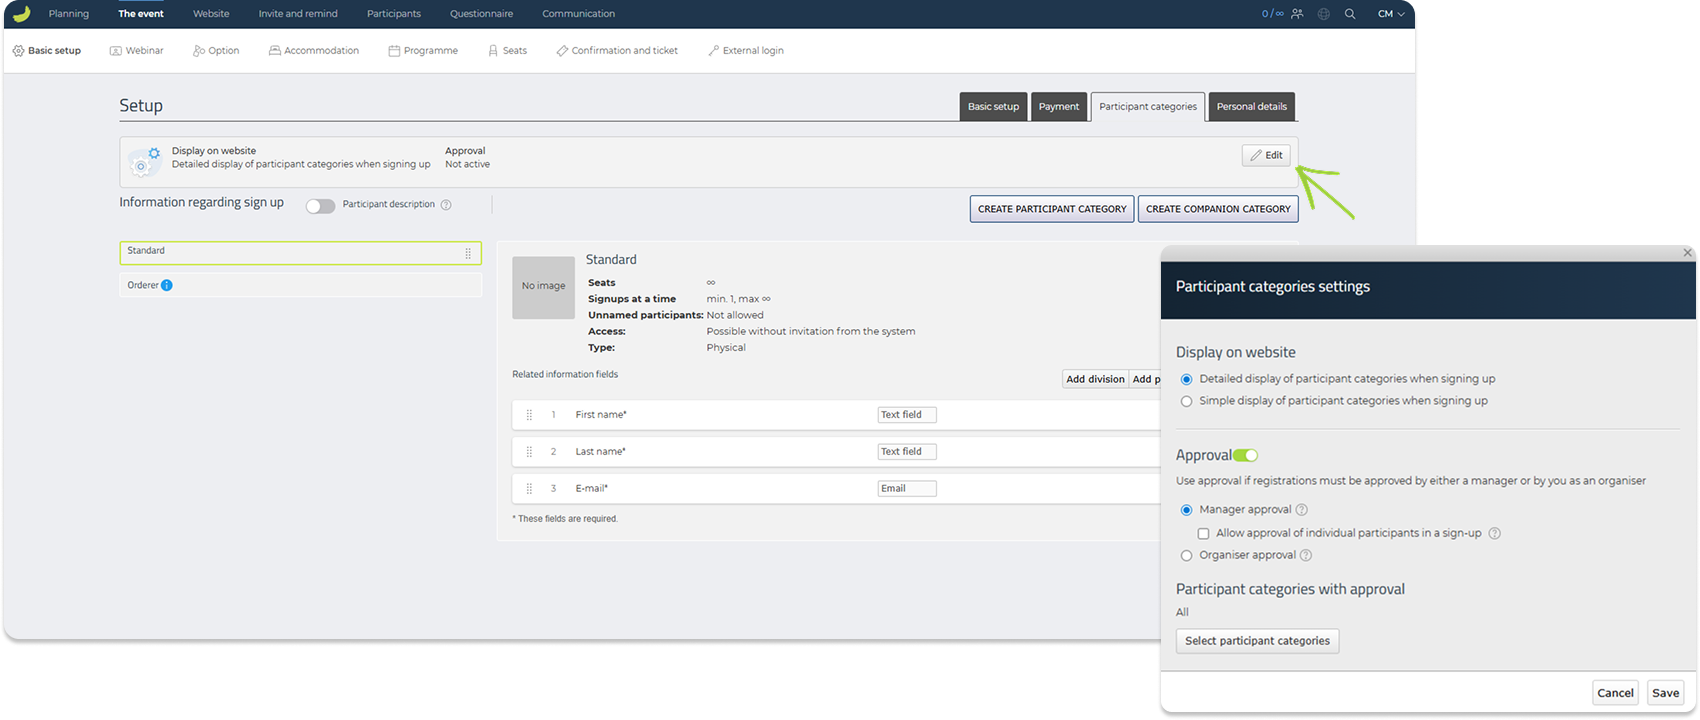
Here, you can choose how participant categories should be displayed on the website, for example as a simple or detailed display during sign-up.
You can also enable approval if registrations must be approved before they are fully confirmed. Approval can be handled either by a manager or by you as the organiser. You can choose whether approval should apply to all participant categories or only selected categories.
For more detailed guides on approval, see:
How to use manager approval for your event
How to use organiser approval for your event
Personal details
In Personal details, you can manage the personal information fields available for the event.
This section gives you an overview of all personal information fields, including standard fields such as first name, last name, email, address, zip code, city, country, company, and VAT ID.
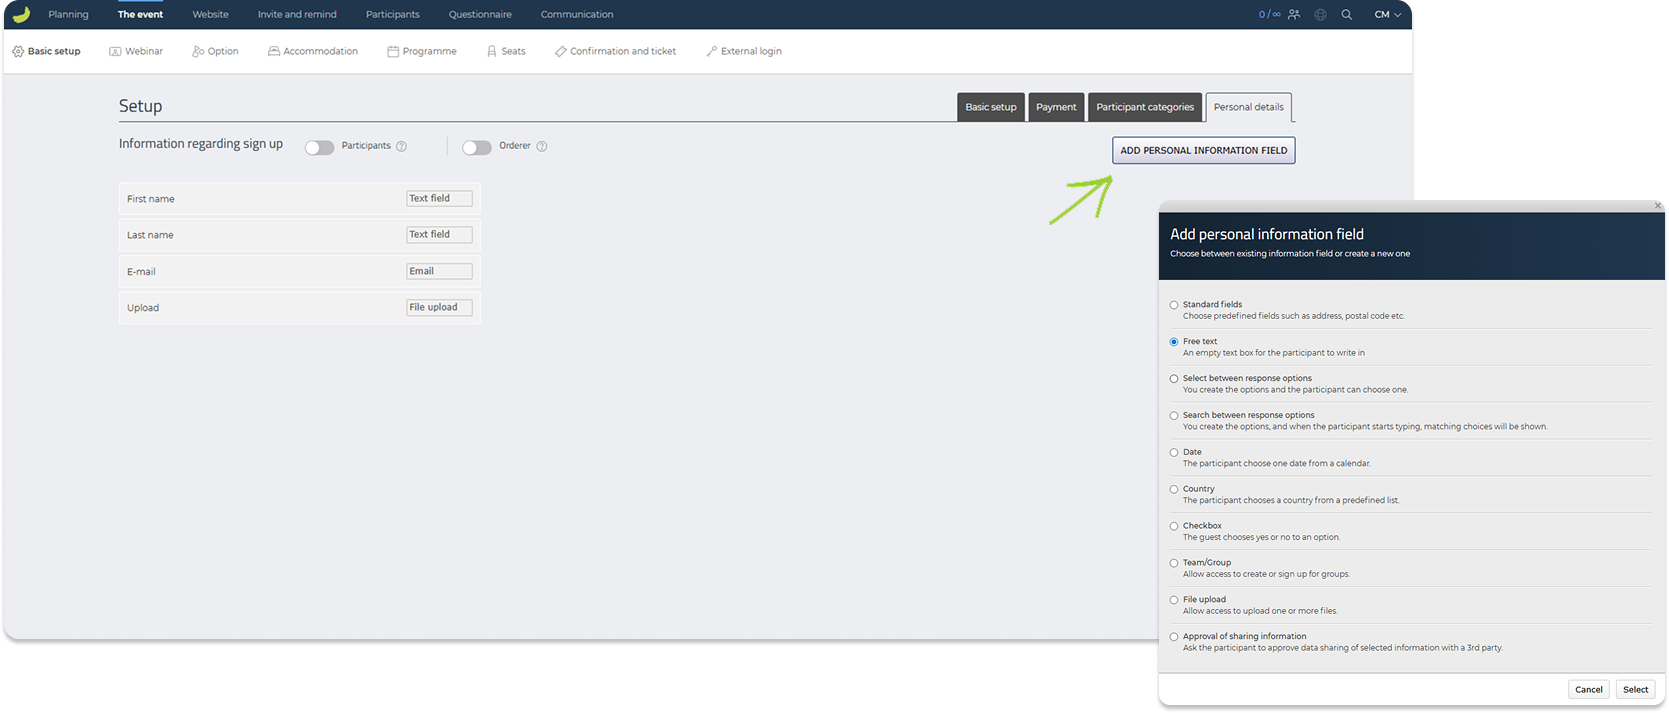
You can also add additional personal information fields if you need to collect more details from participants.
If a personal information field has been created but is not connected to a participant category, it will still be visible under Personal details. To make the field part of the registration flow, it must be added to the relevant participant category.
Webinar
Under The event → Webinar, you can create and manage webinars connected to your event.
Use this tab if your event is fully online or includes online participation. Before you can create a webinar, you must have at least one participant category where the type of participation is set to Online or Hybrid.
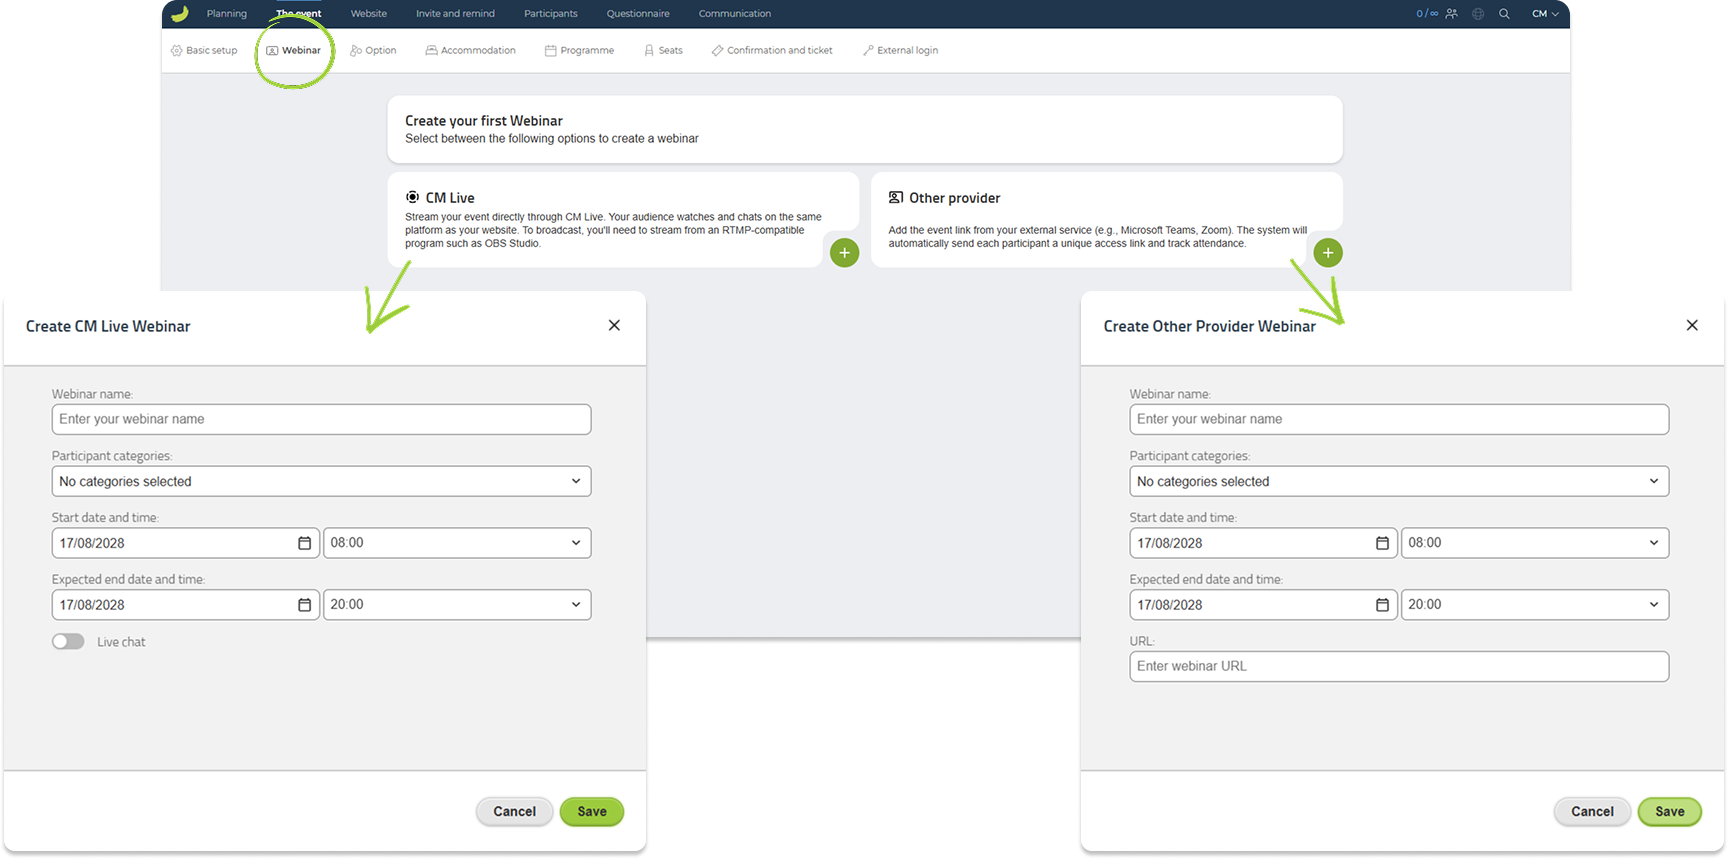
When creating a webinar, you first choose the webinar type:
CM Live
Select CM Live if you want to stream your event directly through Conference Manager. Participants can watch the stream and use the chat on the same platform as your event website.
After creating a CM Live webinar, Conference Manager will provide a stream server, stream key, and test URL.
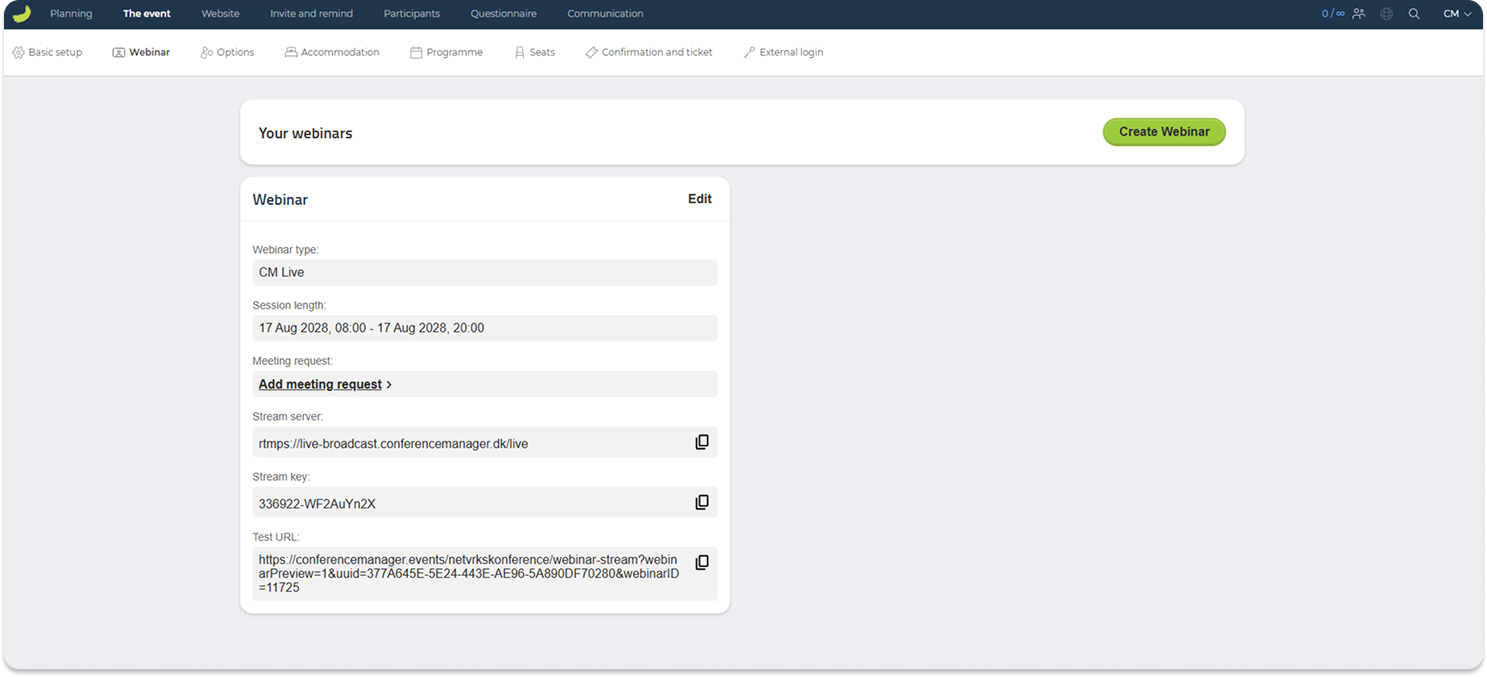
The stream server and stream key are used in your streaming software, for example OBS Studio, to connect your broadcast to Conference Manager.
You can read OBS Studio’s own setup guide here: OBS Quick Start Guide.
You can also watch our video introduction to the webinar features here: Online Introduction to Webinar Features.
Please note that the webinar user interface has been updated and may look different from the version shown in the video. However, the functionalities remain the same.
The test URL is for you as an administrator. You can use it to preview the webinar, test the participant experience, join the chat, and answer questions during the webinar.
Other provider
Select Other provider if you are using an external webinar or meeting service, such as Zoom, Microsoft Teams, or another provider.
Enter the webinar URL from the external service. Conference Manager will use this link to give participants access to the webinar.
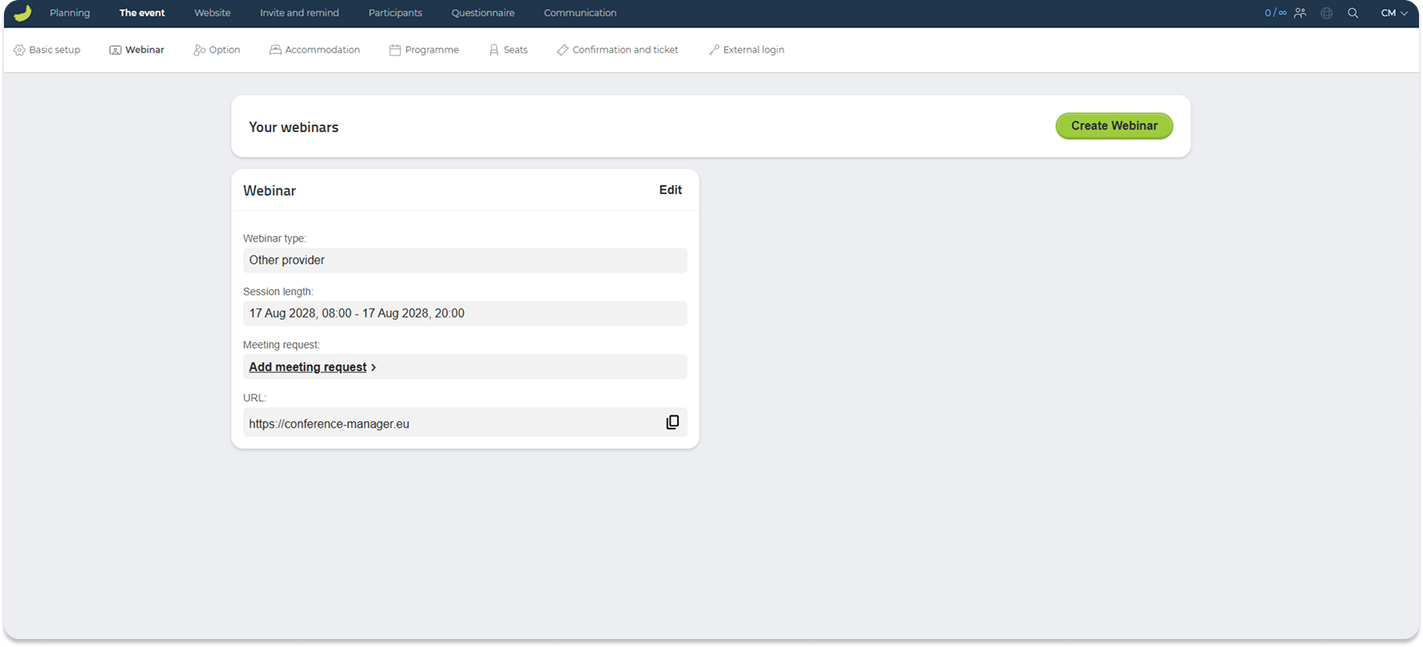
Before adding the link, make sure that the settings in the external webinar service allow participants to access the webinar through the link sent from Conference Manager. For example, check that participants do not need to be manually invited, approved, or registered separately in the external service, unless this is part of your intended setup.
Also make sure that any access restrictions, such as sign-in requirements, waiting rooms, passwords, or domain restrictions, will not prevent participants from joining the webinar.
Webinar link
Participants will automatically receive their personal webinar link by email one hour before the webinar starts.
If you want participants to receive their personal webinar link earlier, you can include it in a meeting request. This allows participants to add the webinar to their calendar and access their personal link directly from the calendar invitation.
Read more about how to create meeting requests here:
Create a meeting request
You can also insert the webinar link in an email under Communication. Create or edit an email, click Insert link, and select Choose a page on the website under Link address. Then choose Link to webinar from the dropdown menu and click Save. The participant’s personal webinar link will then be inserted into the email.
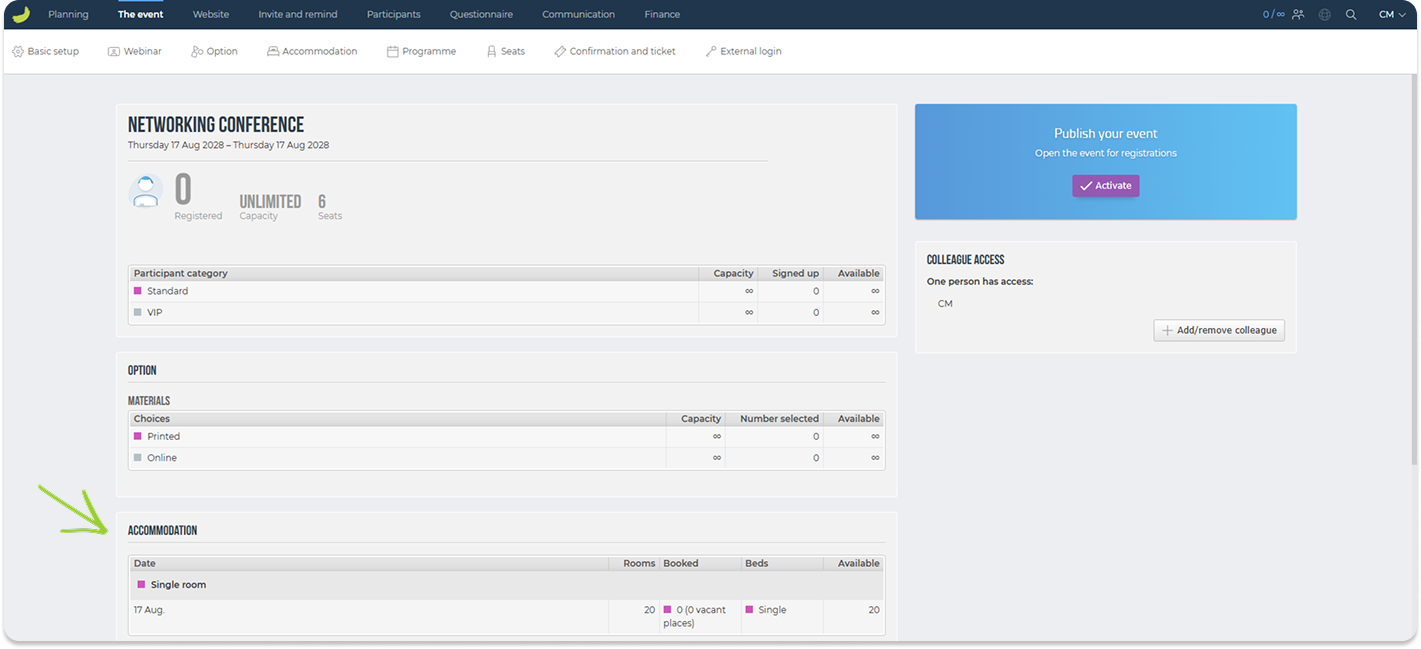
Options
Under The event → Options, you can create additional choices that participants can select during registration.
Options can be used for add-ons such as transportation, dinners, workshops, merchandise, social activities, or other extras connected to the event.
Click Add option to create a new option.
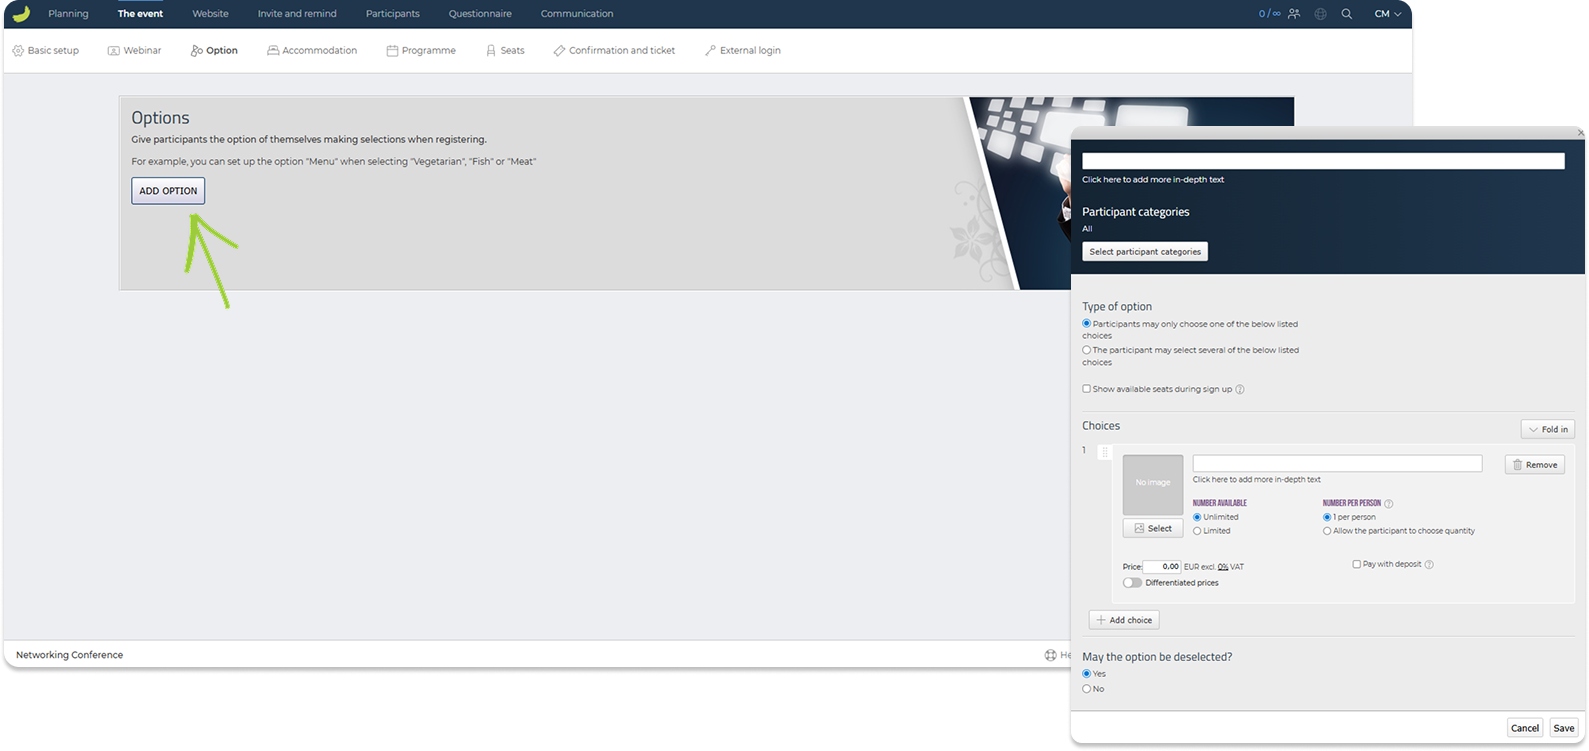
When setting up an option, you can define:
Name and description
Give the option a name and, if needed, add more in-depth text. This can help participants understand what the option includes.
Participant categories
Choose which participant categories the option should be available to. You can make the option available to all categories or only selected ones.
Type of option
Choose whether participants may select only one of the available choices, or whether they may select several choices.
Choices
Each option contains one or more choices. For each choice, you can add a name, image, description, available quantity, price, and rules for how many units each participant may select.
You can choose whether the number available should be unlimited or limited, and whether each participant can select one unit only or choose a quantity.
If prices are enabled for the event, you can add a price to each choice. You can also use differentiated prices or allow payment by deposit if this is relevant for your setup.
Once an option has been created, it will appear under Your options. From here, you can edit, delete, expand, collapse, or reorder the option.
Options are displayed as part of the registration flow for the participant categories they are connected to.
View selected options
Once participants have started registering, you can get a quick overview of selected options from the event dashboard. To access the event dashboard, click The event in the main menu.
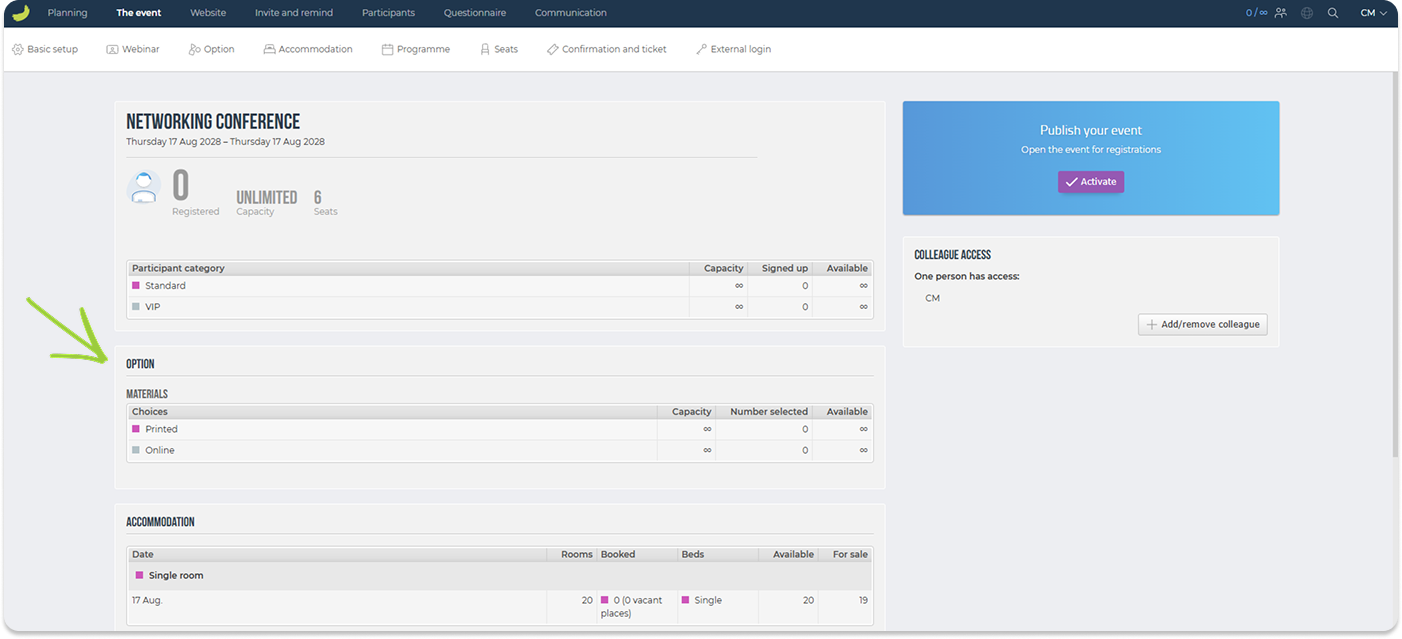
Here, you can see summary information such as how many participants have selected each option, availability, and reservations.
For a more detailed overview, go to Participants → Other lists → Option. Here, you can see which participants have selected which options. This list can also be used to export information or follow up with participants if needed.
Accommodation
Under The event → Accommodation, you can set up accommodation options for your event and allow participants to choose their preferred stay during registration.
Use this tab if participants should be able to select accommodation, such as a hotel room or overnight stay, as part of the sign-up flow.
Before adding accommodation options, you can click the settings icon to configure the general accommodation settings. Here, you can add information text for the accommodation step, choose how zero amounts should be displayed, decide whether selected participant categories are allowed to deselect accommodation, and define whether participants may update their accommodation after registration.
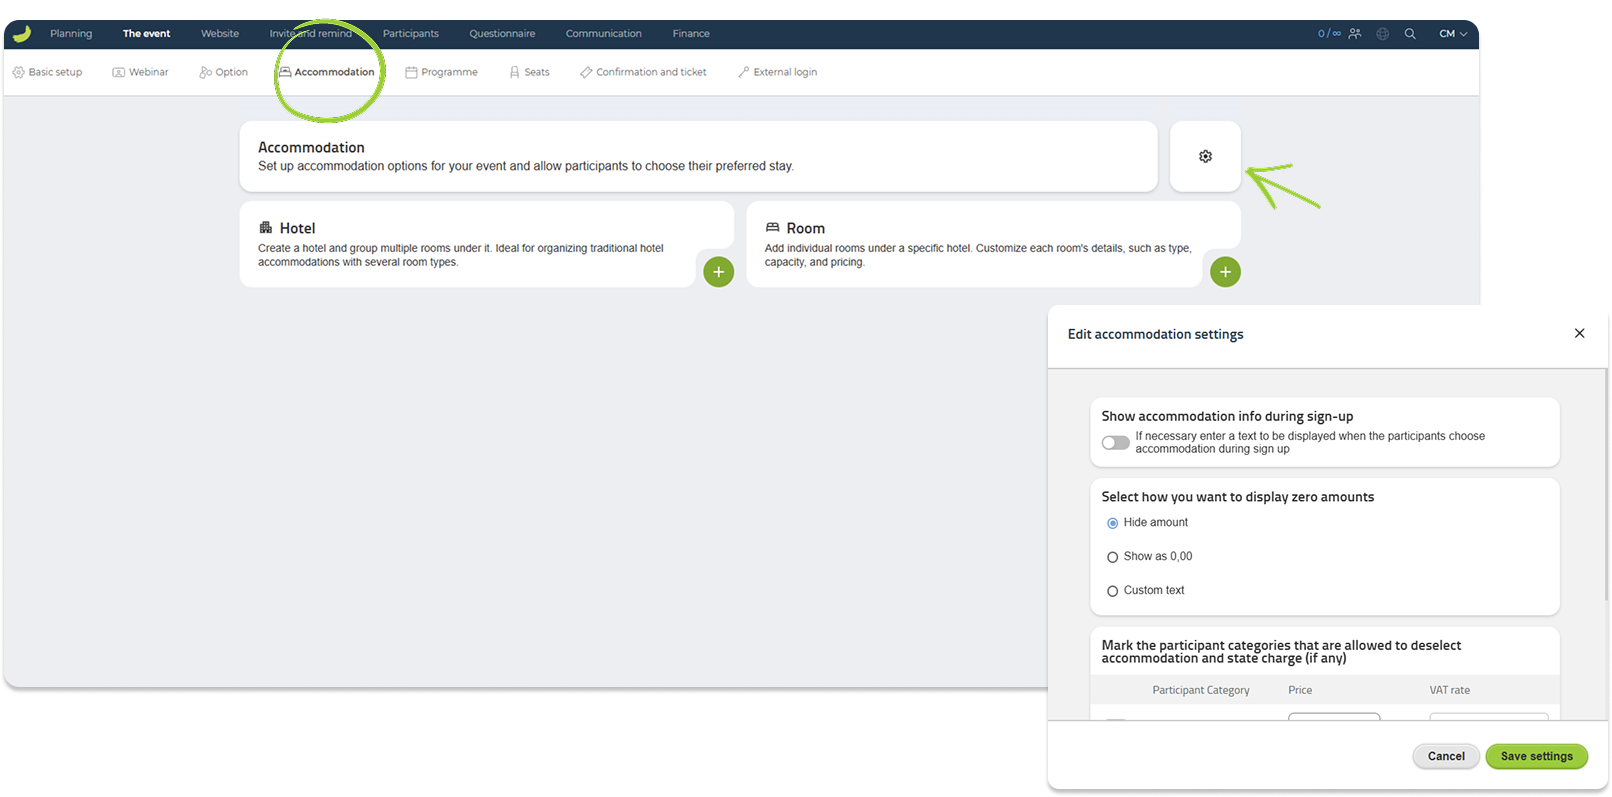
Accommodation can be set up in two ways:
Hotel
Create a hotel if you want to group rooms under a specific hotel. This is useful if your event offers several hotels or if one hotel has multiple room types.
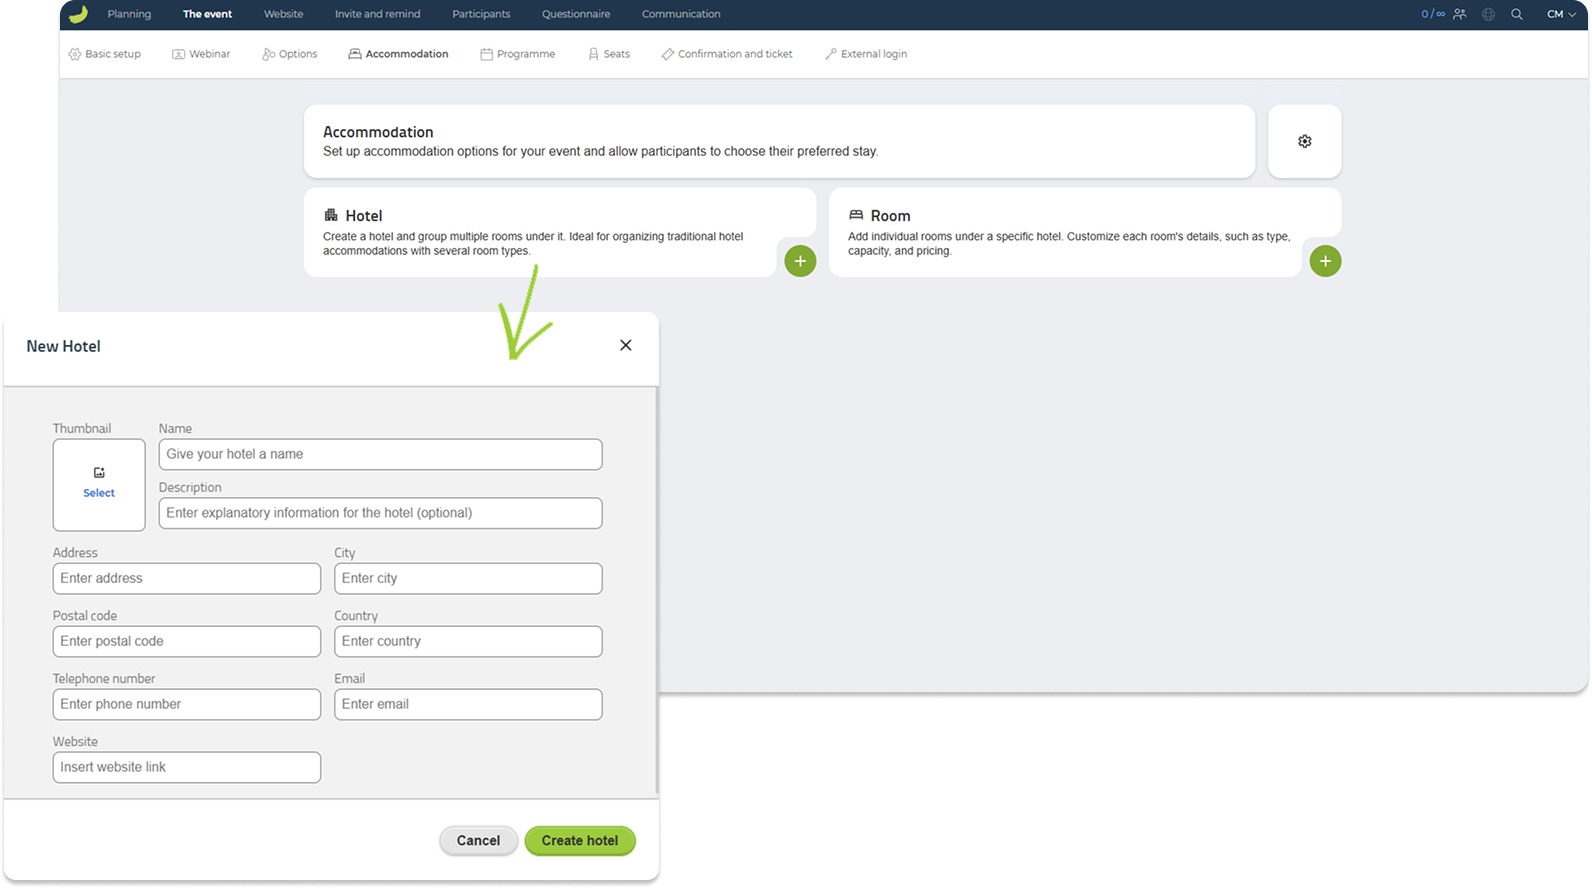
When creating a hotel, you can add information such as name, description, address, city, postal code, country, telephone number, email, website, and thumbnail image.
Room
Create rooms to define the actual accommodation choices participants can select during registration.
A room can be connected to a hotel, but it does not have to be. If it is not relevant to group rooms under hotels, you can create rooms as standalone accommodation options.
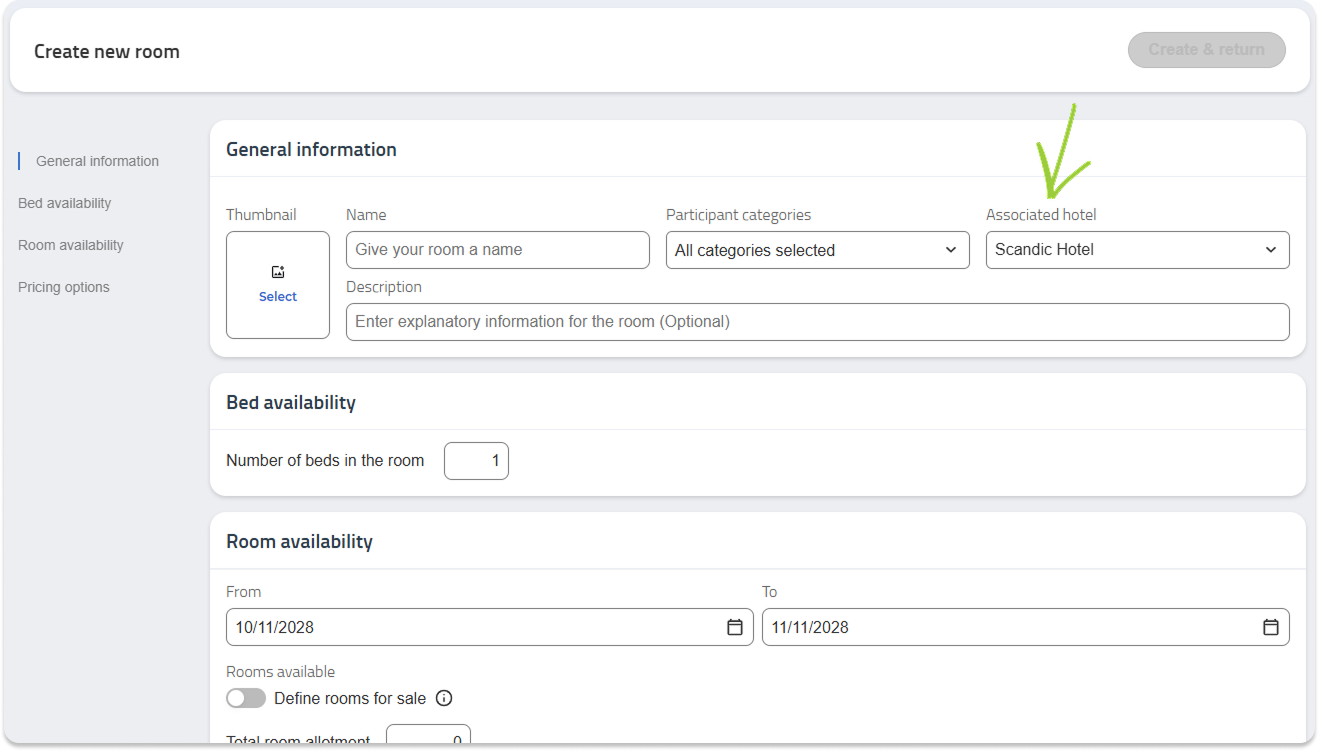
For example, you can create several hotels and connect different room types to each hotel, or you can simply create room options without using hotels.
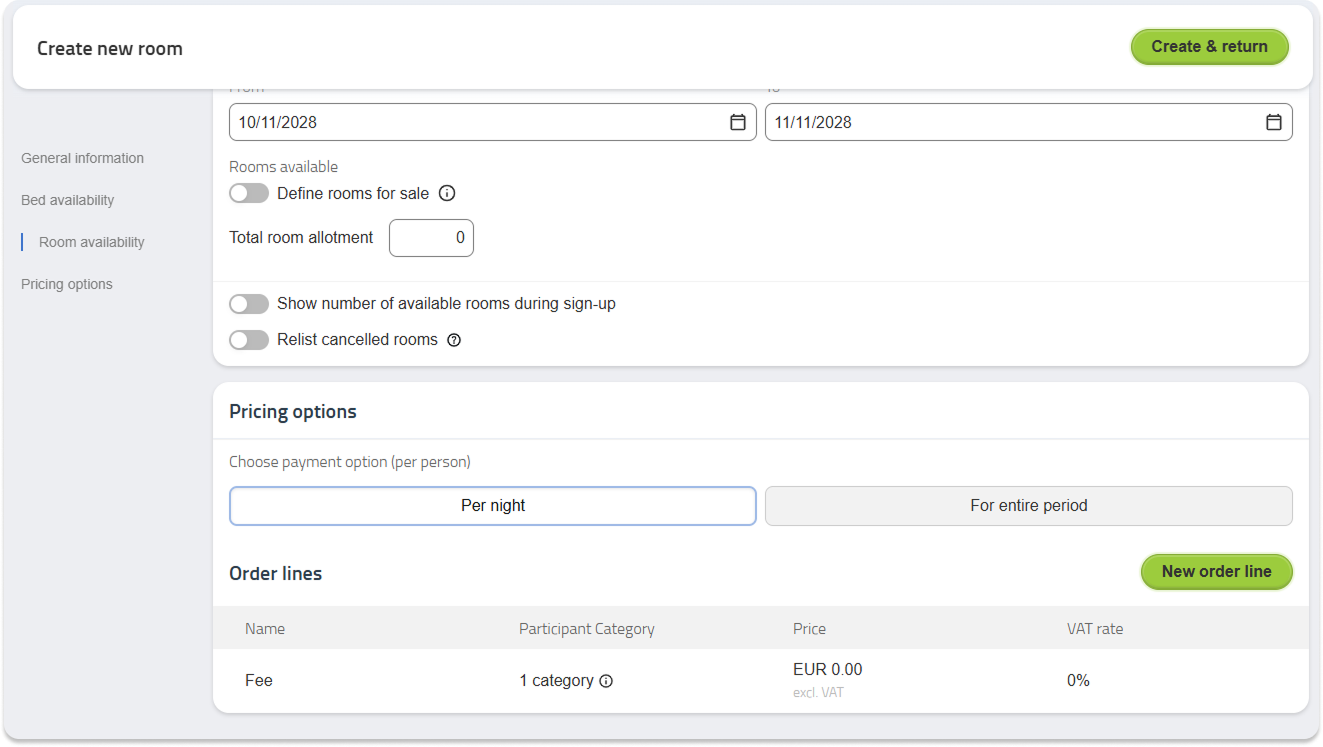
When creating a room, you can define the room name, description, participant categories, associated hotel if relevant, number of beds, availability period, total room allotment, whether available rooms should be shown during sign-up, and pricing.
If accommodation has a cost, you can add pricing per night or for the entire period, including VAT information if relevant.
View selected accommodation
Once participants have started registering, you can get a quick overview of accommodation selections from the event dashboard, if accommodation is part of your event setup.
To access the event dashboard, click The event in the main menu.
For a more detailed overview, go to Participants → Accommodation. Here, you can see which accommodation choices participants have selected. This overview can be used to manage room bookings, check accommodation needs, and export information for hotels or other accommodation providers.
Programme
Under The event → Programme, you can create and manage the agenda for your event.
Use the programme to add sessions, presentations, workshops, breaks, dinners, social activities, or other items that should be displayed as part of the event agenda. If relevant, you can also allow participants to select programme items during registration.
Click Edit at the top of the page to configure the overall programme settings.
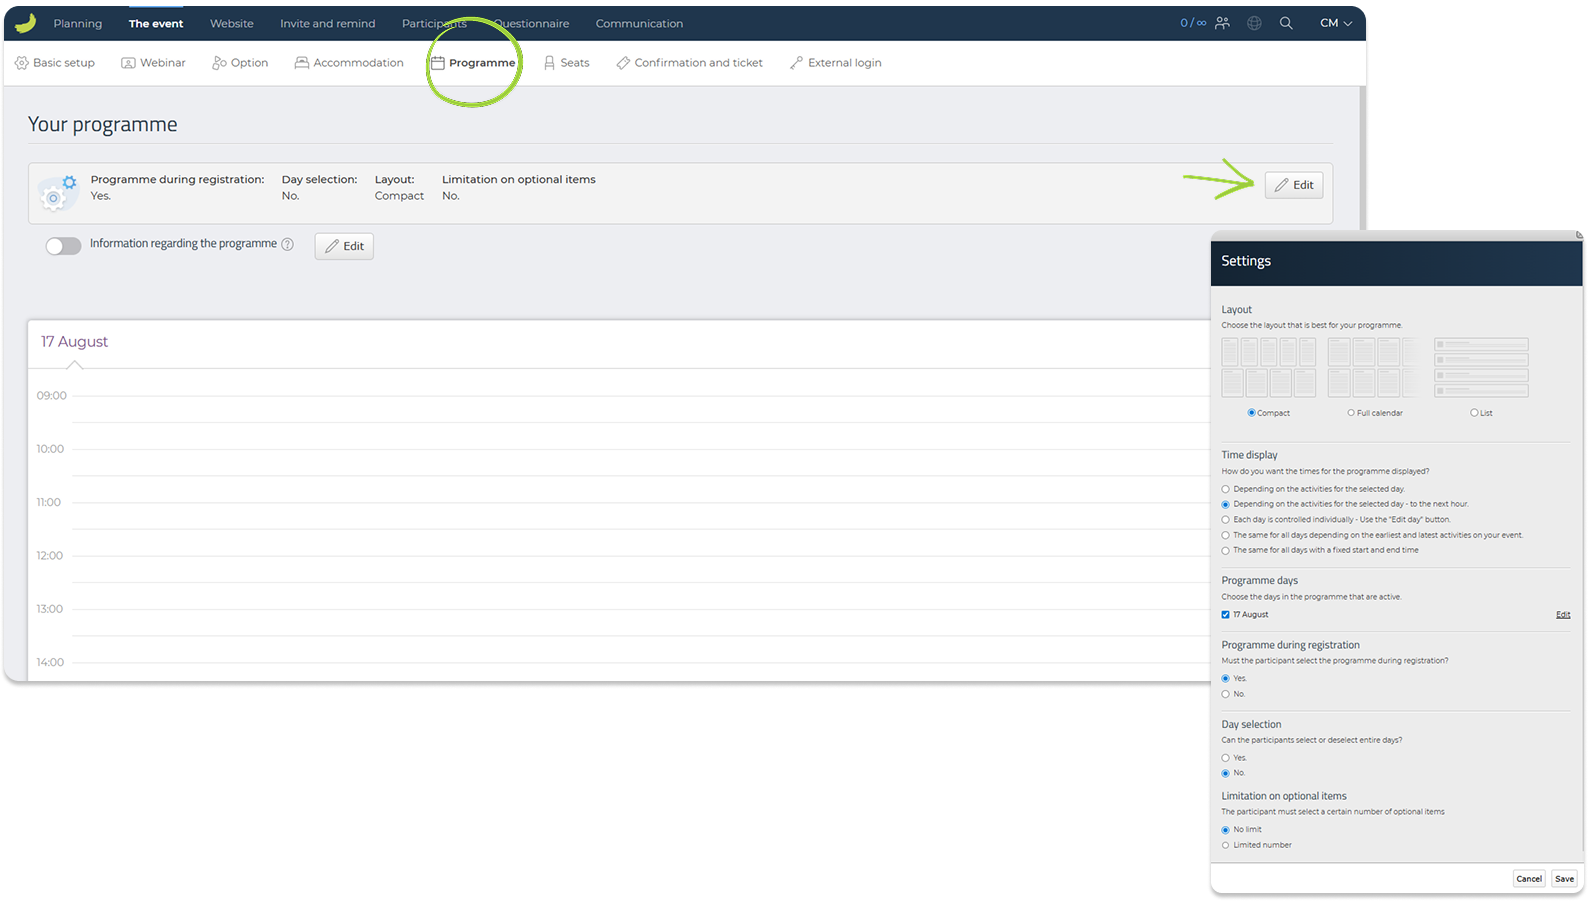
Here, you can define:
Layout
Choose how the programme should be displayed. You can select Compact, Full calendar, or List.
Time display
Choose how the time scale should be shown in the programme overview.
Programme days
Select which days should be active in the programme. If your event runs over several days, each active day will appear as a separate day in the programme overview. You can then switch between the days and add programme tracks to the relevant day.
You can also click Edit on a specific day to edit its name.
Programme during registration
Choose whether participants should select programme items during registration. If this is enabled, the programme becomes part of the sign-up flow.
Day selection
Decide whether participants can select or deselect entire programme days during registration. This is mainly relevant if your event has more than one active programme day.
Limitation on optional items
Choose whether participants must select a certain number of optional programme items.
You can also add Information regarding the programme.
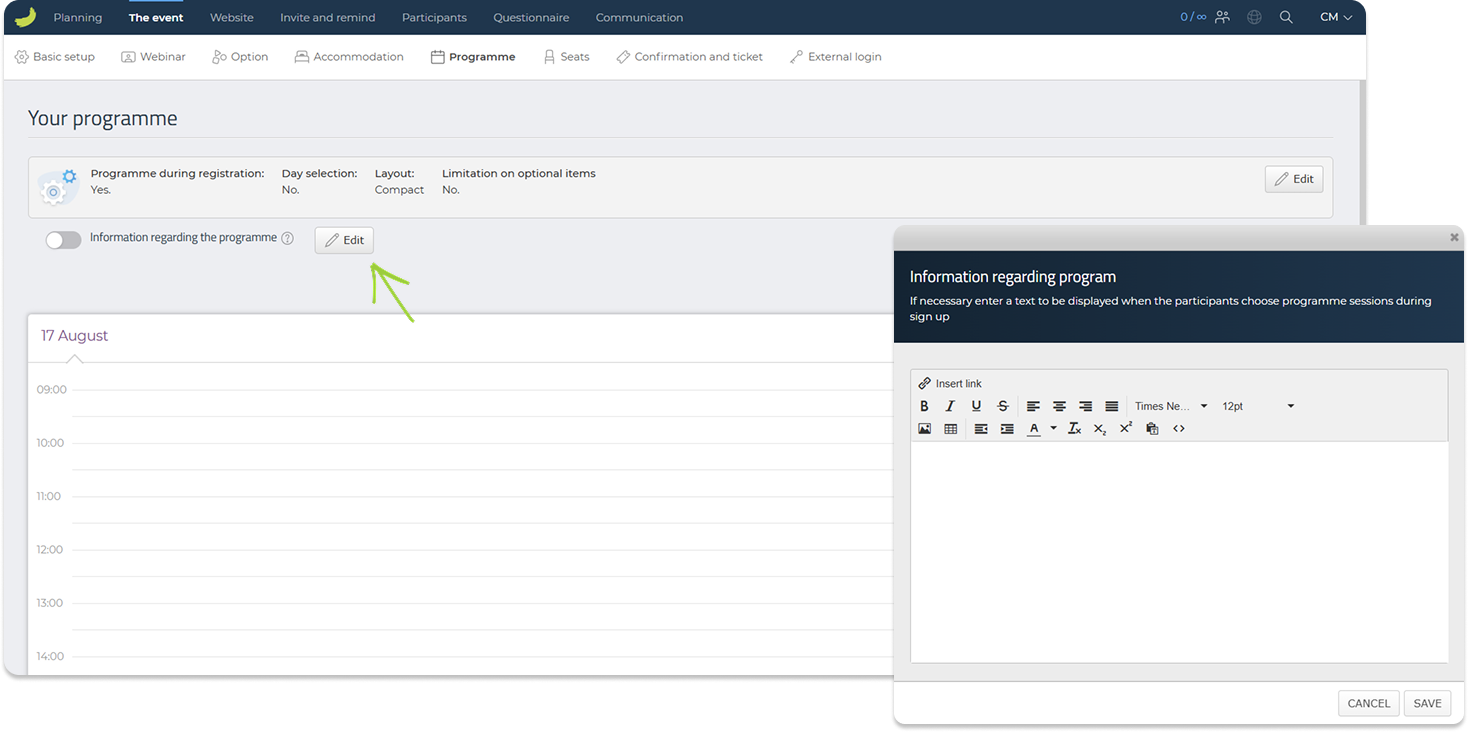
This text will be shown to participants when they reach the programme step during sign-up. Use it to explain how participants should choose sessions, whether any items are mandatory, or other important information about the agenda.
Add programme tracks
To add a programme item, click Add new track.
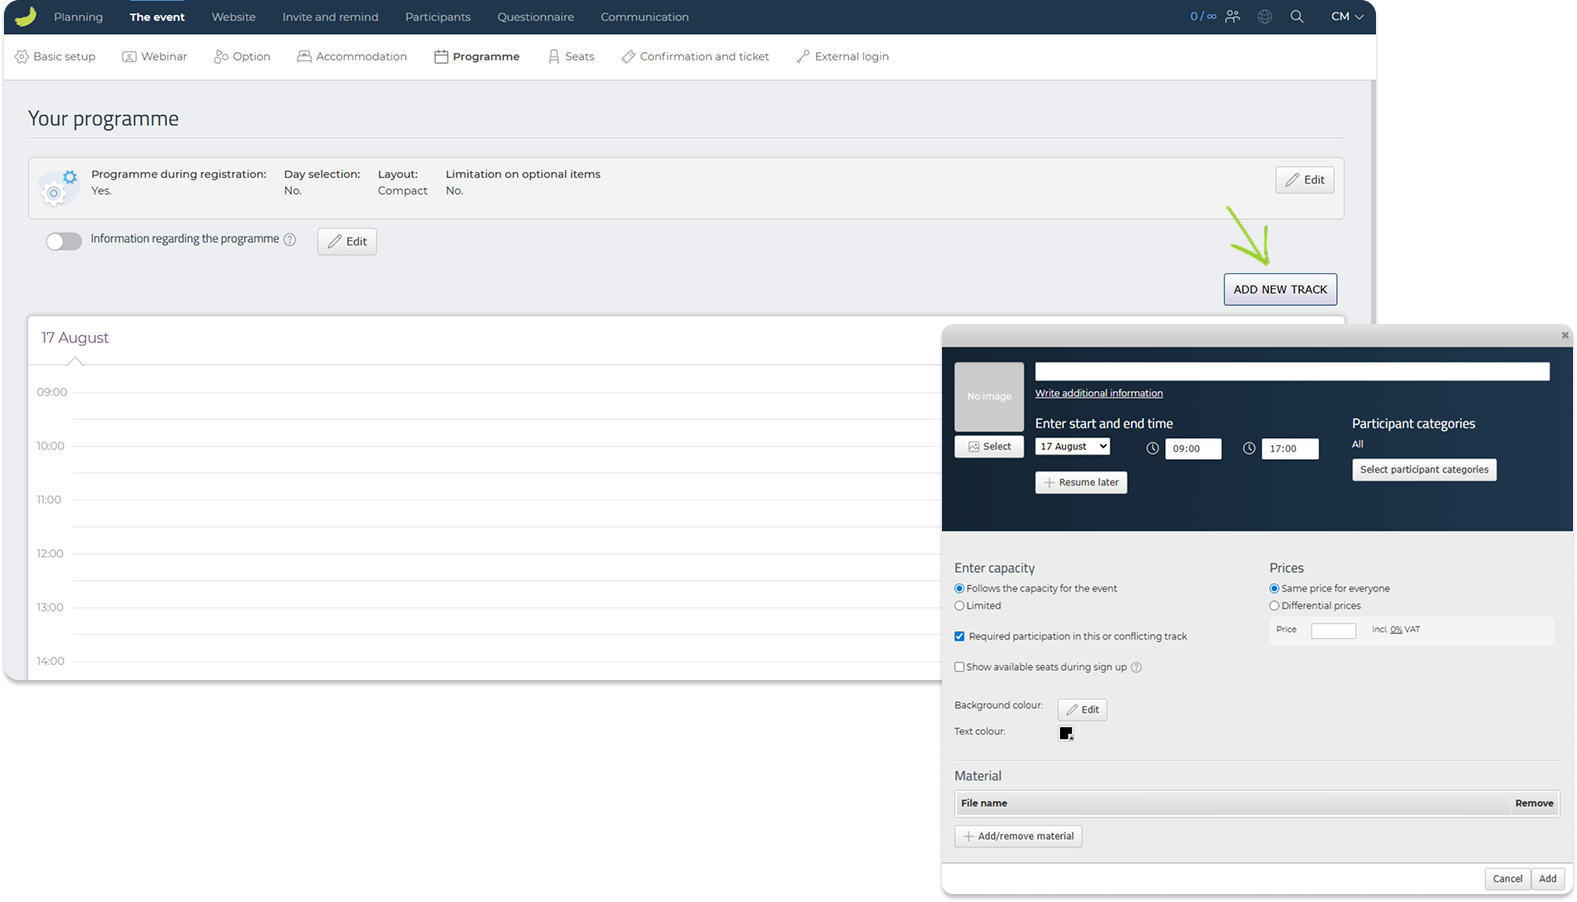
A programme track can be used for any item in the agenda, such as a session, workshop, presentation, break, dinner, or activity.
When creating a programme track, you can define:
Name and additional information
Add the title of the programme track and, if needed, write additional information or a description.
Image
Add an image to visually represent the programme track.
Start and end time
Select the programme day and define the start and end time for the track. If the event has multiple active programme days, make sure the track is added to the correct day.
Participant categories
Choose whether the track should be available to all participant categories or only selected categories.
Capacity
Choose whether the track should follow the overall event capacity or have a limited capacity of its own.
Required participation
Decide whether participation in the track should be required. This can be useful for mandatory sessions or programme items that conflict with other tracks.
Available places during sign-up
Choose whether the number of available places should be shown to participants during registration.
Price
If prices are enabled for the event, you can add a price to the programme track. You can use the same price for everyone or set differentiated prices.
Colours
Choose background and text colours for the programme track in the programme overview.
Materials
Add files or materials to the programme track, such as presentations, handouts, or additional documents.
Click Add to save the programme track.
Once programme tracks have been added, they will appear in the programme overview. You can edit an existing track by clicking on it.
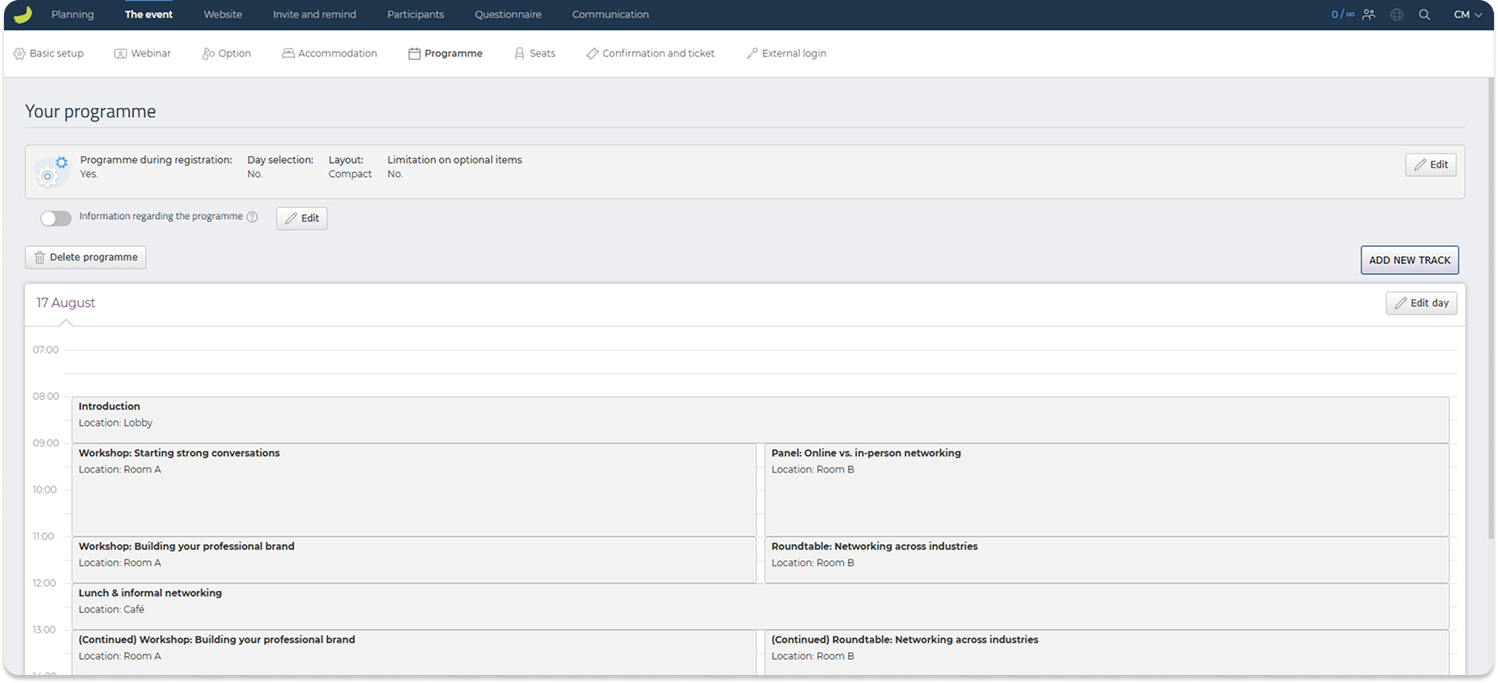
Programme tracks can overlap in time, which allows you to create parallel sessions. If the programme is shown during the sign-up flow and the tracks are required, participants must select one of the available tracks.
View selected programme items
Once participants have started registering, you can get a quick overview of programme selections from the event dashboard. To access the event dashboard, click The event in the main menu.
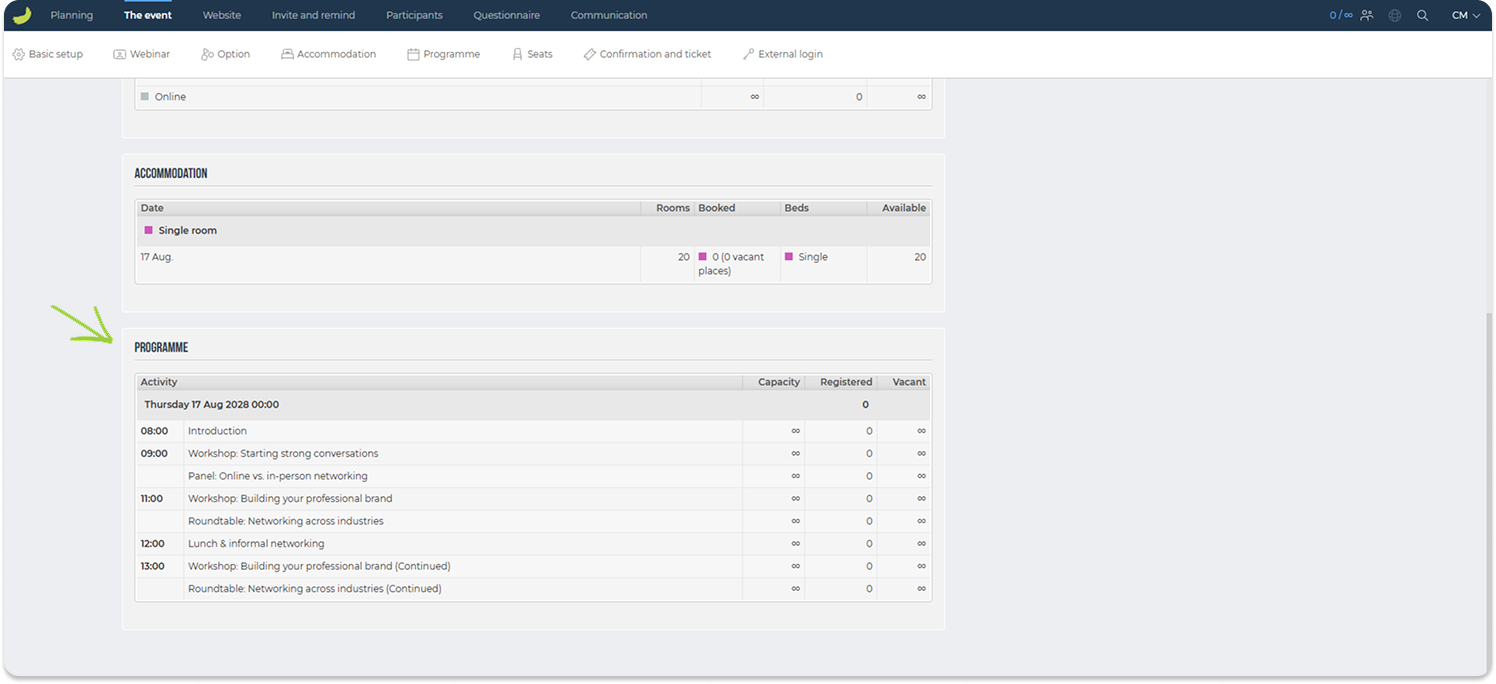
Here, you can see summary information such as capacity, registered participants, and vacant places for programme items.
For a more detailed overview, go to Participants → Other lists → Programme. Here, you can see which programme tracks specific participants have selected.
Seats
Under The event → Seats, you can create and manage seating charts for your event.
Use this tab if participants should be able to select a specific seat, stand, booth, table, or another bookable place during registration.
This section gives you a brief overview of the Seats feature. For a more detailed guide on how to create and configure seating charts, see: How to use Seats.
Please note that there are fees for using the Seats feature. To view the applicable fees, click your name in the top-right corner of Conference Manager when logged in and go to Modules.
Click Add seats to create a new chart.
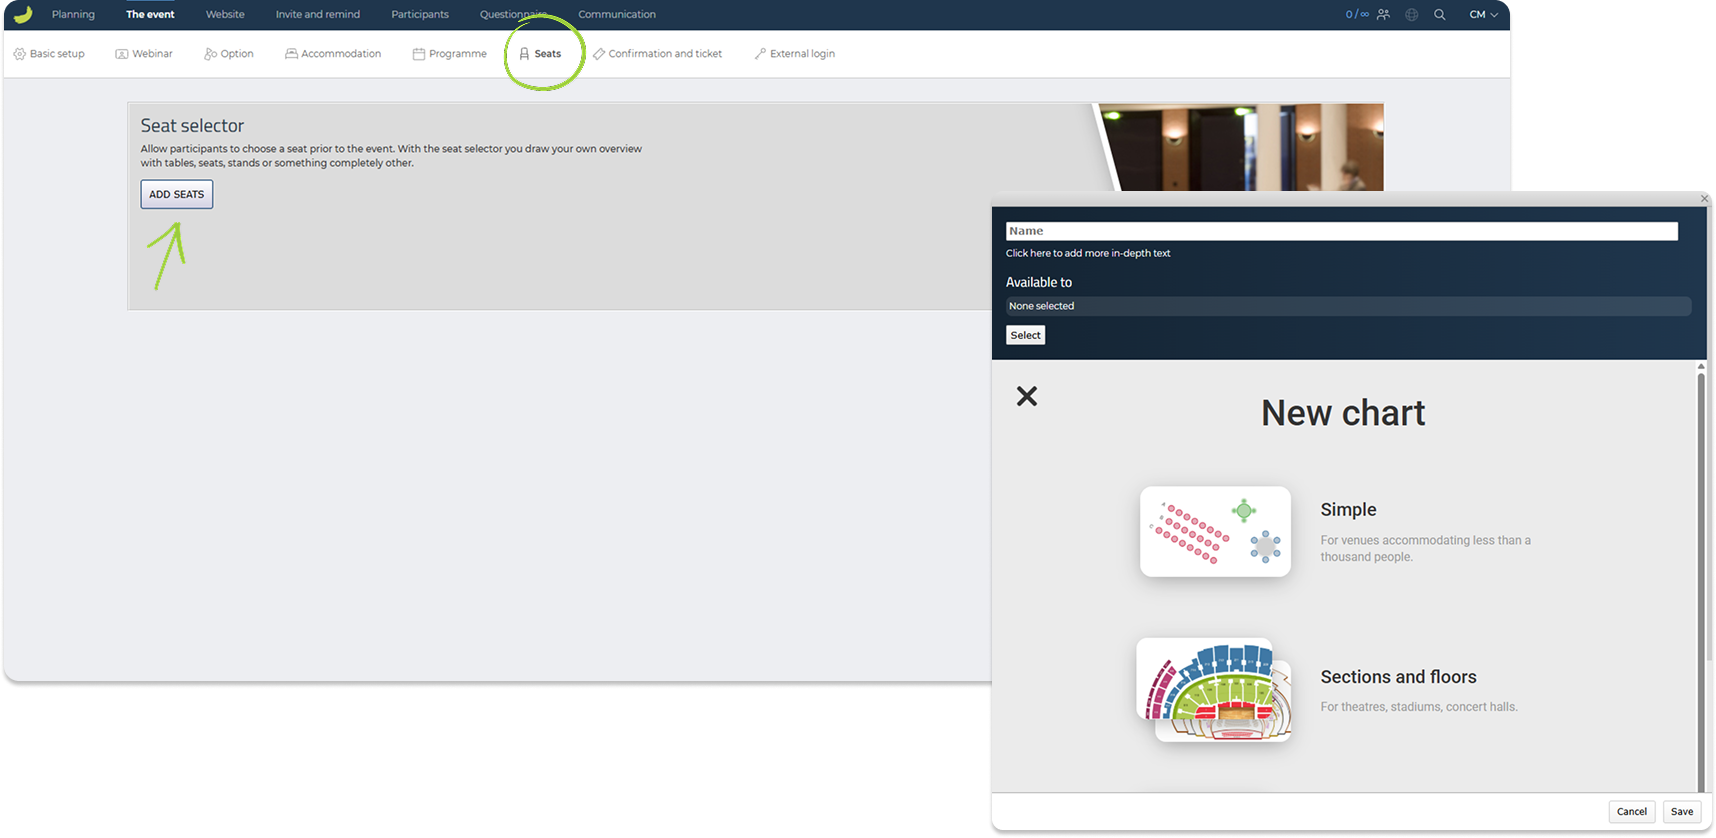
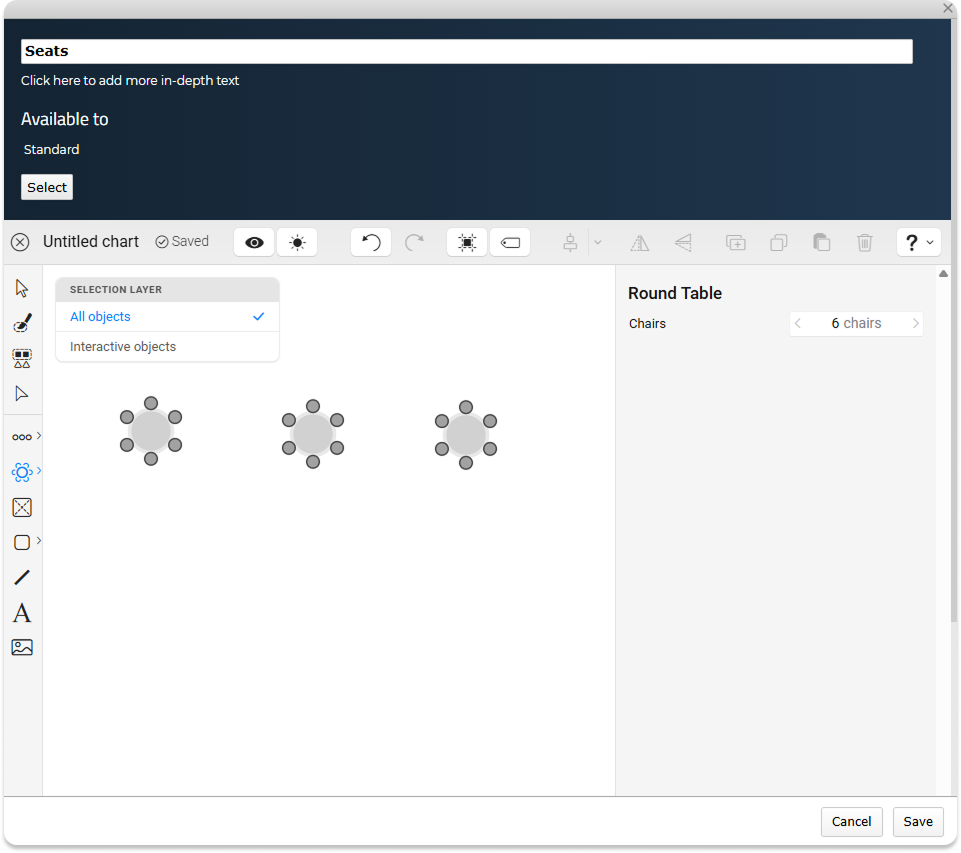
When creating a chart, you can define:
Name and description
Give the chart a name and, if needed, add more detailed information.
Available to
Choose who the chart should be available to. A chart can be connected to either participant categories or options.
Use participant categories if the chart should be available based on the participant type, for example standard participants, VIP guests, or companions.
Use options if the chart should only be available when a participant has selected a specific option, for example a stand package, dinner option, workshop, or booth selection.
Chart type
Choose the type of chart you want to create.
For simpler layouts, you can create a Simple chart. This can be used for smaller venues, stand areas, meeting rooms, or other layouts where you only need a straightforward selection of bookable places.
For larger or more complex venues, you can use Sections and floors. This is useful for theatres, stadiums, concert halls, or venues with multiple areas or levels.
Reference chart
If you already have a floor plan or seating plan, you can upload it and use it as a reference while drawing the chart. This can make it easier to recreate an existing layout.
After selecting the chart type, you can use the chart editor to draw and configure the bookable places. This may include seats, tables, booths, stands, sections, labels, background images, or other elements depending on your setup.
Once the chart has been created, it will appear under Your chart. From here, you can edit the chart, view the booking summary, or manage the chart setup.
You can also add Seat reservation information. This text will be shown to participants when they reach the seat selection step during sign-up. Use it to explain how seat selection works or what participants should be aware of before choosing a place.
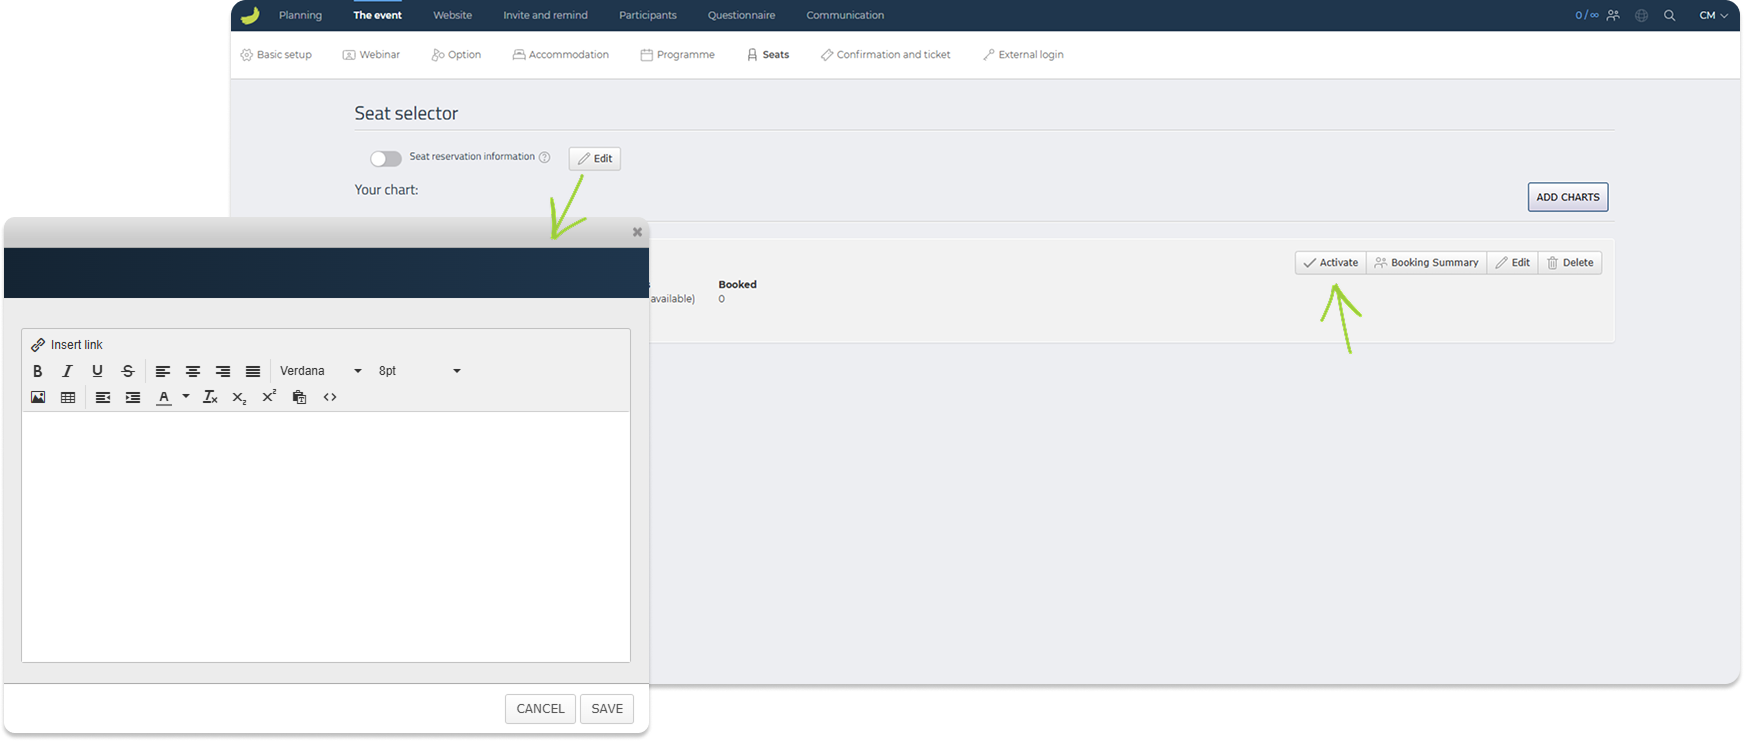
When the chart is ready, remember to click Activate. Participants can only use the chart during registration once it has been activated.
Note: Once a chart has been activated, it cannot be deactivated again. Make sure the chart is finished and connected to the correct participant categories or options before activating it.
When the event is open for registration, participants will be able to choose from the available places connected to their participant category or selected option. The system will keep track of which places are available and which have already been booked.
View selected seats
Once participants have started registering, you can view selected seats by clicking on Booking Summary on the relevant chart to see an overview of bookings for that specific chart.

For a more detailed participant overview, go to Participants → Other lists → Seats. Here, you can see selected seats or bookable places, including information such as chart, section, row, seat, and participant details, depending on the chart setup.
Confirmation and ticket
Under The event → Confirmation and ticket, you can set up the documents and calendar information participants receive after registering.
This section contains the following tabs: Order confirmation, Invoice — only visible if invoicing through Conference Manager is enabled, Ticket, and Meeting requests.
Order confirmation
In Order confirmation, you can create and manage the order confirmations sent after registration.
Start by clicking the general Edit button at the top of the Order confirmation page. Here, you can adjust the overall confirmation settings, such as whether participant confirmations for the order responsible should be attached individually or as one file. You can also select if any participant categories should not receive an order confirmation.
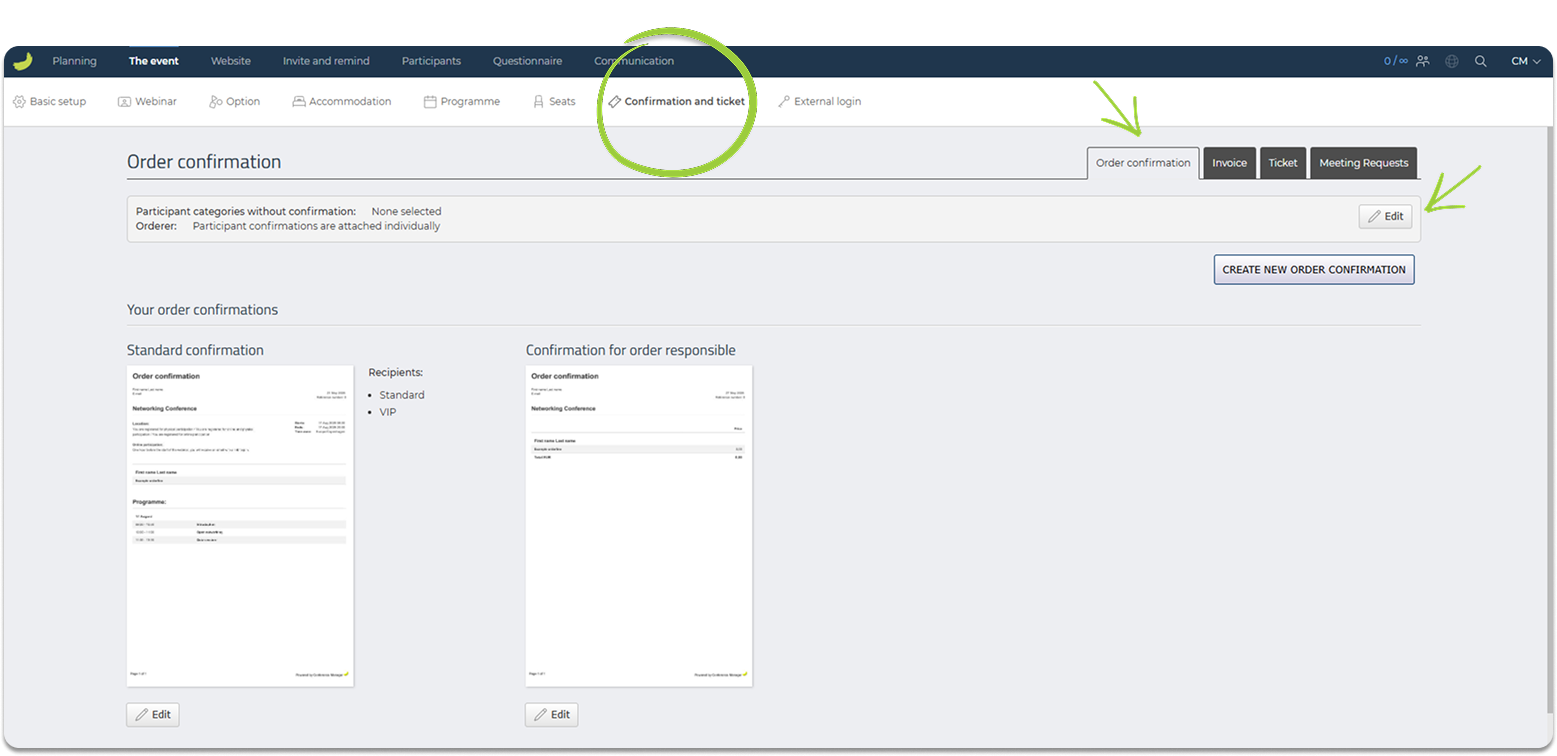
A standard confirmation is available by default, and you can create additional confirmations if different participant categories should receive different confirmation layouts.
If the event has prices, you may also see an order confirmation for the order responsible. This confirmation is used when the person responsible for the order should receive information related to the registration or payment.
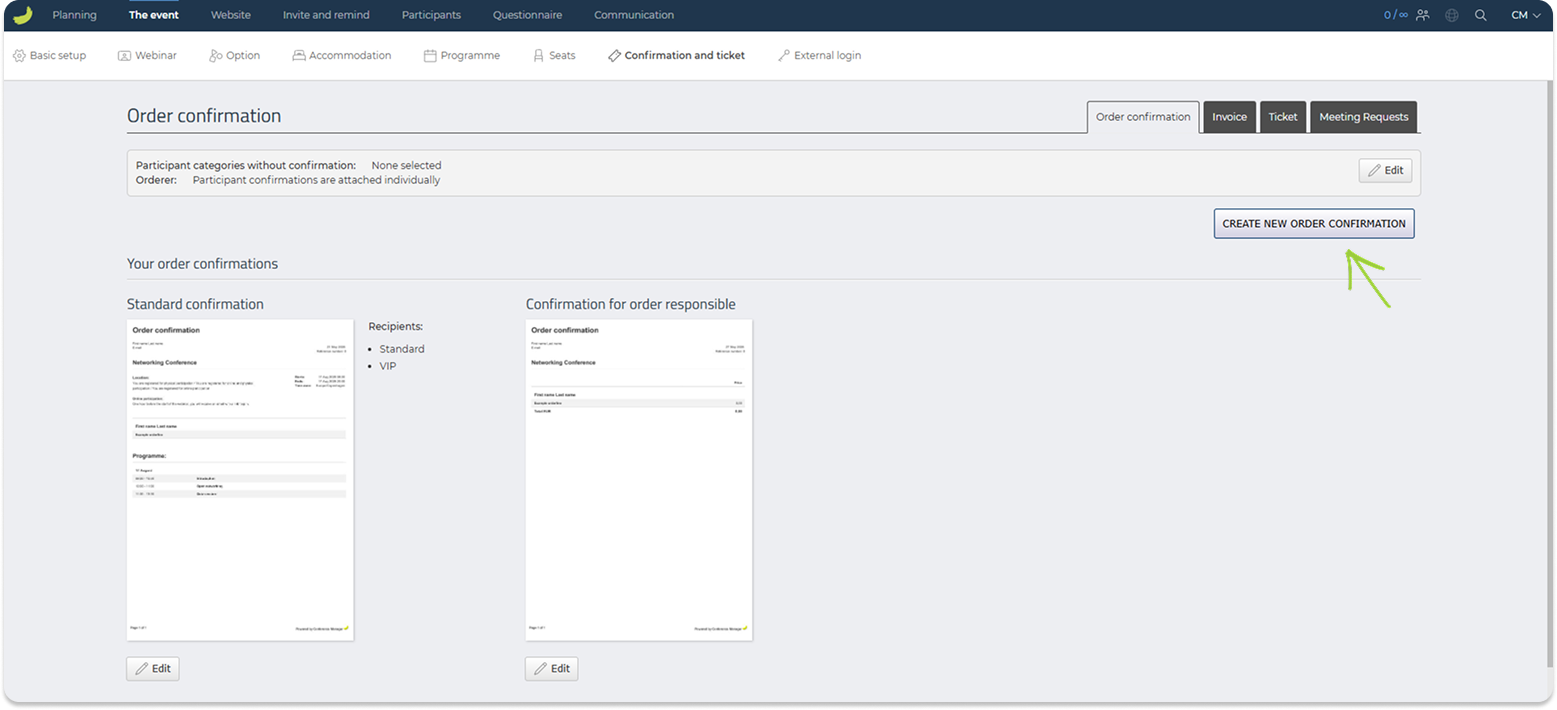
Click Create new order confirmation to create a new confirmation.
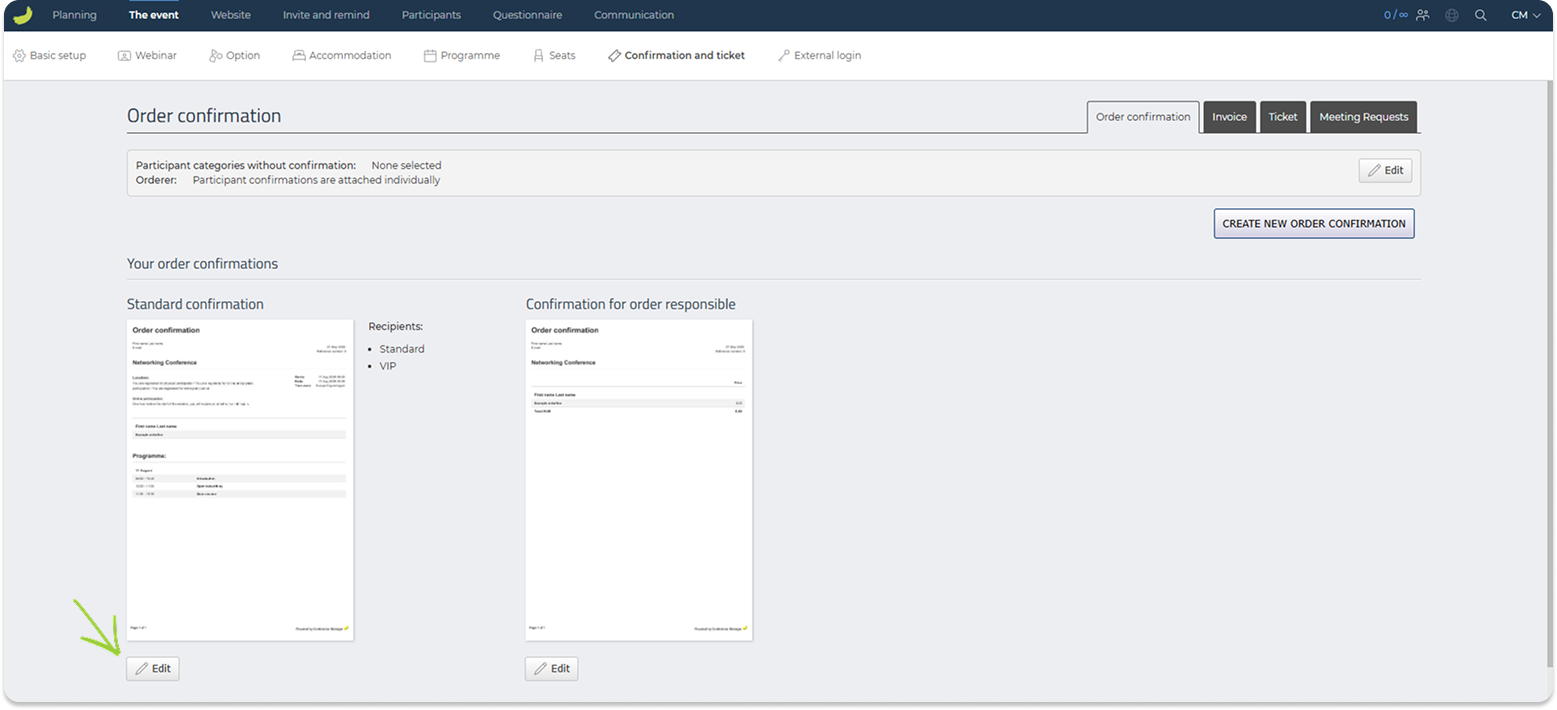
To update the content or recipients of a specific confirmation, click Edit on that confirmation.
Here, you can define:
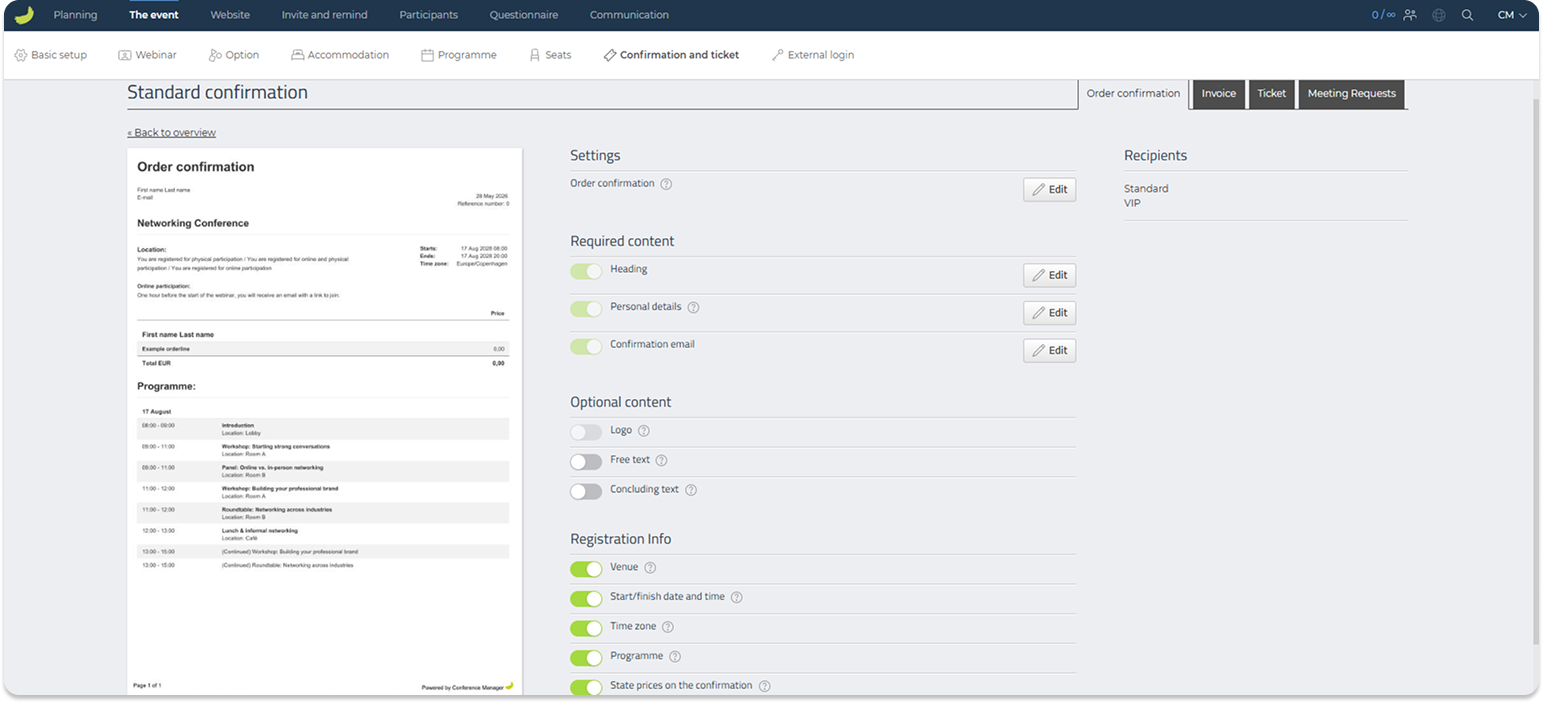
Settings
Choose whether the order confirmation should be shown directly in the confirmation email or attached as a PDF file.
Required content
Edit the heading, personal details, and confirmation email.
Optional content
Add optional elements such as a logo, free text, or closing text.
Registration info
Choose whether information such as venue, event time, time zone, and programme should be included.
Recipients
Choose which participant categories should receive this specific confirmation.
Invoice
The Invoice tab is only visible if you have chosen to use Conference Manager for invoicing.
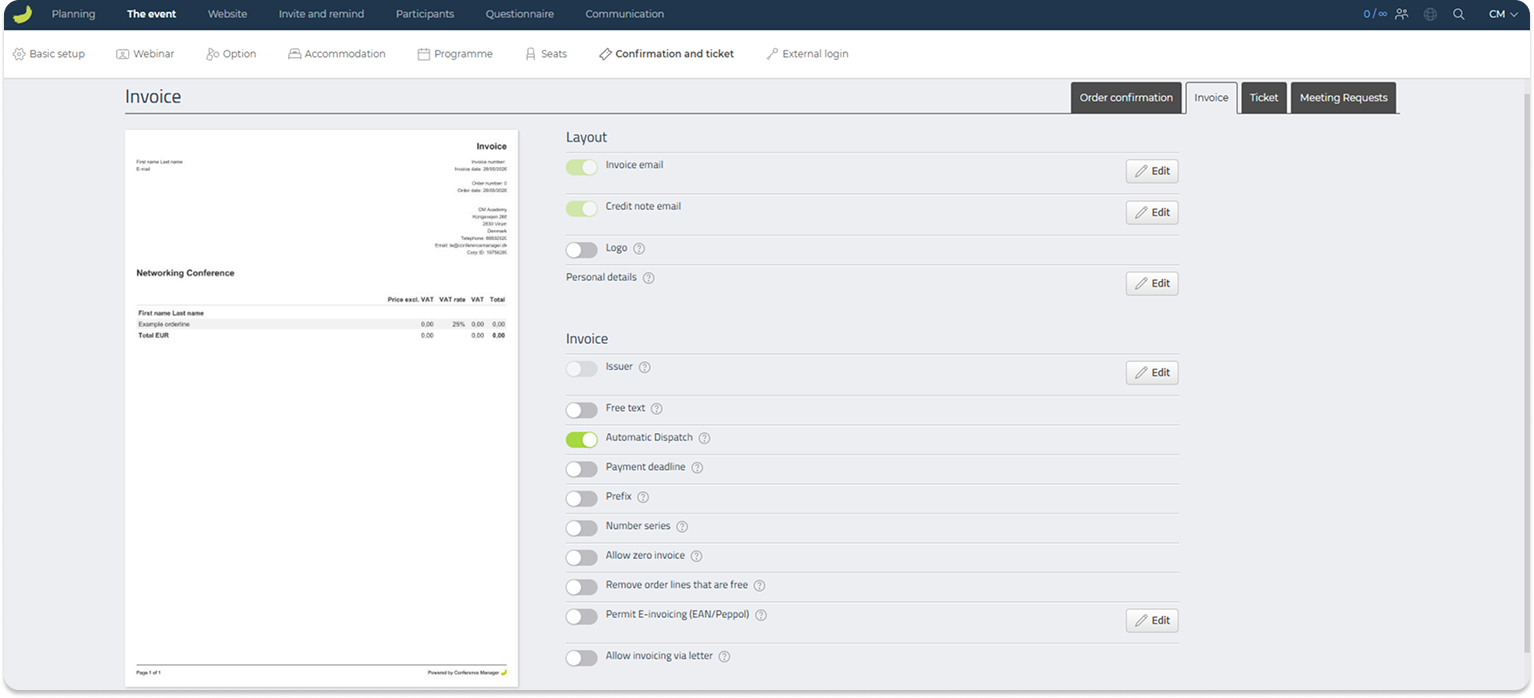
In this tab, you can configure the invoice layout and invoice-related email content. You can choose which information should be shown on the invoice and adjust elements such as invoice email, credit note email, logo, personal details, issuer information, free text, payment deadline, numbering, and other invoice settings.
If invoicing through Conference Manager is not enabled, this tab will not be available.
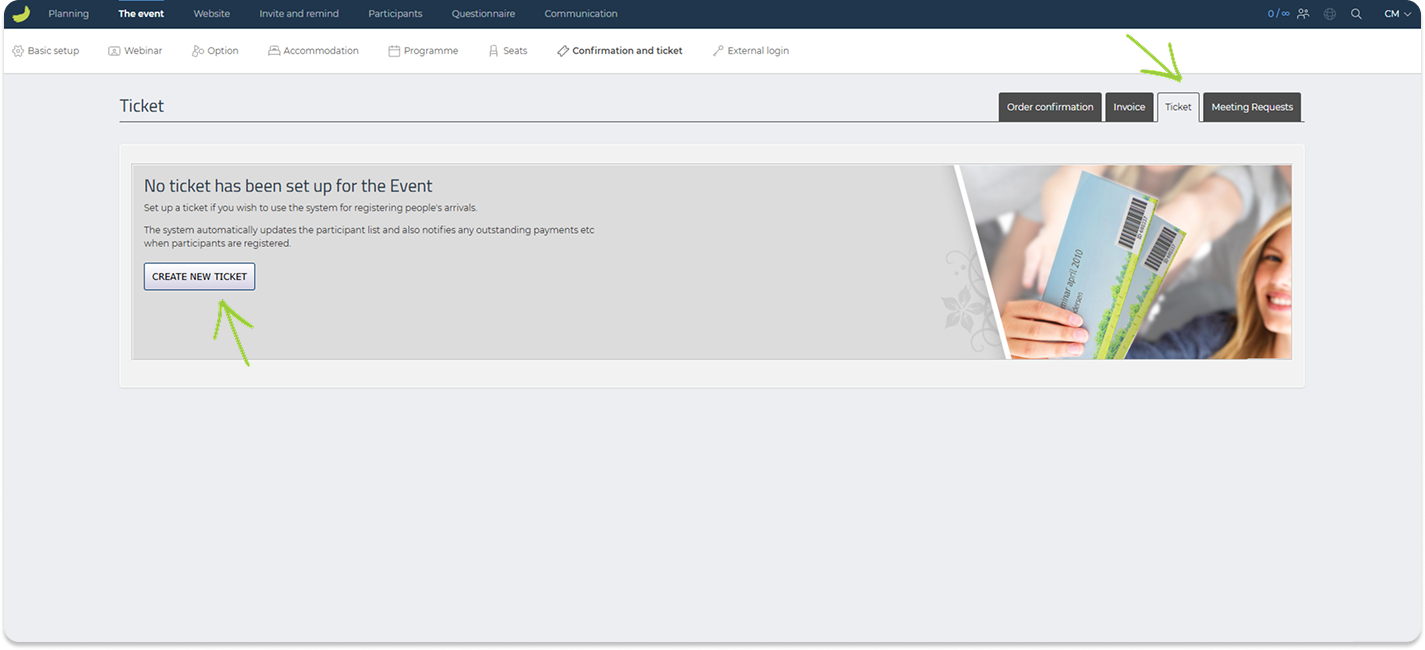
Ticket
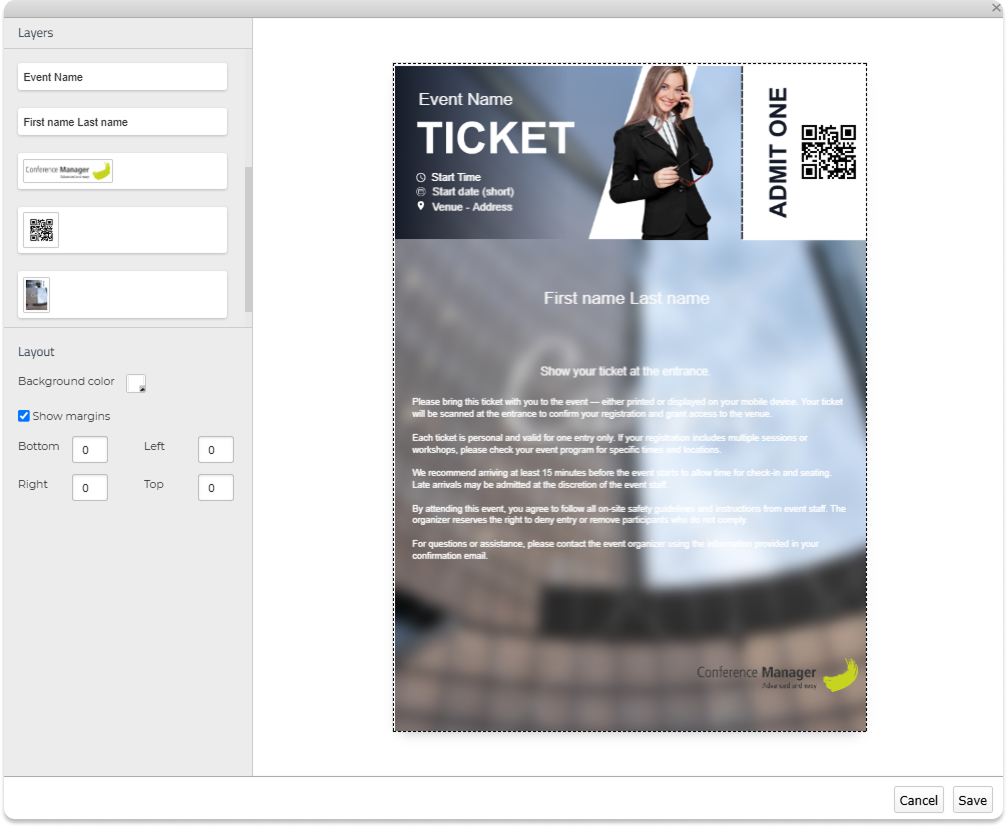
In Ticket, you can create a ticket for your event using the ticket editor.
Tickets can include participant information, event information, images, free text, and a QR code or barcode. QR codes and barcodes can be scanned with the CM Exhibition app and used for participant and arrival registration.
To create a ticket, go to The event → Confirmation and ticket → Ticket and click Create new ticket.
Start by choosing the ticket settings, such as ticket size, template, and title.
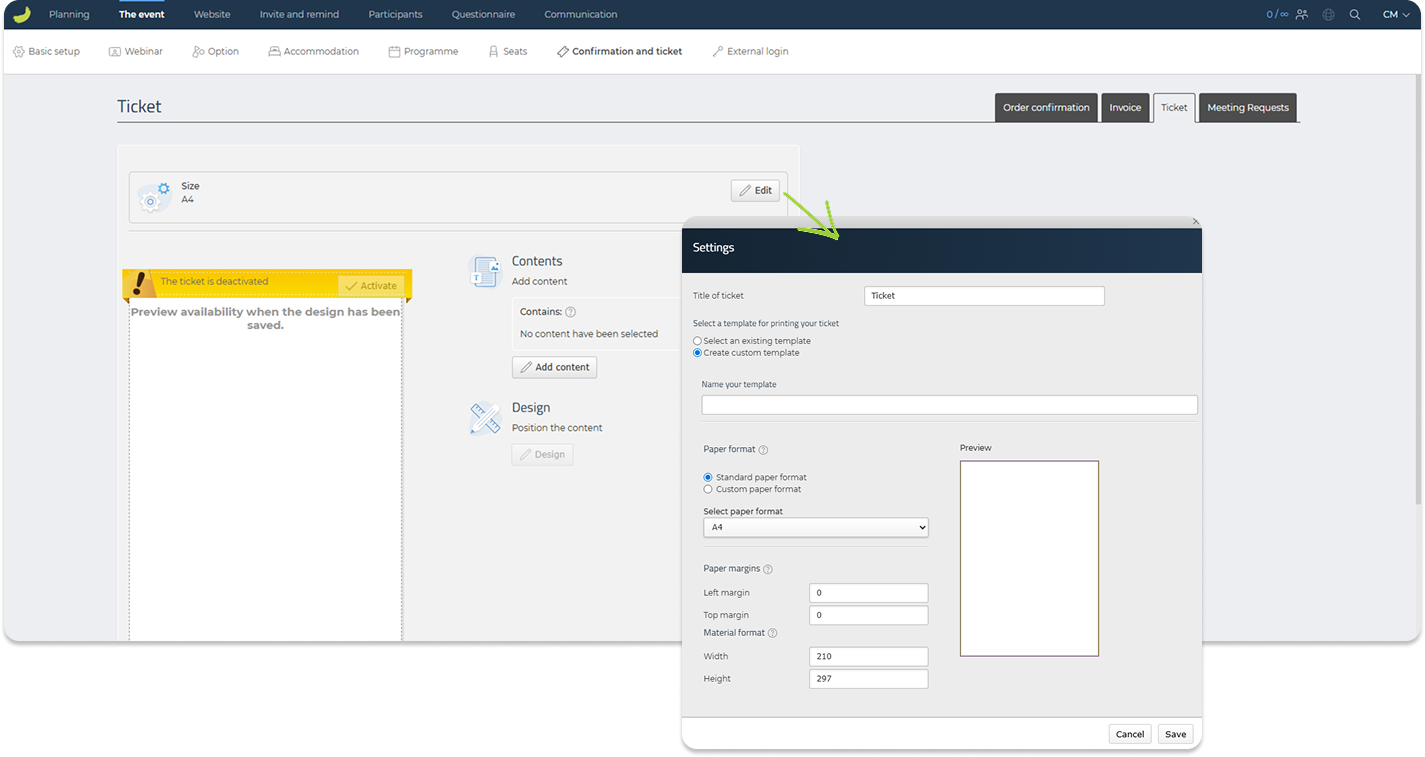
You can then add the content that should appear on the ticket. This can include participant details, event details, images, free text, and a QR code or barcode.
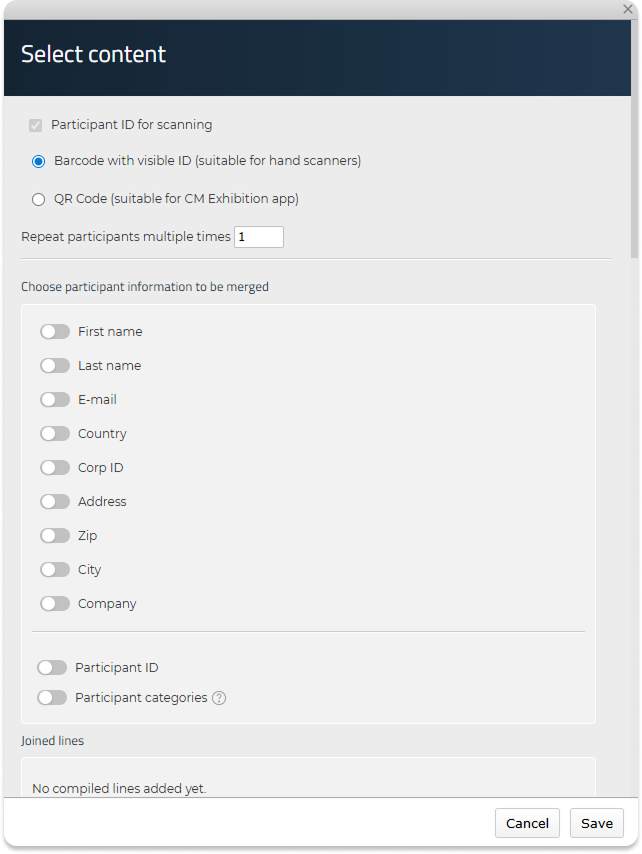
After adding the content, use the ticket editor to design the layout. You can move the elements around, adjust the formatting, and place the content where it should appear on the ticket.
When the ticket is ready, remember to activate it. Once activated, the ticket will automatically be attached to the order confirmation email. Participants can also access their ticket in the CM Events app.
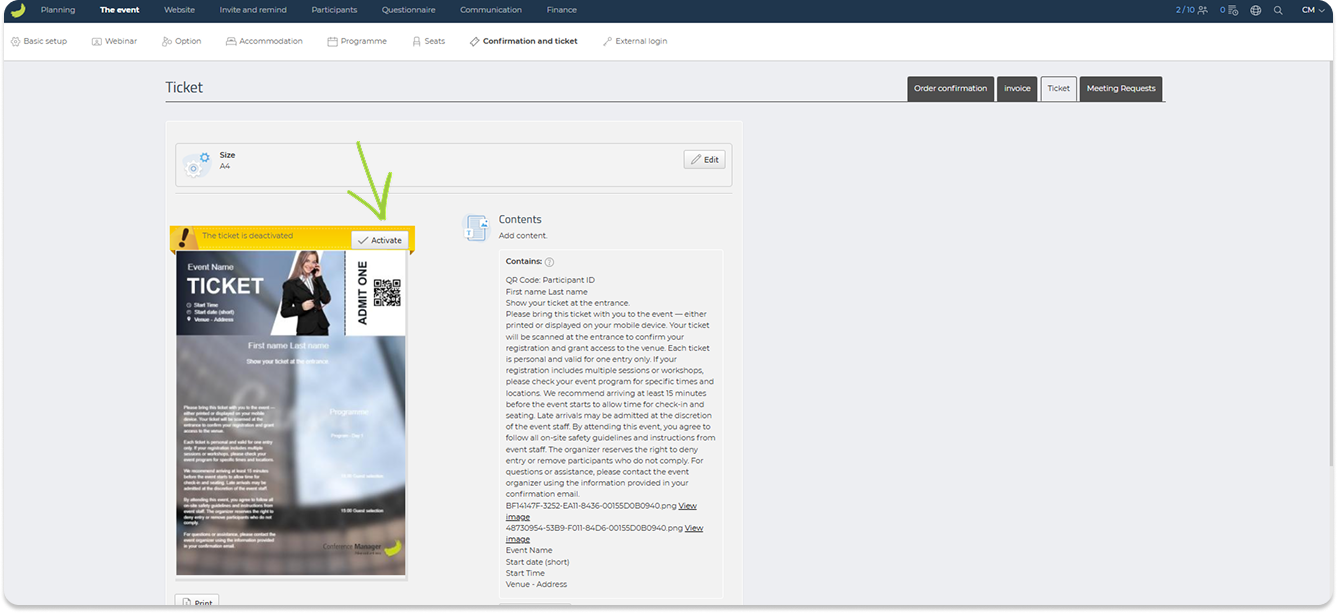
You can also download and print participants’ tickets if needed.
For a more detailed guide on how to create and design tickets, see:
How to create a ticket
Meeting requests
In Meeting requests, you can create calendar invitations that participants can add to their calendar.
A meeting request can either be sent as a separate email together with the order confirmation, or made available as a download link on the confirmation page.
Click Edit to choose how participants should receive meeting requests.
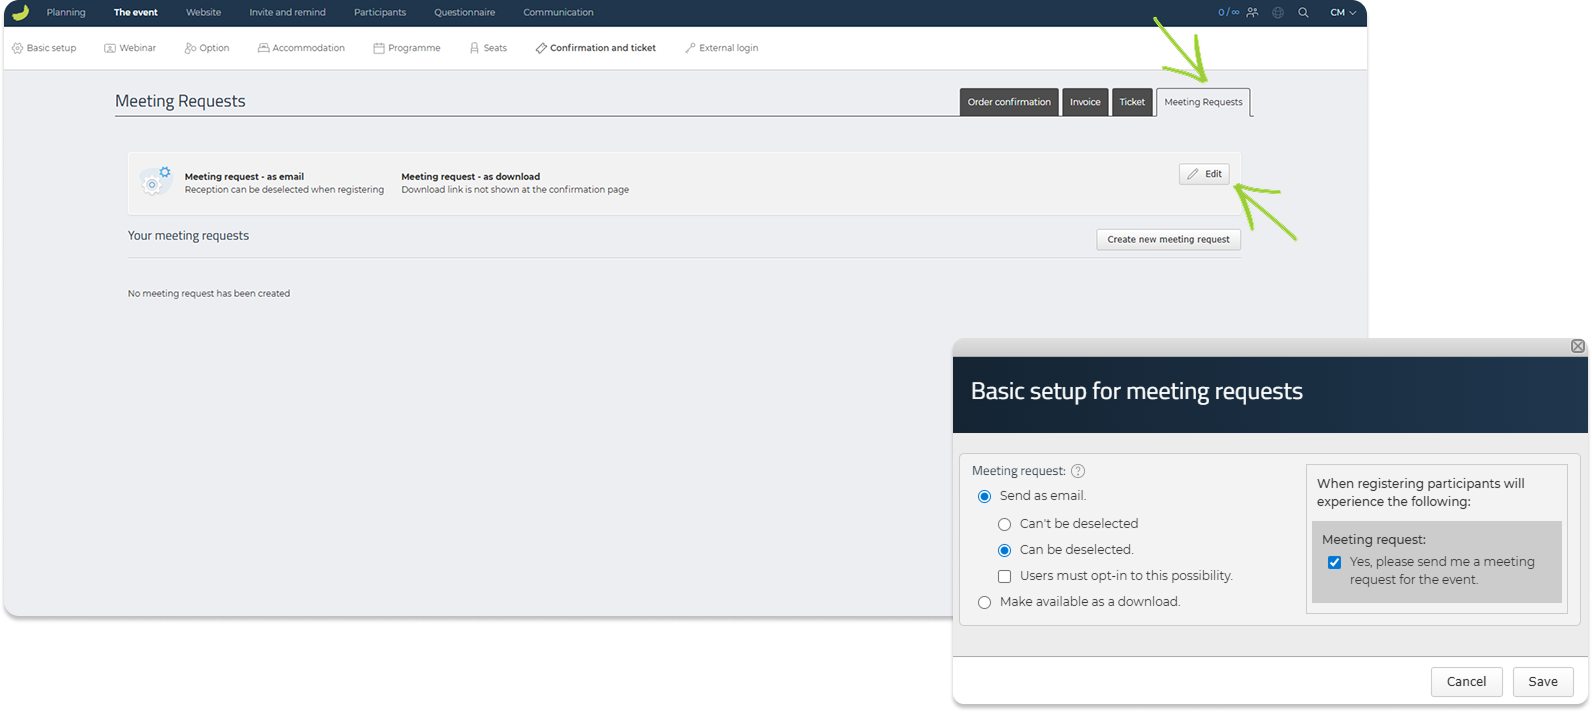
If the request is sent by email, you can decide whether it should be sent automatically, whether participants can deselect it, or whether they must actively opt in during registration.
Click Create new meeting request to create the actual request.
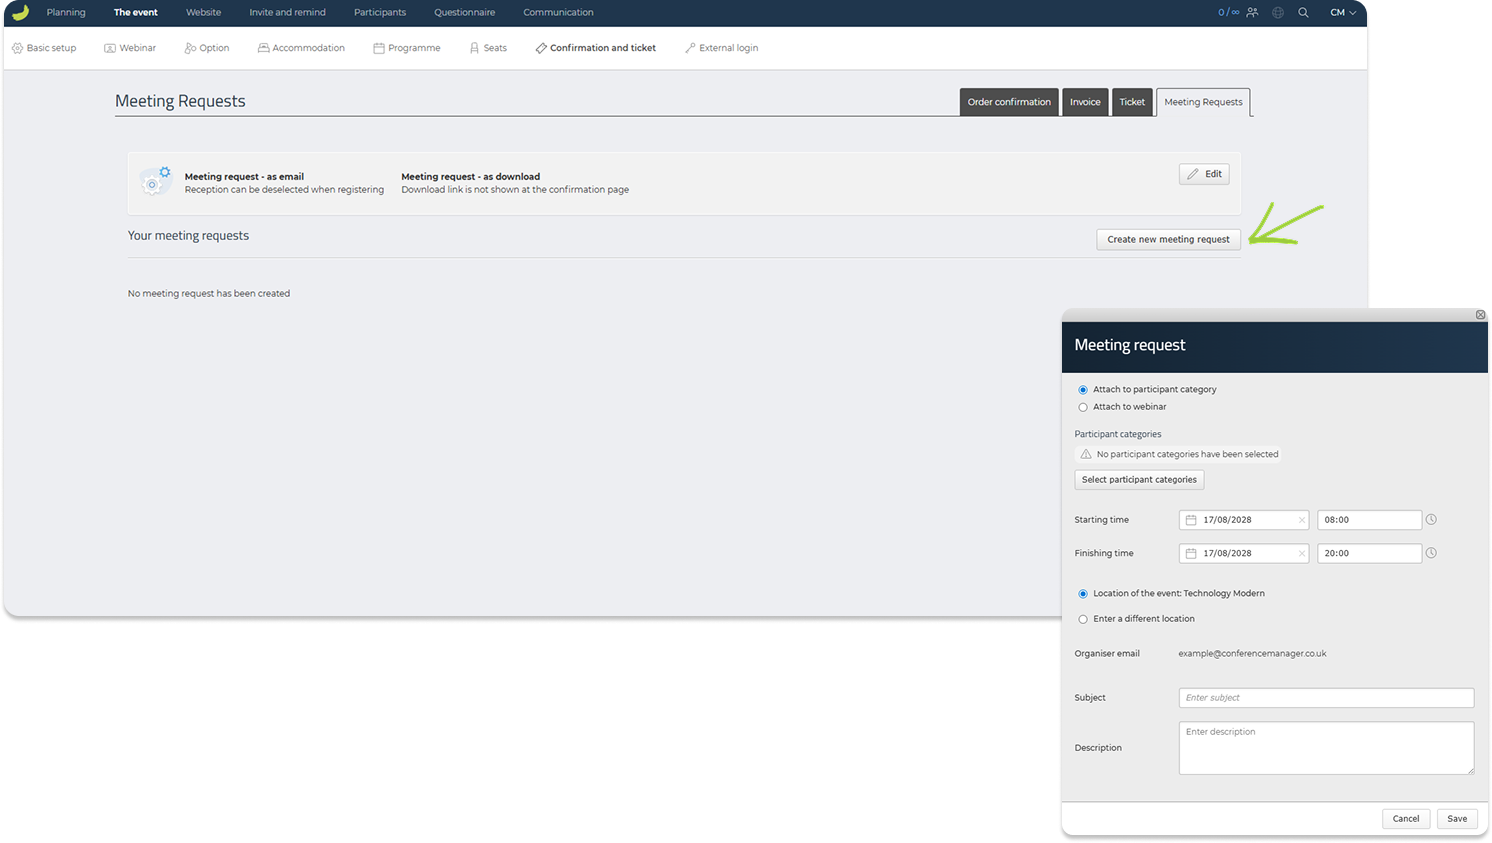
Here, you can select the participant categories, define the start and finish time, choose the location, and add a subject and description. If you have created a webinar for the event, you can also connect the meeting request to the webinar, so the webinar link can be included in the meeting request.
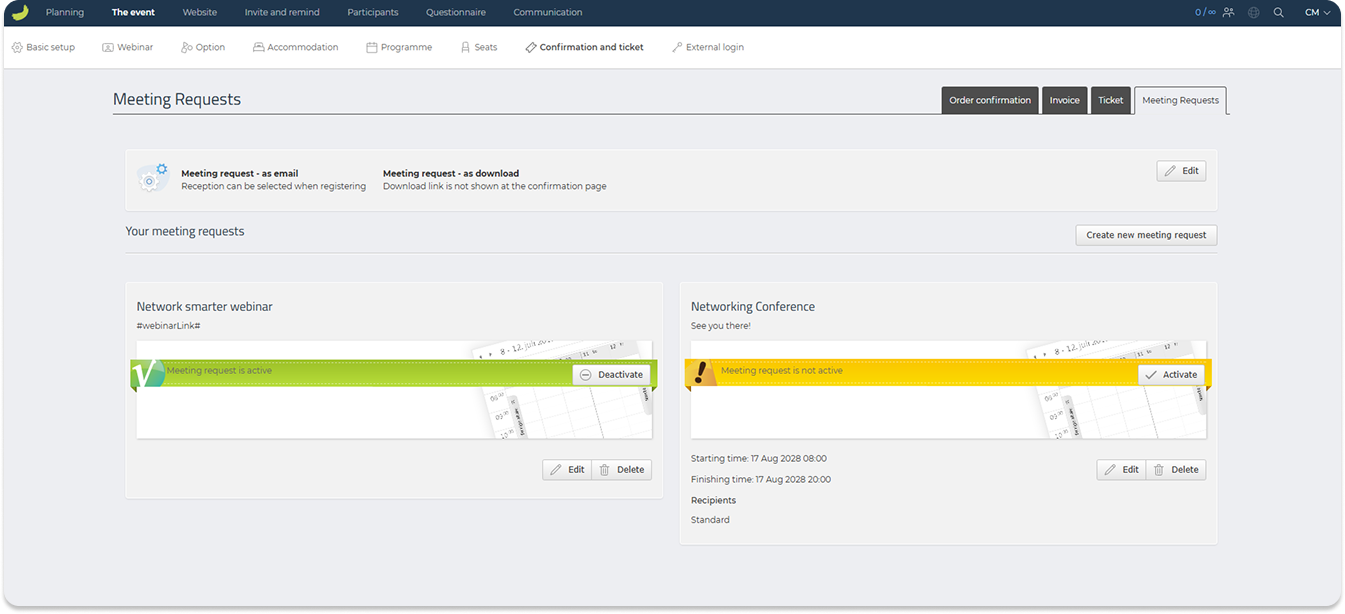
Once a meeting request has been created, it will appear under Your meeting requests. From here, you can edit, delete, activate, or deactivate the request.
Remember to activate your meeting request to make it available to participants.
Important: Once a meeting request has been sent to a participant, it cannot be changed retroactively. If participants need an updated meeting request, you must send them a new order confirmation or ask them to download the updated request from their registration.
For a more detailed guide on how to create meeting requests, see:
Create meeting requests
External login
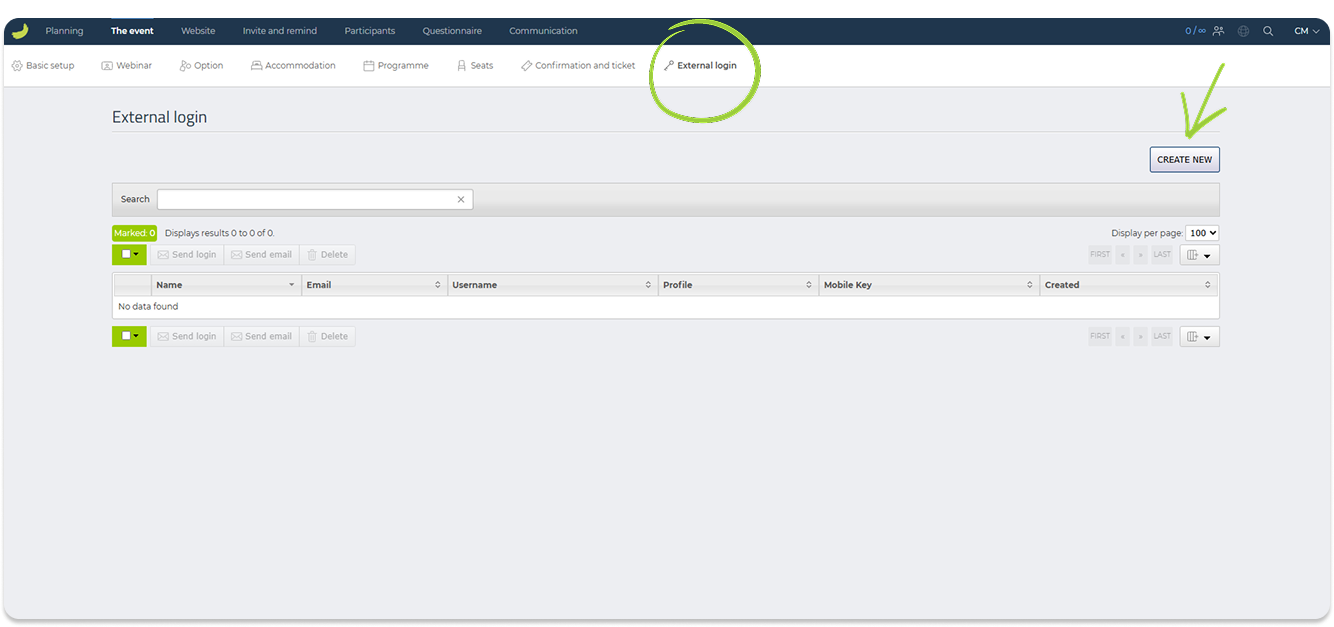
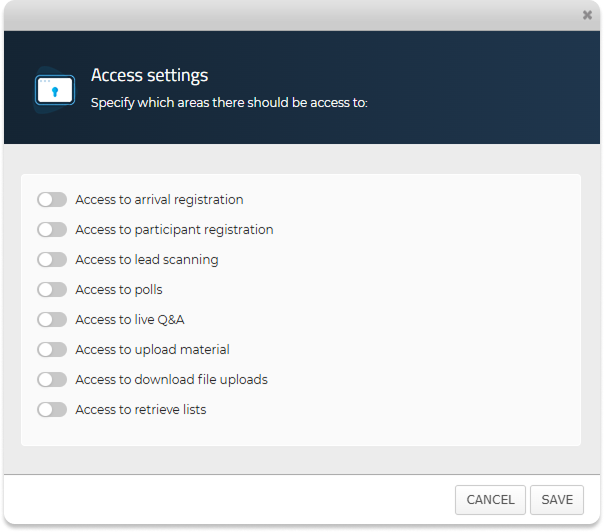
Under The event → External login, you can create external logins for selected people who need access to specific parts of your event without giving them full access to Conference Manager.
This can be useful for colleagues, partners, suppliers, staff, or others who only need access to selected information or functions, such as participant information, materials, polls, quizzes, or other event-related areas.
Click Create new to create an external login.
You can create external logins manually or upload an Excel file with the people you want to give access to.
When creating an external login, enter the person’s name, username, and email address.
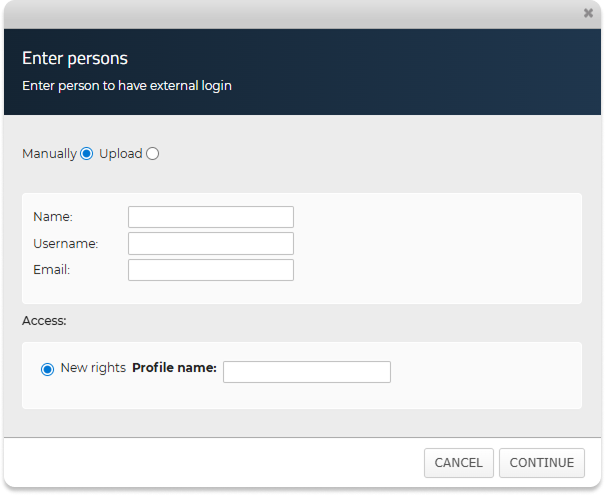
You must also define their access rights. You can either use saved permissions or create a new profile by entering a profile name. The profile determines which information and functions the external user can access, and it can be reused later.
Once the external login has been created, it will appear in the overview. To send the login details, select the external user and click Send login.
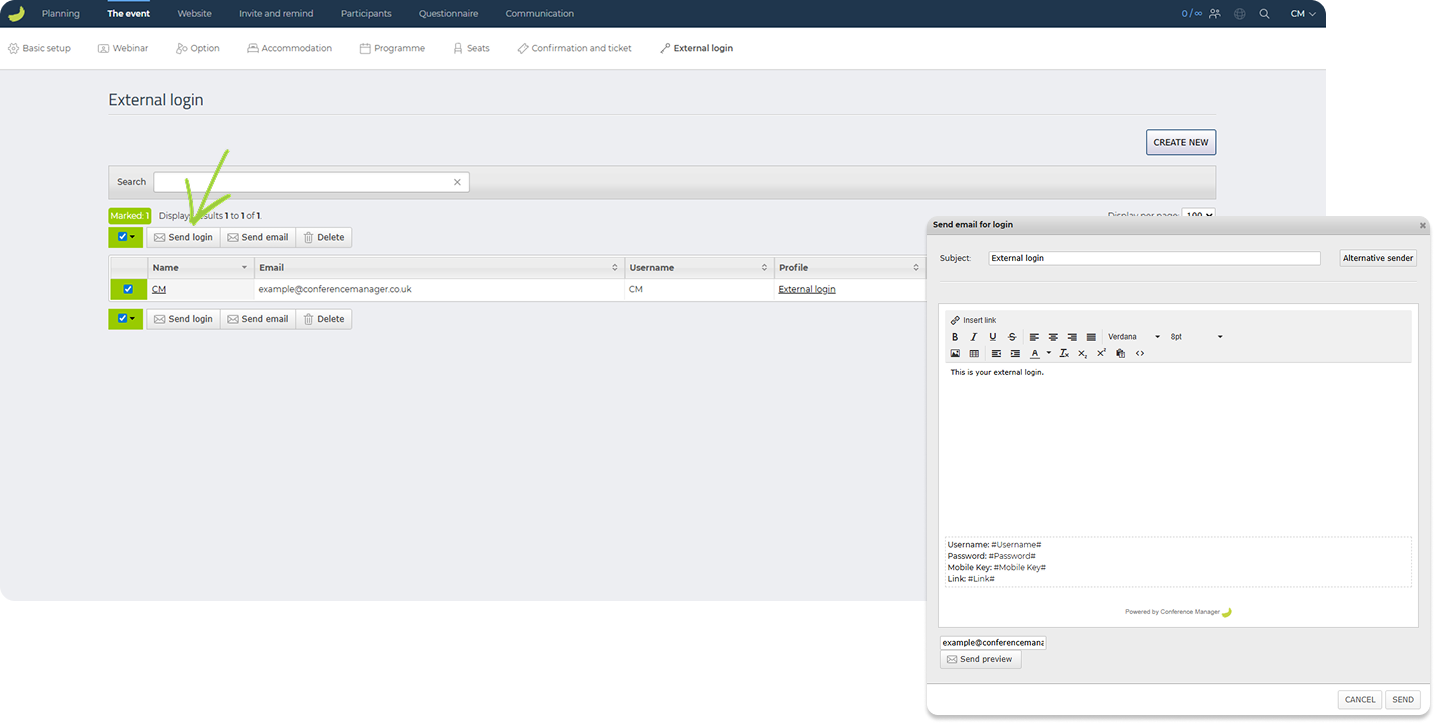
You can then write a message or instructions to the external user. Their login details will automatically be included in the email.
For a more detailed guide on how to create an external login, see:
Create an external login
For a guide that explains how external users log in and use their access, see:
How to use an external login in Conference Manager
Website
Under Website, you can set up and manage the event website that participants use to register for the event.
This section contains two main areas: Setup and activation and Written content.
Setup and activation
Under Website → Setup and activation, you can configure the basic website settings, open the Website Designer, and publish or unpublish the event website.
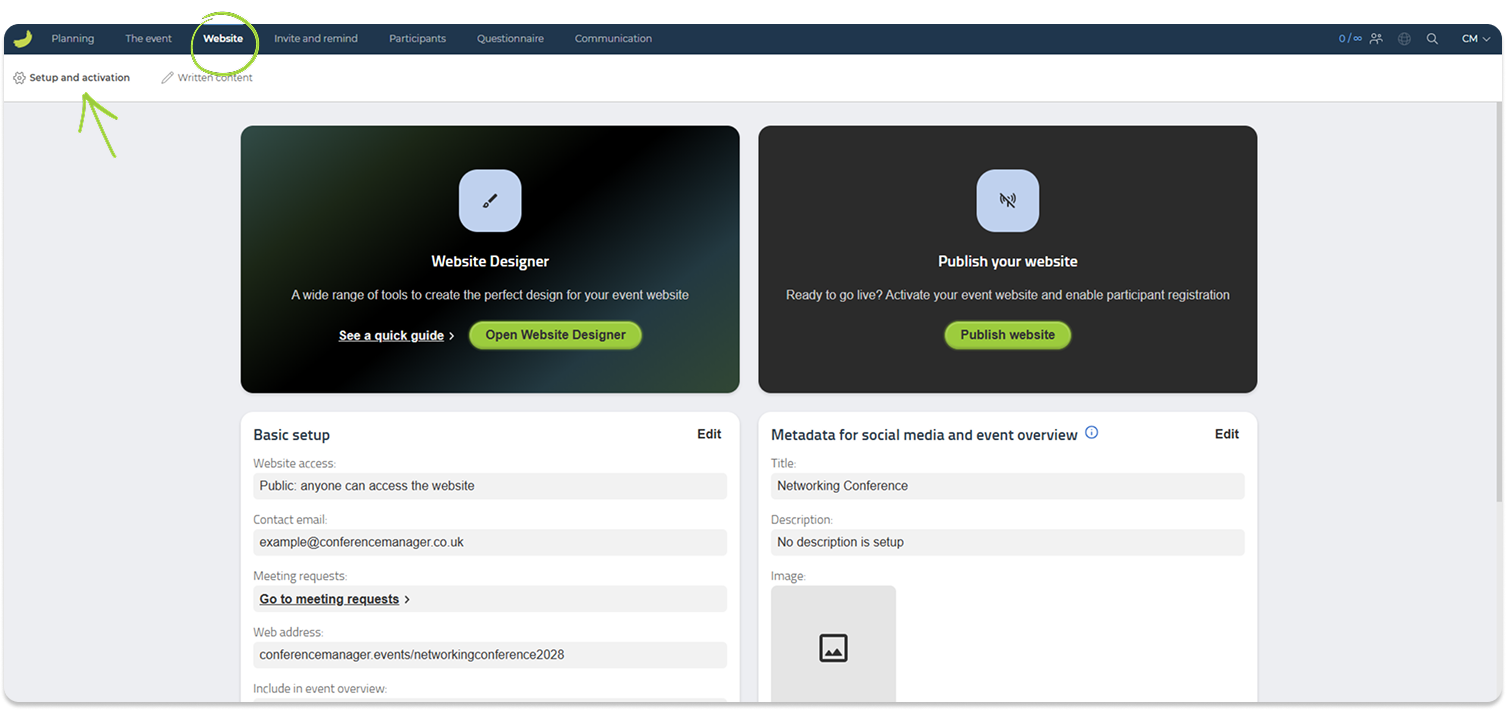
Website Designer
Click Open Website Designer to design and adjust the event website. Here, you can work with the layout, pages, content, and visual setup of the website.
For a quick introduction to the Website Designer, see Website Designer quick introduction.
For a detailed video introduction to the Website Designer, see Video introduction to Website Designer.
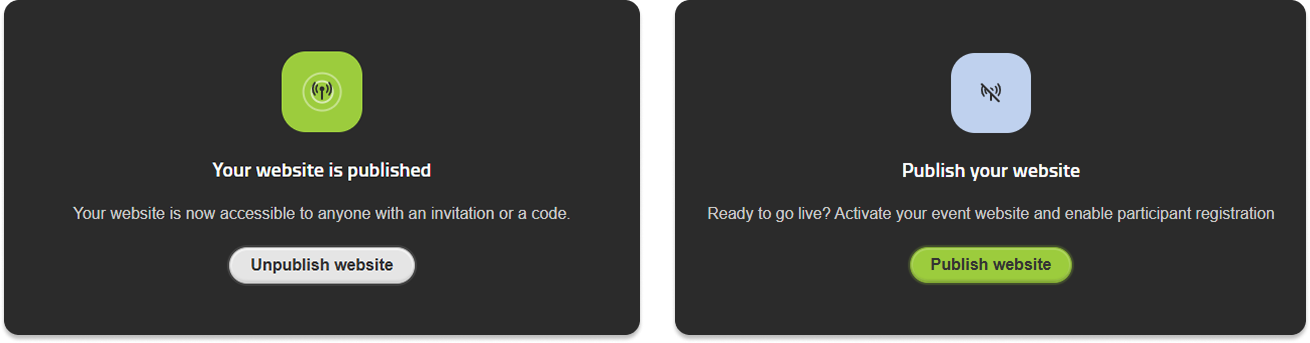
Website status
If the website is published, participants can access the site according to the selected website access settings. You can also unpublish the website if it should no longer be available online.
Basic setup
In Basic setup, click Edit to configure basic website settings.
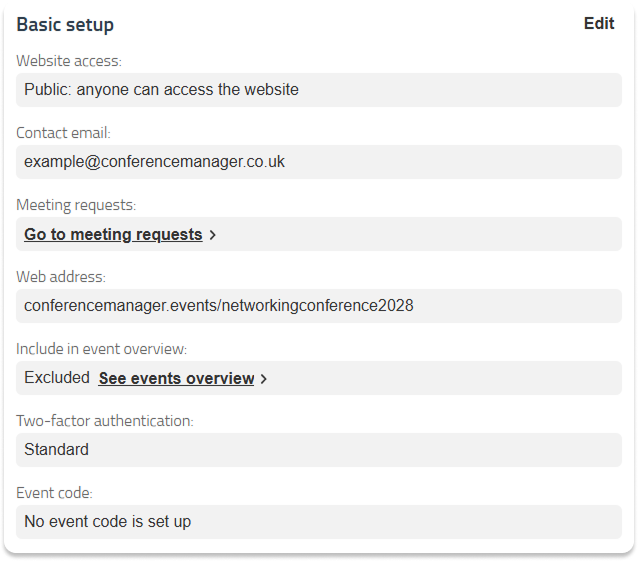
Here, you can define:
Website access
Choose who should be able to access the website. For example, the website can be public, or access can require an invitation or event code.
Contact email
Enter the email address participants can use if they need to contact you about the event.
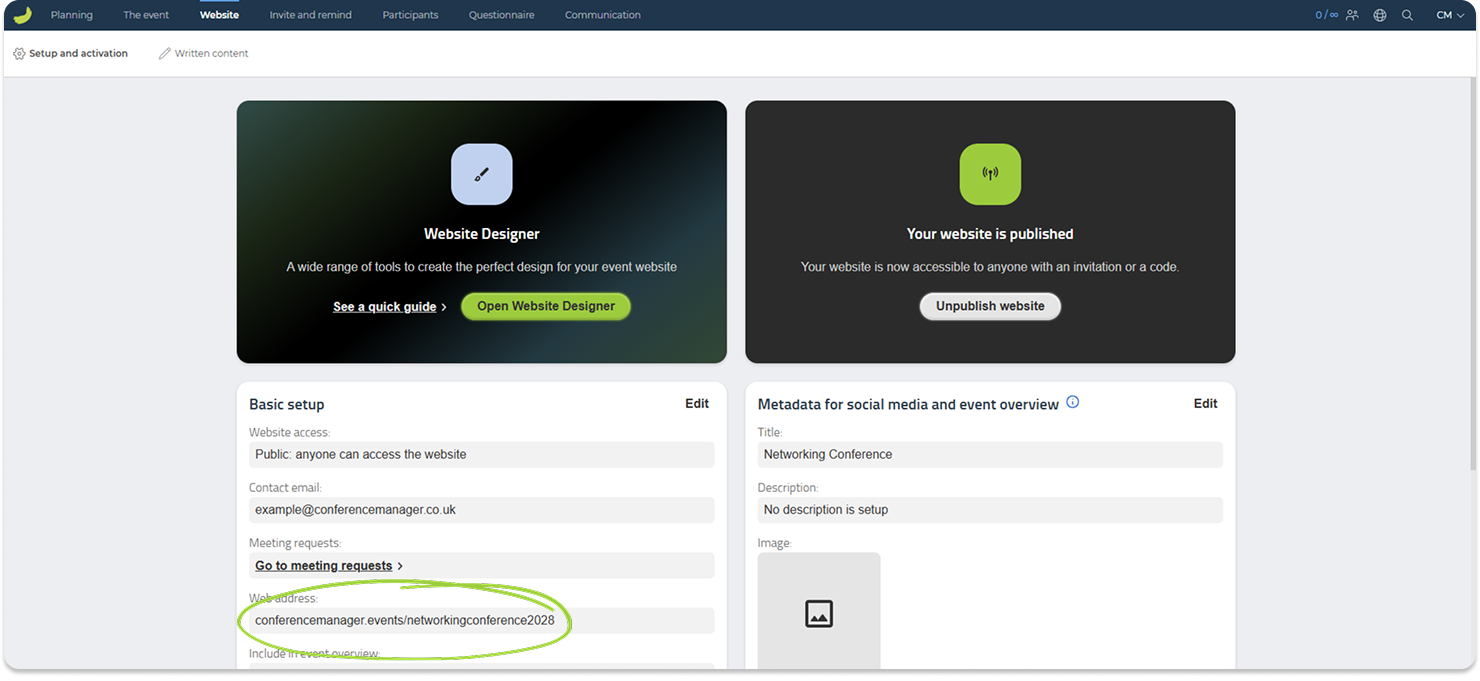
Web address
The web address is the link to the event website. Note that the web address cannot be changed while the website is published.
Include in event overview and search engines
Choose whether the event should be shown in your company event overview and on search engines.
Two-factor authentication
Choose the level of two-factor protection for participants accessing the event website. This setting applies to participant access to the event, not your own Conference Manager login.
Use this setting if you want an extra layer of security before participants can access registration and event content.
For a more detailed explanation of the different levels of two-factor protection, see:
What is the difference between the different levels of two-factor protection for my event?
Event code
Under Event code, you can create an event code for the event website.
This can be used to give participants access to the event website through a direct link that includes the event code, or by letting them enter the code manually from your organisation’s event overview.
This is especially useful if the website is private, or if you want selected participants to access the event through a specific code.
The link generated in this section gives access to the event website. If you want to create an event code for a specific participant category instead, this is done under The event → Basic setup → Participant categories.
For a more detailed guide on how to use event codes, see:
What is an event code – and how is it used?
Metadata for social media and event overview
Here, you can define how the event should appear when shared on social media and when shown in the company event overview. You can add a title, description, and image.

For recommended image sizes for meta data pictures, see: Recommended image sizes in Conference Manager
Google Analytics
If relevant, you can configure Google Analytics tracking for the event website.
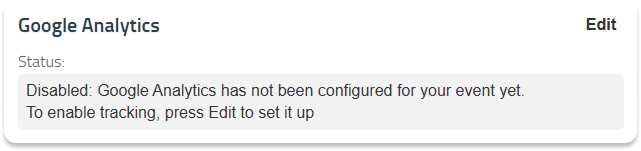
Read more about Google Analytics in Google’s own documentation here: Google Analytics Help
Written content
Under Website → Written content, you can edit the default texts shown to participants during and after registration.
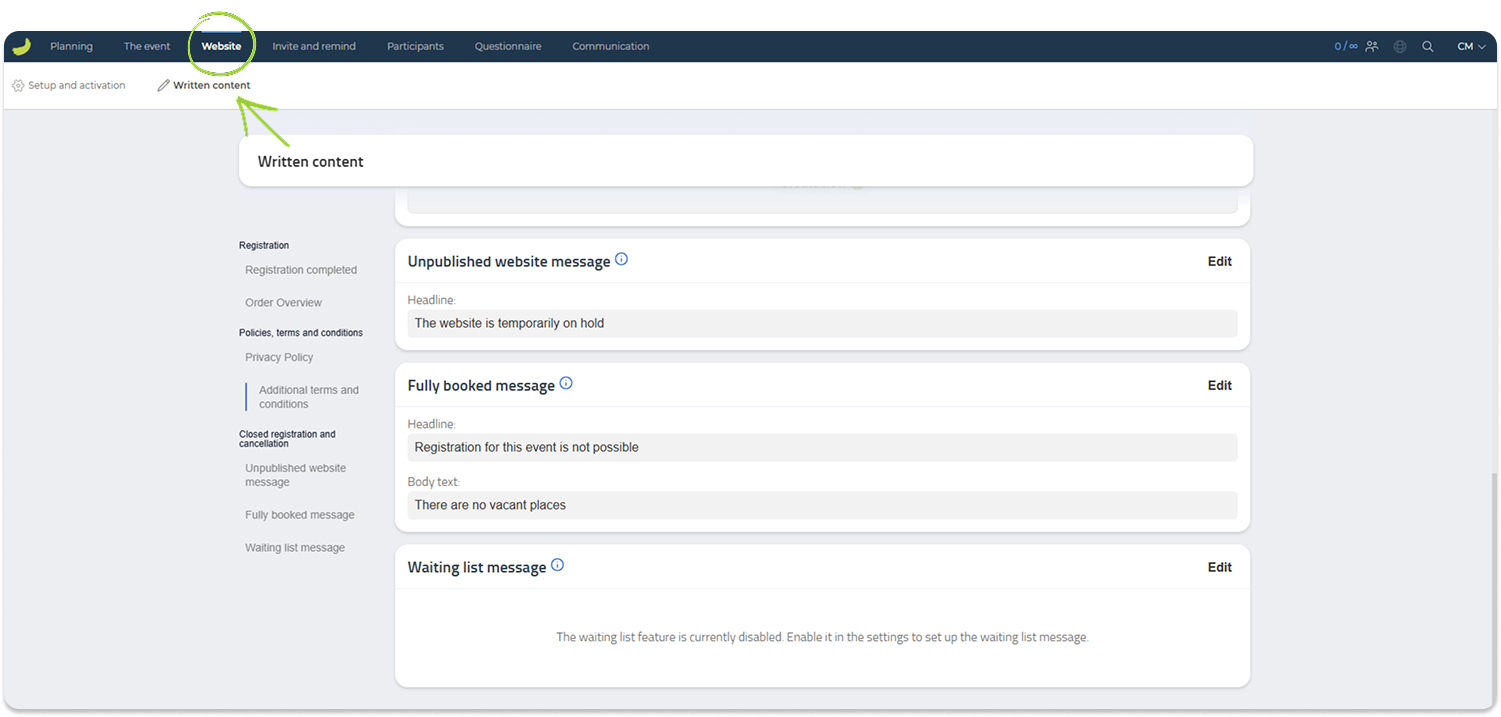
This includes texts such as:
- registration completed message
- order overview
- privacy policy
- cancellation terms and conditions
- additional terms and conditions
- unpublished website message
- fully booked message
- waiting list message
Use this section to make sure that participant-facing messages are clear and match your event setup.
For example, you can edit the Registration completed text shown after a participant has signed up, or adjust the Fully booked message shown if the event no longer has available places.
If you have enabled a waiting list, you can also edit the waiting list message shown to participants.
Invite and remind
Under Invite and remind, you can manage potential participants, create invitations, send invitations, and follow up with reminders.
This section contains two main areas: Invitation list and Invitations.
You can invite participants through the Conference Manager system, or you can invite participants externally by sharing a registration link yourself.
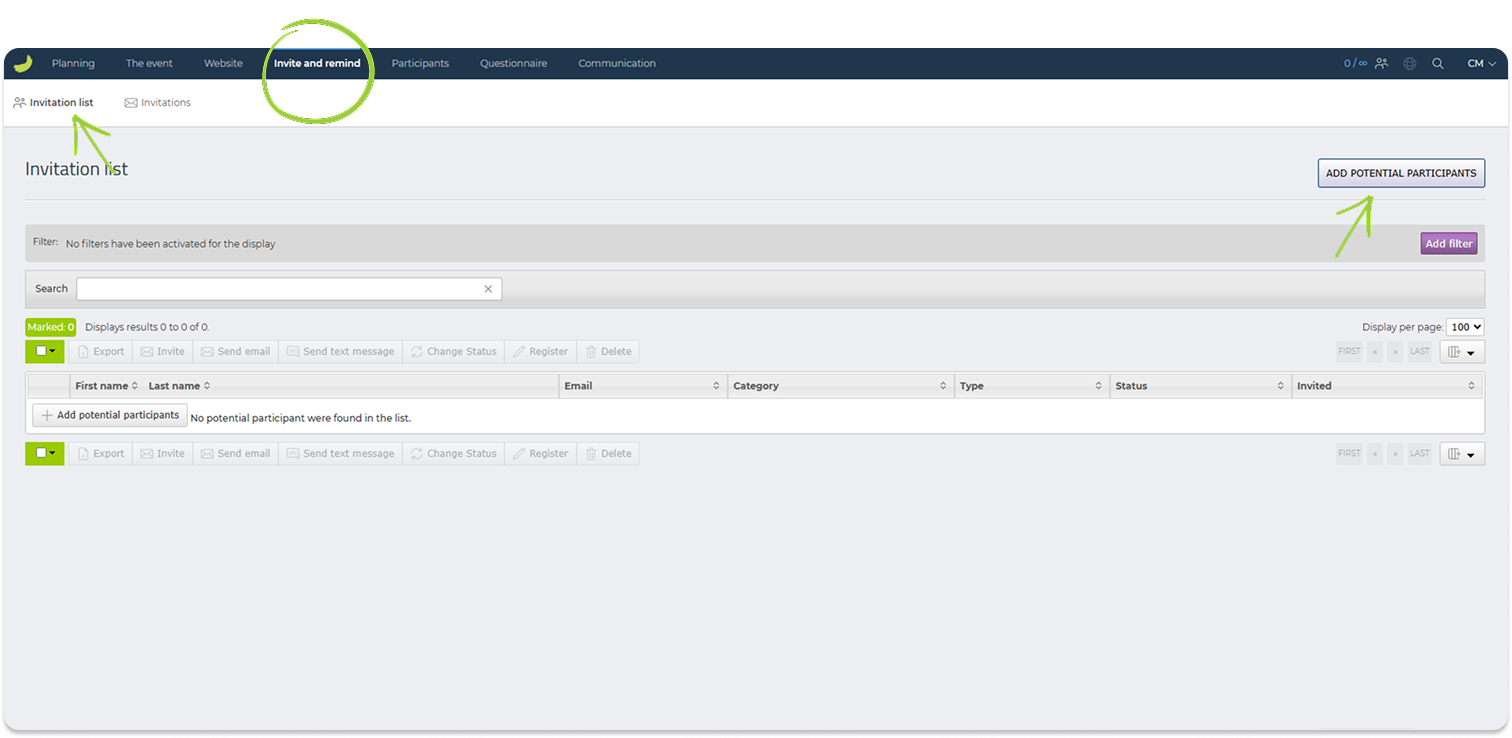
Invitation list
Under Invite and remind → Invitation list, you can add and manage potential participants before they register for the event.
You can choose between Personal email addresses and Group emails.
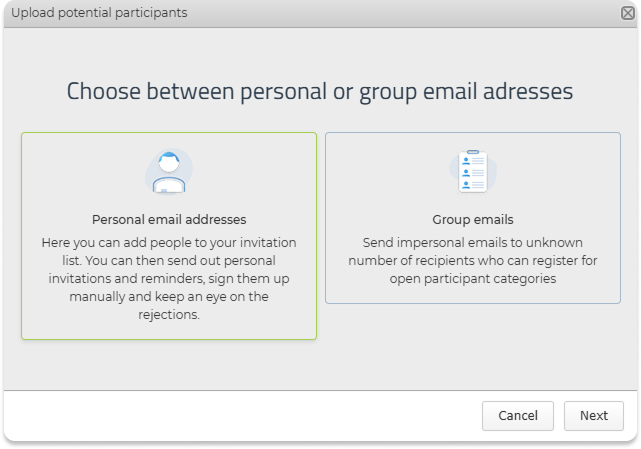
Personal email addresses
Use this option if you want to add known participants to the invitation list. You can add participants manually or upload an external file with the relevant participant information.
When adding personal email addresses manually, you can select the participant category and enter information such as first name, last name, and email address.
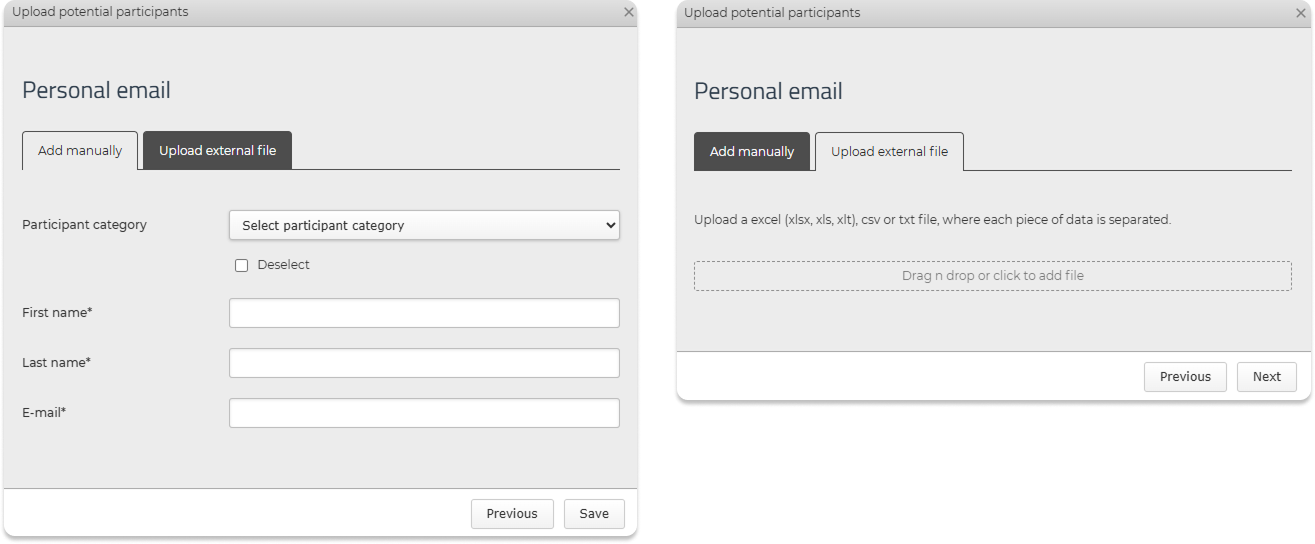
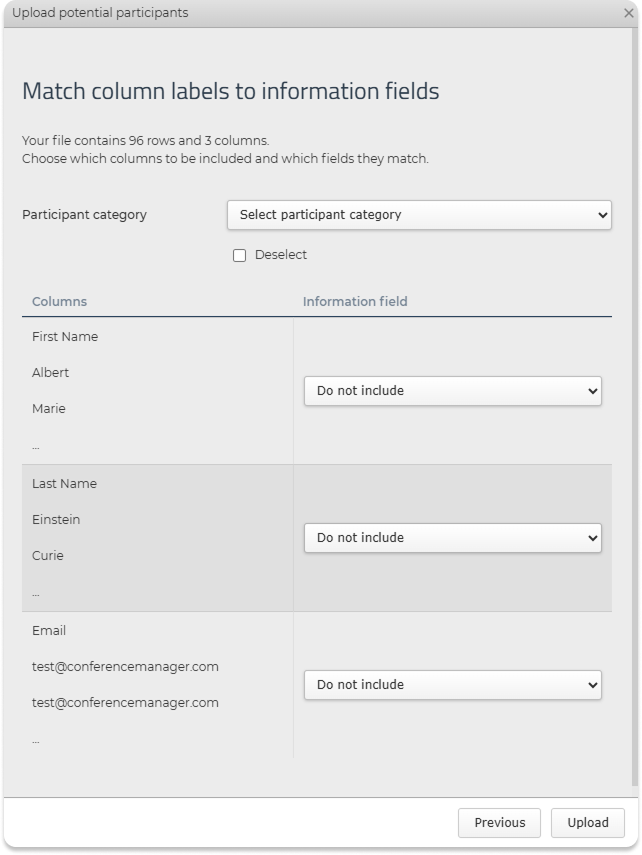
If you upload a file, you will be asked to match the columns in your file with the personal information fields in Conference Manager.
Personal email addresses are used for personal invitations. This means that each invited person can be tracked individually. When a person registers through their personal invitation, they are moved from the invitation list to the participant list.
Group emails
Use this option if you want to send an invitation to a shared or general email address, where the exact recipients are not known in advance. Recipients who receive the invitation can then register for one of the open participant categories.
You can add group emails manually by entering a group name and group email address, or you can upload an external file with several group emails.
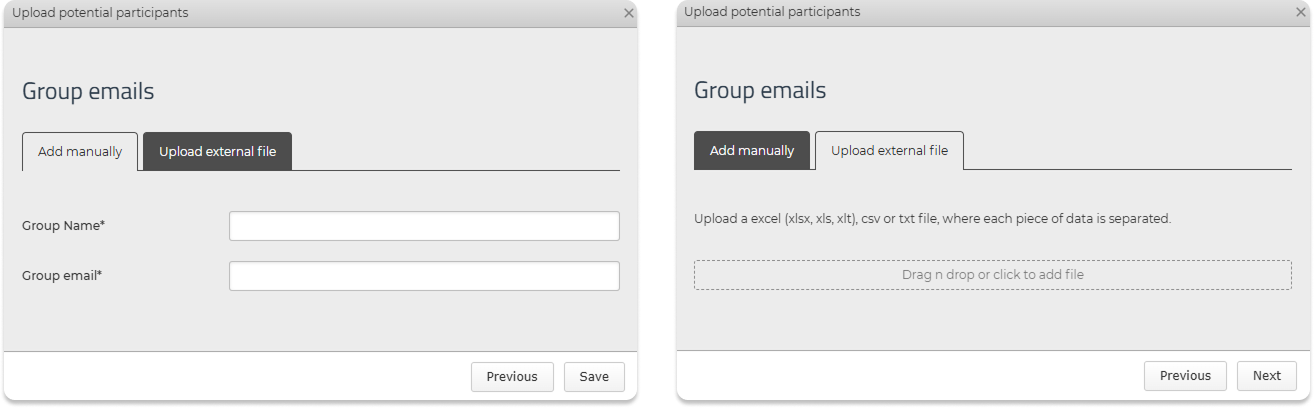
If you upload a file with group emails, you will be asked to match the columns in your file with the fields Group name and Group email.
Please note that group emails are not personal invitations. This means that recipients are not tracked individually in the invitation list. When someone registers through a group email invitation, the group email entry is not moved from the invitation list to the participant list, and you cannot track exactly who registered from that specific invitation.
Once potential participants have been added, they will appear in the invitation list.
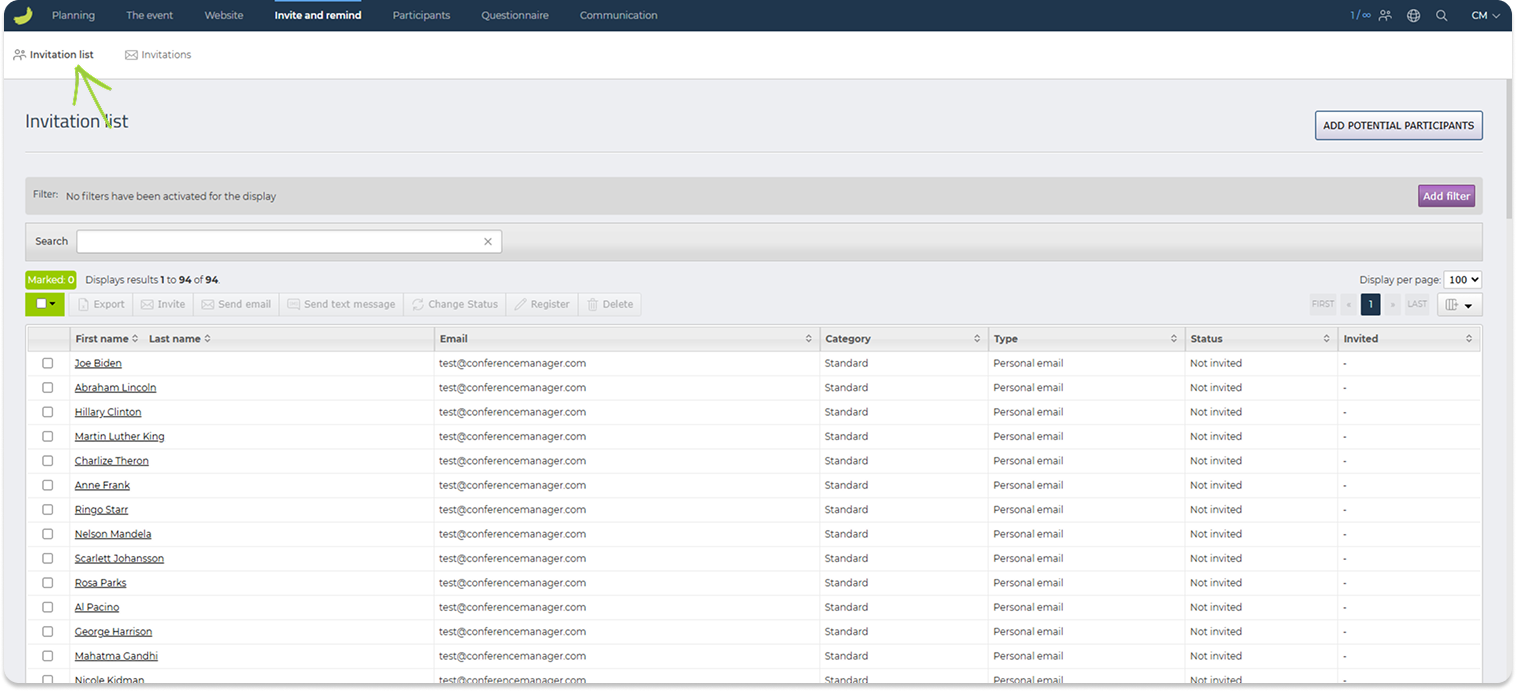
From the invitation list, you can select one or more potential participants and perform actions such as:
- export selected participants
- send an invitation
- send an email
- send a text message
- change status
- register participants manually
- delete participants from the list
- You can also use the search field and filters to find specific participants or narrow down the list.
Potential participants invited via personal email addresses remain in the Invitation list until they register for the event. Once a participant completes their registration, they are automatically removed from the Invitation list and added to the Participant list.
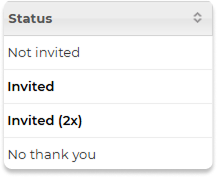
In the Invitation list, the Status column shows the current status for each potential participant, for example whether they have been invited, have not yet been invited or have declined the invitation.
To send an invitation, you can select the relevant participants and click Invite. You can also invite the participants under the Invitations tab.
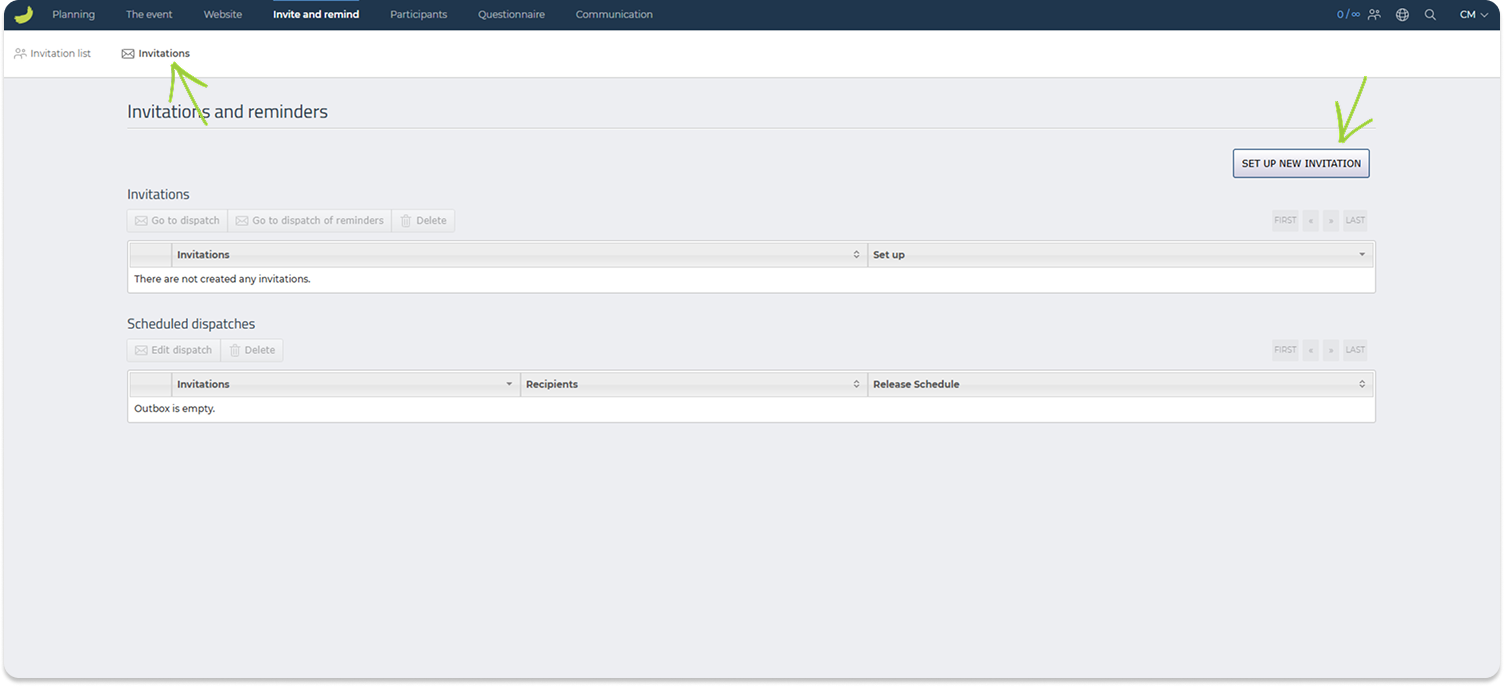
Invitations
Under Invite and remind → Invitations, you can create and manage invitation and reminder templates.
Click Set up new invitation to create a new invitation template.
When creating an invitation, make sure to include a registration link so recipients can sign up for the event. You can click Insert link in the editor and choose where it should lead, for example to the event description or directly to the registration page.
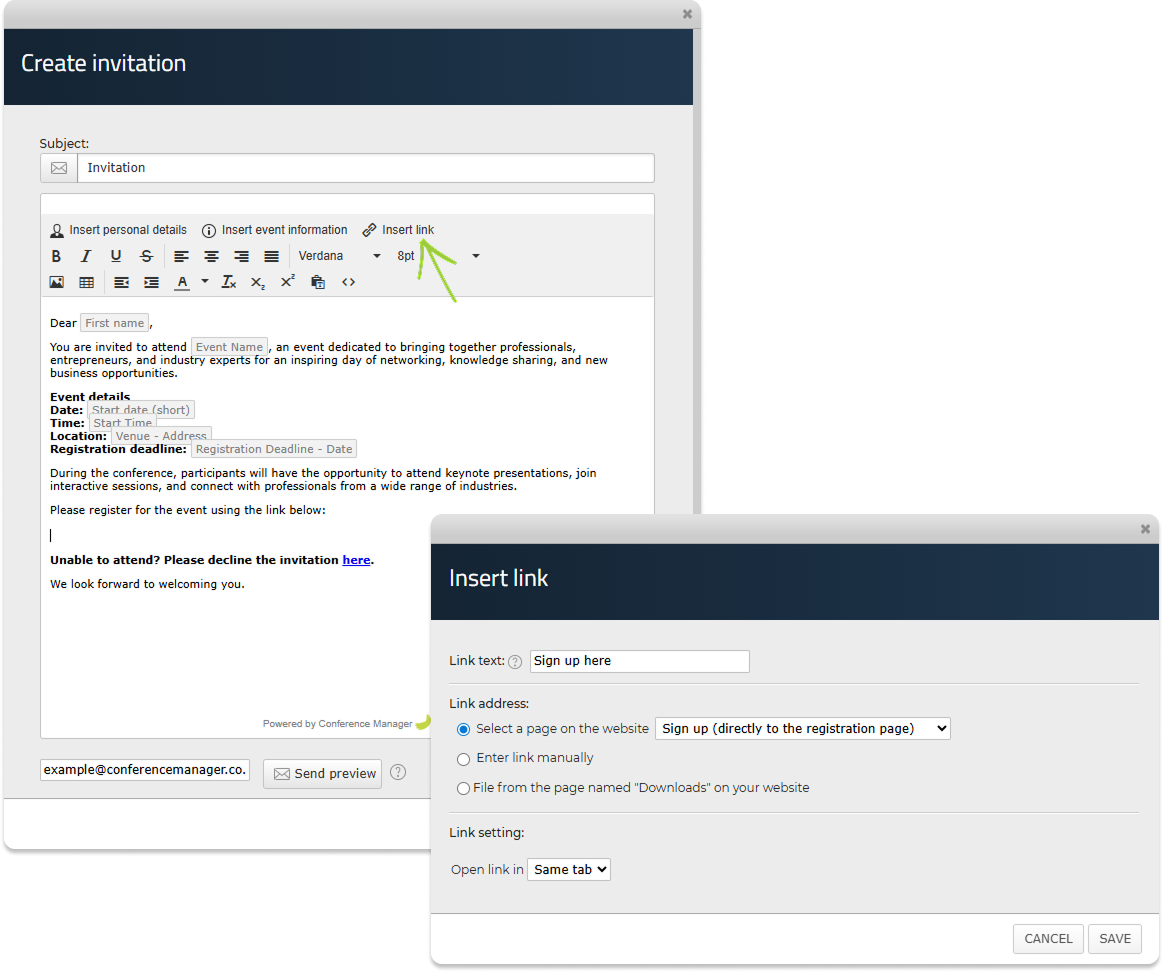
You can also include a No thank you link if recipients should be able to decline the invitation. If a recipient clicks this link, their status in the invitation list will automatically be updated. Please note: The No thank you link only works for personal email invitations.
After creating the invitation, give it a reference name. This name is only used internally, so you can recognise the template later.
To send an invitation, select the invitation template and click Go to dispatch.
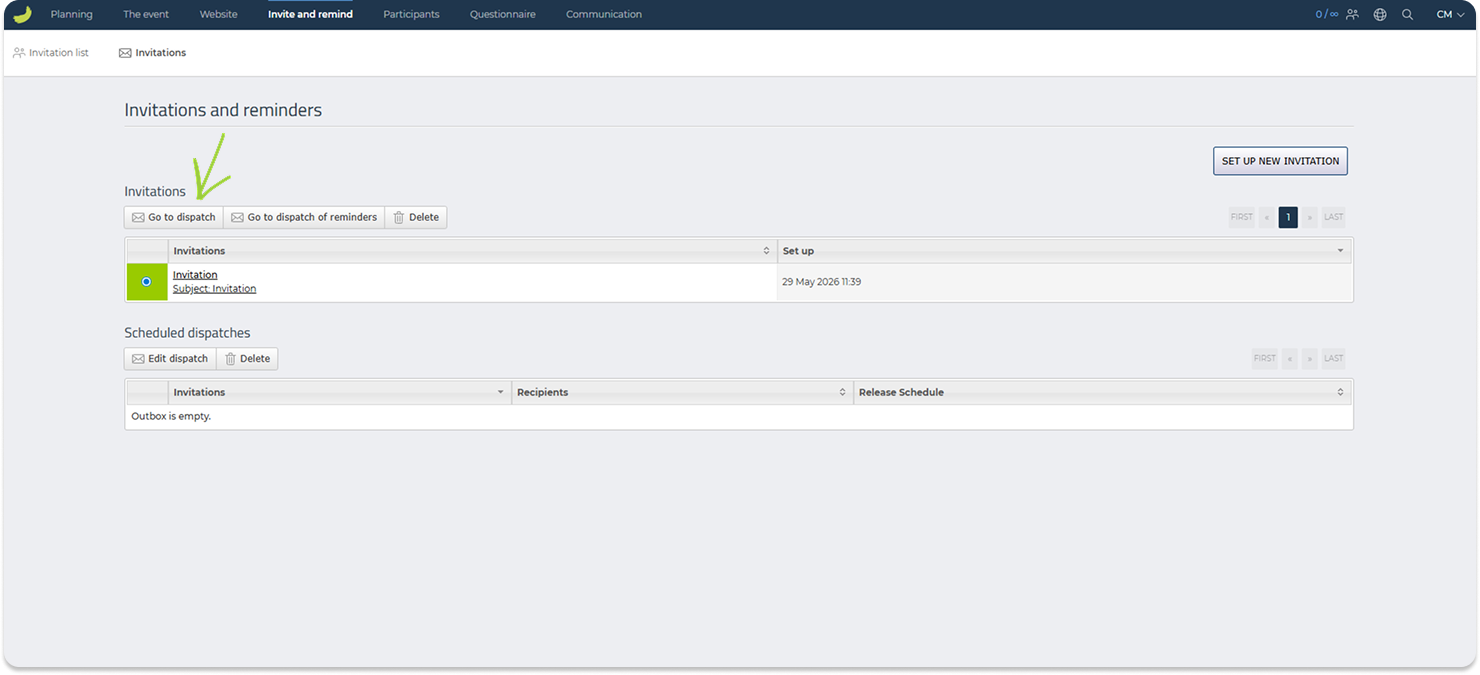
The dispatch flow consists of three steps:
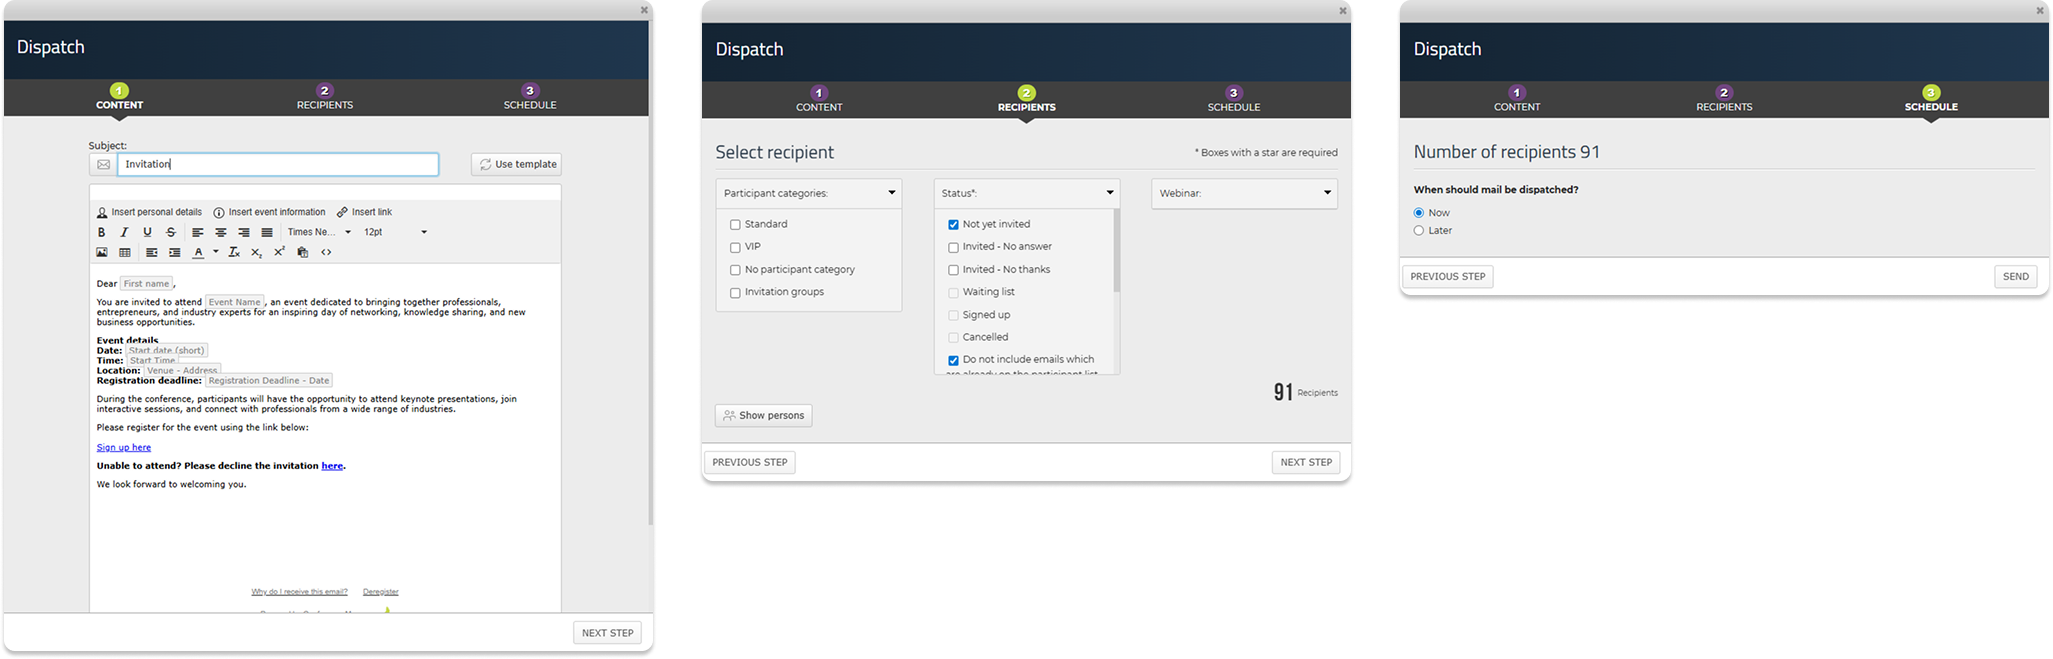
Content
Review and, if needed, edit the invitation before sending it.
Recipients
Choose who should receive the invitation. You can filter recipients by for example participant category or status, or manually select specific people.
Schedule
Choose whether the invitation should be sent now or scheduled for later.
Reminders
You can also use the Invitations tab to send reminders to potential participants who have not yet responded.
Create a reminder template in the same way as an invitation template. Once the reminder template has been created, select it and click Go to dispatch of reminders.
The system will help target recipients who have not yet responded to the original invitation. This only works for personal email invitations.
The reminder dispatch follows the same flow as invitations: Content, Recipients, and Schedule.
Invite externally
You can also invite participants outside the Conference Manager system by sharing a registration link yourself.
This can be useful if you want to share the link through an intranet, newsletter, email campaign, flyer, QR code, or another external channel.
If the event website is public and open for registration, you can share the website address from Website → Setup and activation → Basic setup.
If you want the link to go directly to the registration flow, you can add /signup at the end of the web address.
If the event or a participant category is restricted, you can create an event code and use the generated link to give access. Event codes for participant categories are created under The event → Basic setup → Participant categories.
For a guide on how to use event codes, see:
What is an event code – and how is it used?
Always test the registration link before sharing it with participants.
For a more detailed guide on invitations, reminders, and external invitation links, see:
How to invite and remind potential participants
Participants
Under Participants, you can manage registered participants and get an overview of registrations, payments, participant lists, orders, approvals, accommodation, and other participant-related information, depending on your event setup.
When you open the Participants tab, you first see a dashboard with a quick overview of the event. Here, you can see the number of registered and deregistered participants, available vacancies, registrations by participant category, payment status, and available downloads.
From the Downloads section, you can retrieve different lists and reports, such as the complete participant list, participant report, payment card transaction list, invoice list, or accommodation report, depending on your event setup.
Participant list
Under Participants → Participant list, you can view and manage all registered participants.
You can search for specific participants, add filters, and choose which columns should be shown in the list.
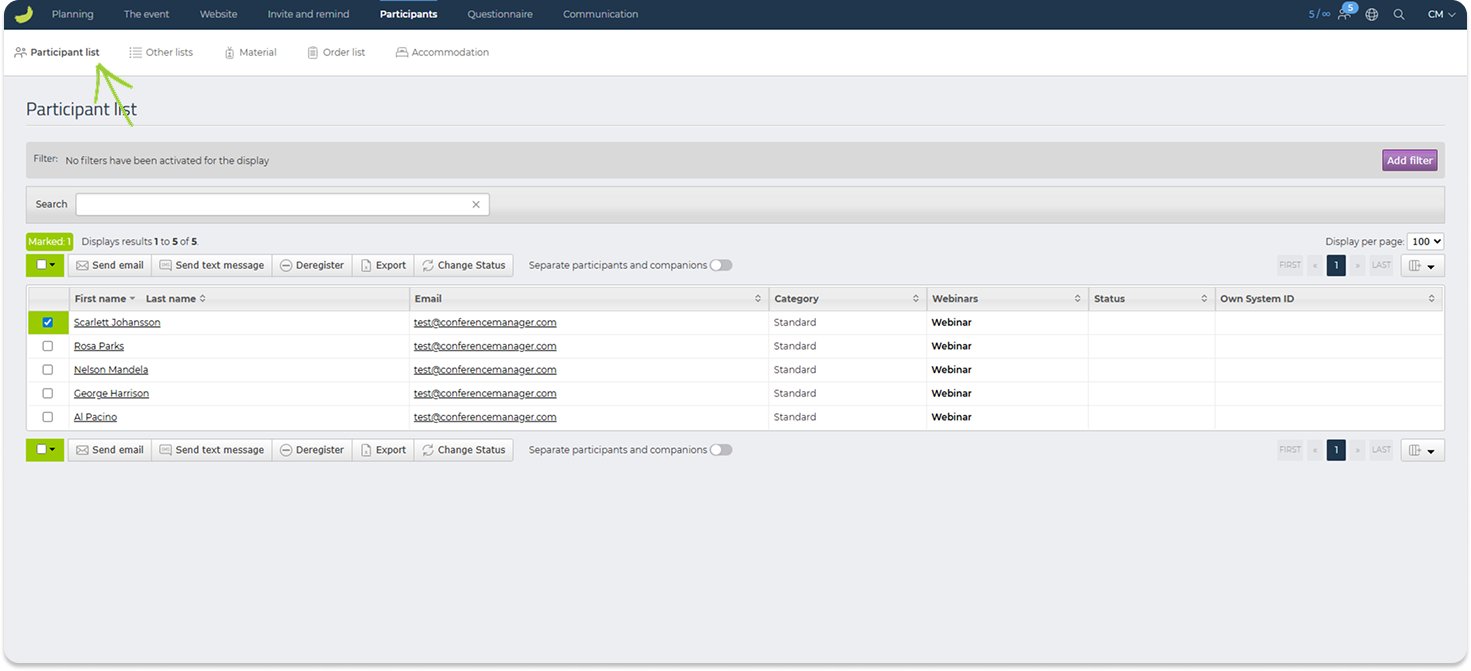
From the participant list, you can select one or more participants and perform actions such as:
- send email
- send text message
- deregister participants
- export selected participants
- change status
If your event includes companions, you can choose whether participants and companions should be shown together or separately.
Click on a participant’s name to open their registration details.
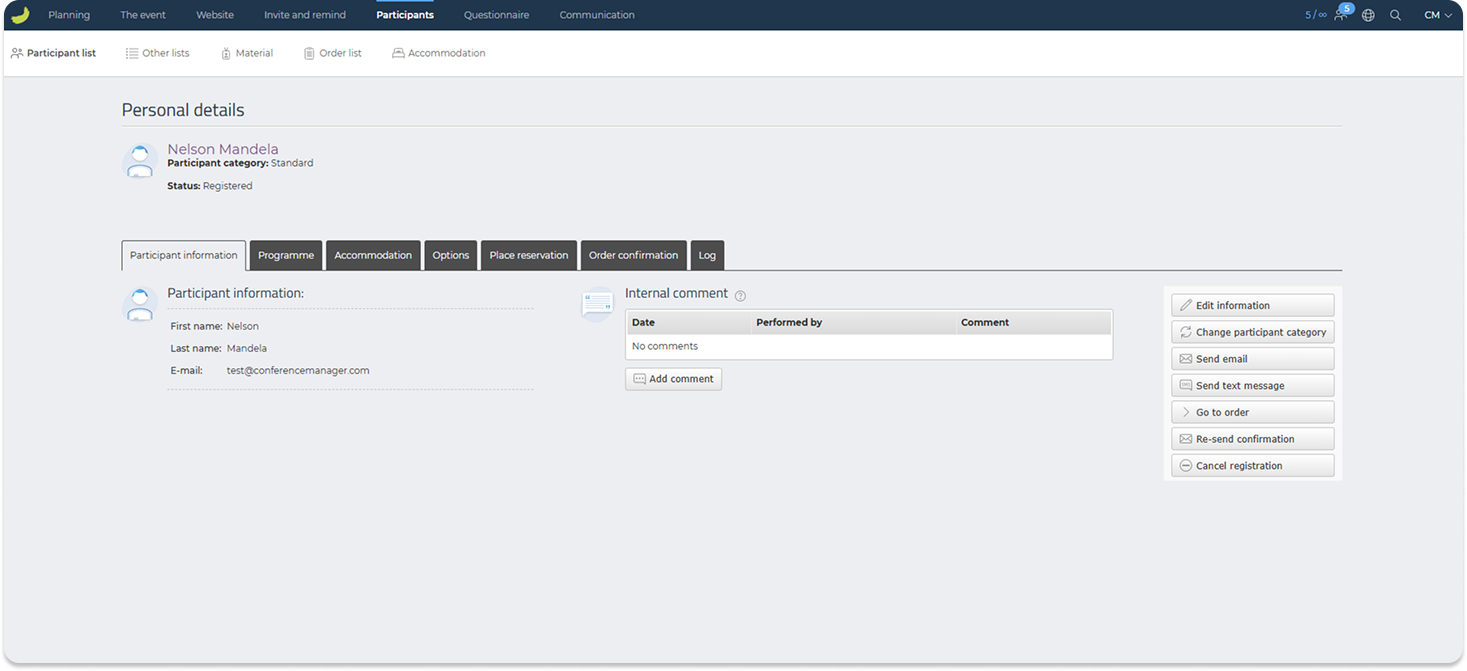
From the participant details page, you can view and manage information for the selected participant. Depending on your event setup, this may include participant information, companions, selected options, place reservation, order confirmation, and log.
You can also edit the participant’s information, send an email, send a text message, go to the related order, resend the confirmation, or cancel the registration.
This page is useful when you need to review or update a single participant’s registration in more detail.
Other lists
Under Participants → Other lists, you can access additional participant-related lists.
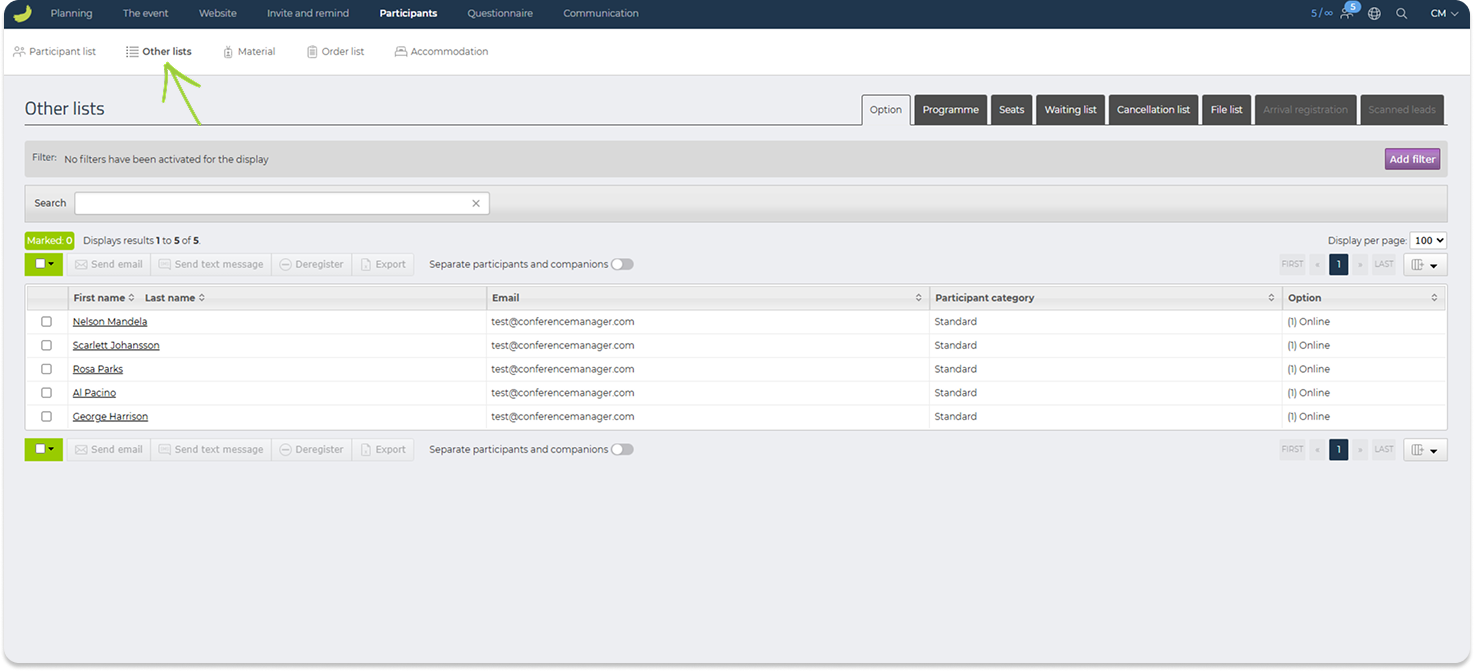
This section contains the following lists:
- Options — participants’ selected options
- Programme — participants’ selected programme items
- Seats — selected seats or bookable places
- Waiting list — participants on the waiting list
- Cancellation list — cancelled registrations
- File list — files uploaded by participants
- Arrival registration — arrival or check-in information collected through the CM Exhibition app
- Scanned leads — lead information collected through lead scanning in the CM Exhibition app
- Duplicate emails — participant email addresses that appear more than once in your event
For a quick introduction to the CM Exhibition app features, see:
CM Exhibition app introduction
Material
Under Participants → Material, you can create and manage participant materials such as name tags, table place cards, and certificates.
Click Create new material to create a new material type.
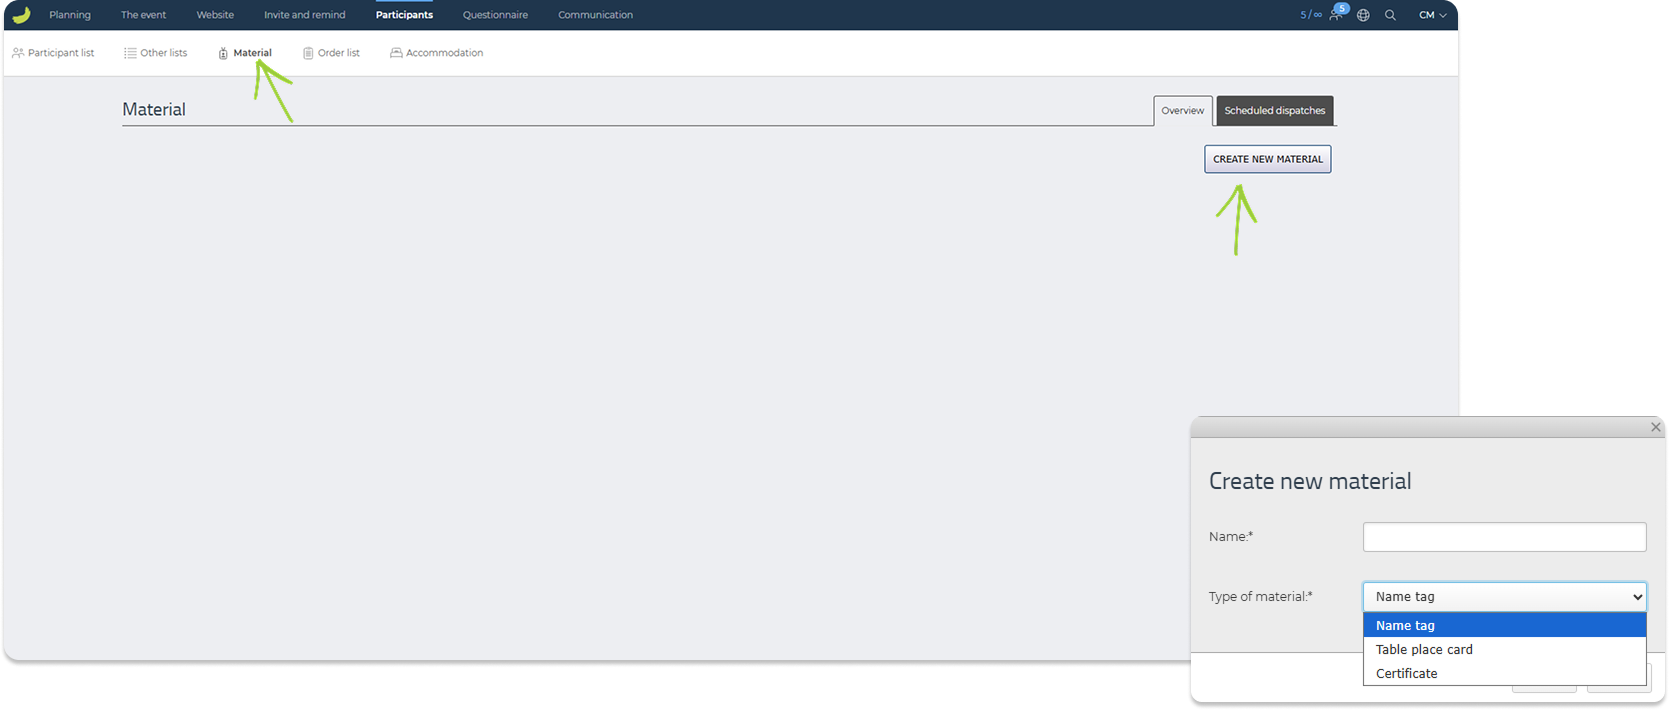
You can choose between:
Name tag
Use this to create name tags for participants.
Table place card
Use this to create place cards if participants should have assigned table seating.
Certificate
Use this to create certificates for participants, for example as proof of attendance or completion.
Once a material type has been created, you can manage the template for it. Templates define the size and format of the material.
You can also use Scheduled dispatches to manage material that should be sent to participants.
For more detailed guides, see:
How to create a name tag
How to create a certificate
Order list
Under Participants → Order list, you can view and manage participant orders.
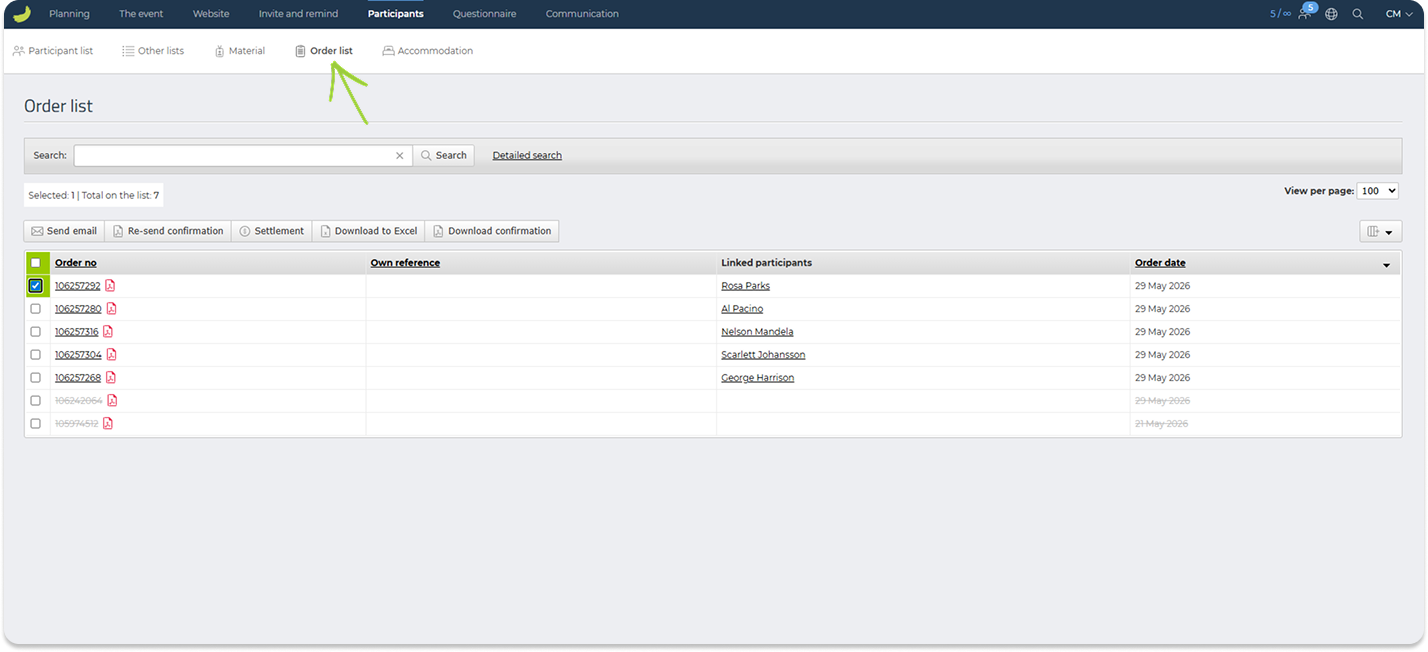
This list gives you an overview of order numbers, order responsible, order date, payment method, invoice number, and balance.
From here, you can search for orders, use detailed search, send emails, create invoices (if relevant), resend confirmations, download order information to Excel, or download confirmations.
Invoice list
The Invoice list tab is only visible if invoicing through Conference Manager is enabled for the event.
Under Participants → Invoice list, you can view and manage invoices connected to participant orders.
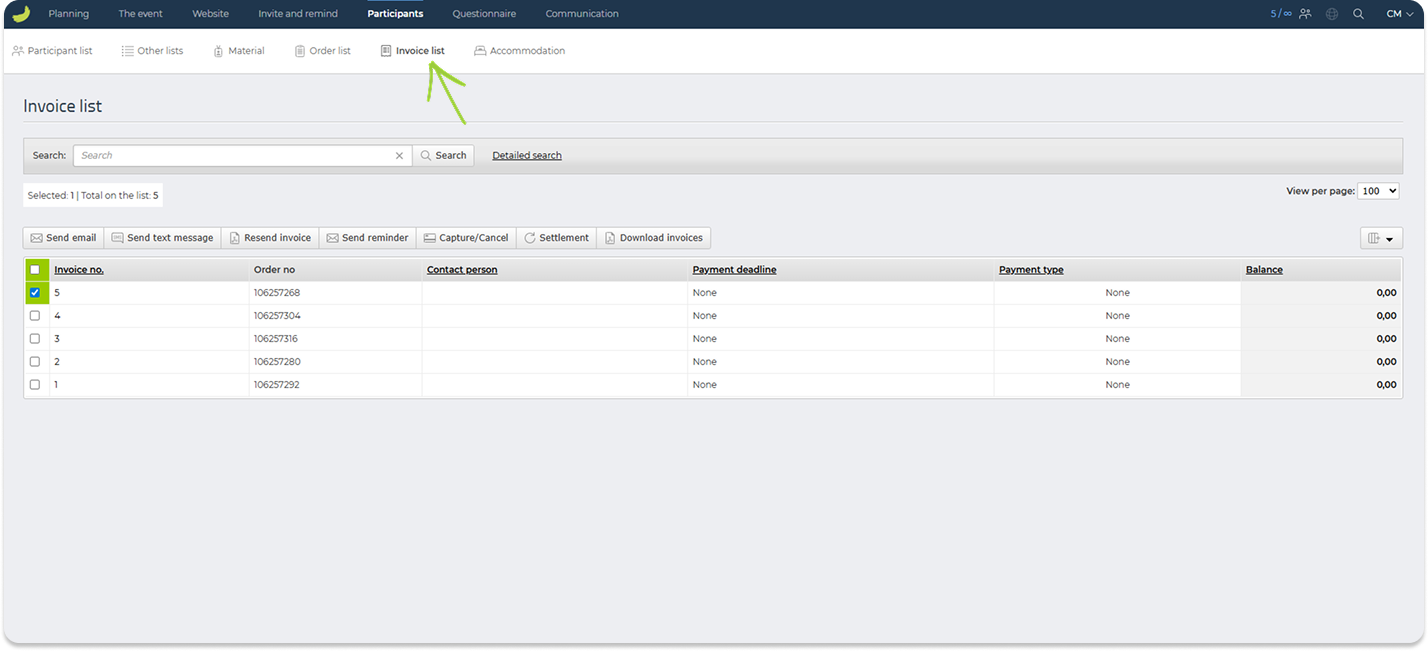
From this list, you can search for invoices, view invoice numbers, order numbers, contact persons, payment deadlines, payment types, and balances.
You can also perform actions such as resending invoices, sending reminders, or downloading invoices, depending on your setup.
Approval
The Approval tab is only visible if Manager approval or Organiser approval has been enabled under The event → Basic setup → Participant categories.
Under Participants → Approval, you can manage registrations that require approval.
Registrations waiting for approval will appear under Awaiting processing.

From here, you can process approval requests and send emails.
For more detailed guides on approval, see:
How to use manager approval for your event
How to use organiser approval for your event
Accommodation
Under Participants → Accommodation, you can manage accommodation bookings if accommodation is part of your event setup.
You can view bookings either by Room list or by Participants.
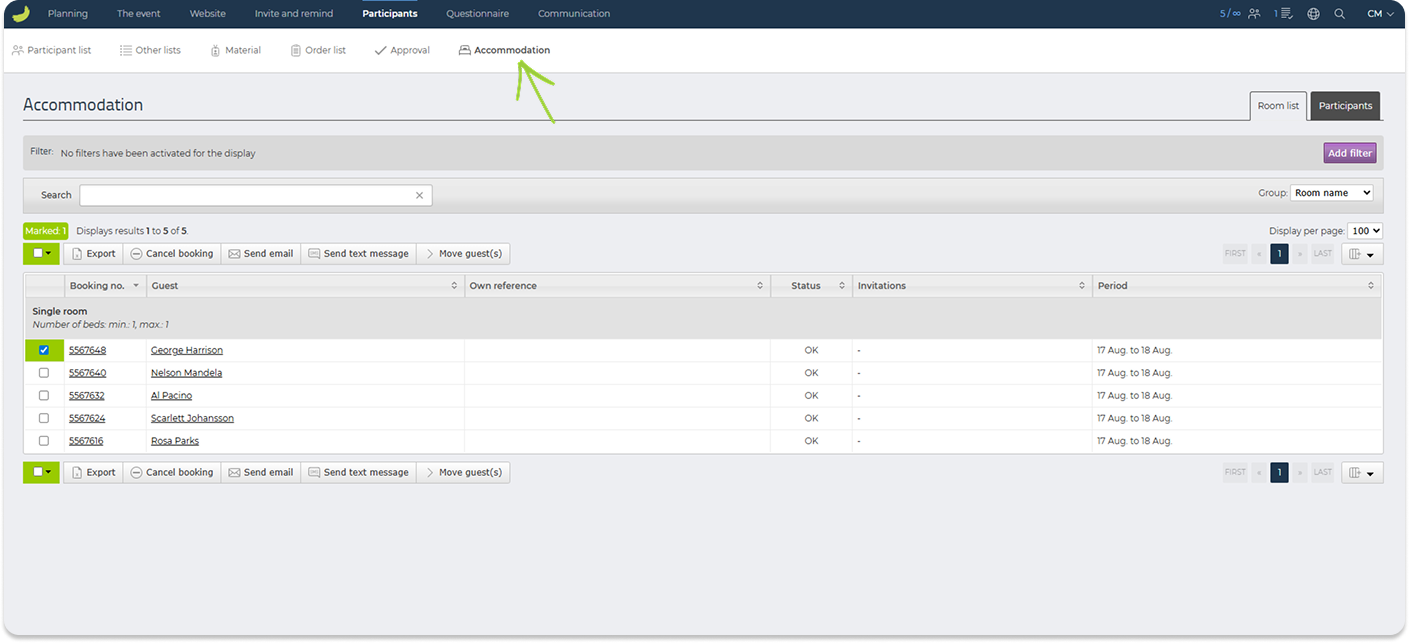
From here, you can search and filter accommodation bookings, export lists, cancel bookings, send emails or text messages, and move guests if needed.
This section is useful when managing room allocation, hotel overviews, and participant accommodation details.
Questionnaire
Under Questionnaire, you can create questionnaires, send them to participants, and set up polls or quizzes for your event.
This section contains three main areas: Questionnaires, Dispatches, and Polls.
Questionnaires
Under Questionnaire → Questionnaires, you can create and manage questionnaires for your event.
Questionnaires can be used to collect feedback, evaluations, preferences, or other information from participants before, during, or after the event.
Click Create questionnaire to create a new questionnaire. You can either set up a new questionnaire from scratch or copy a previously created questionnaire.
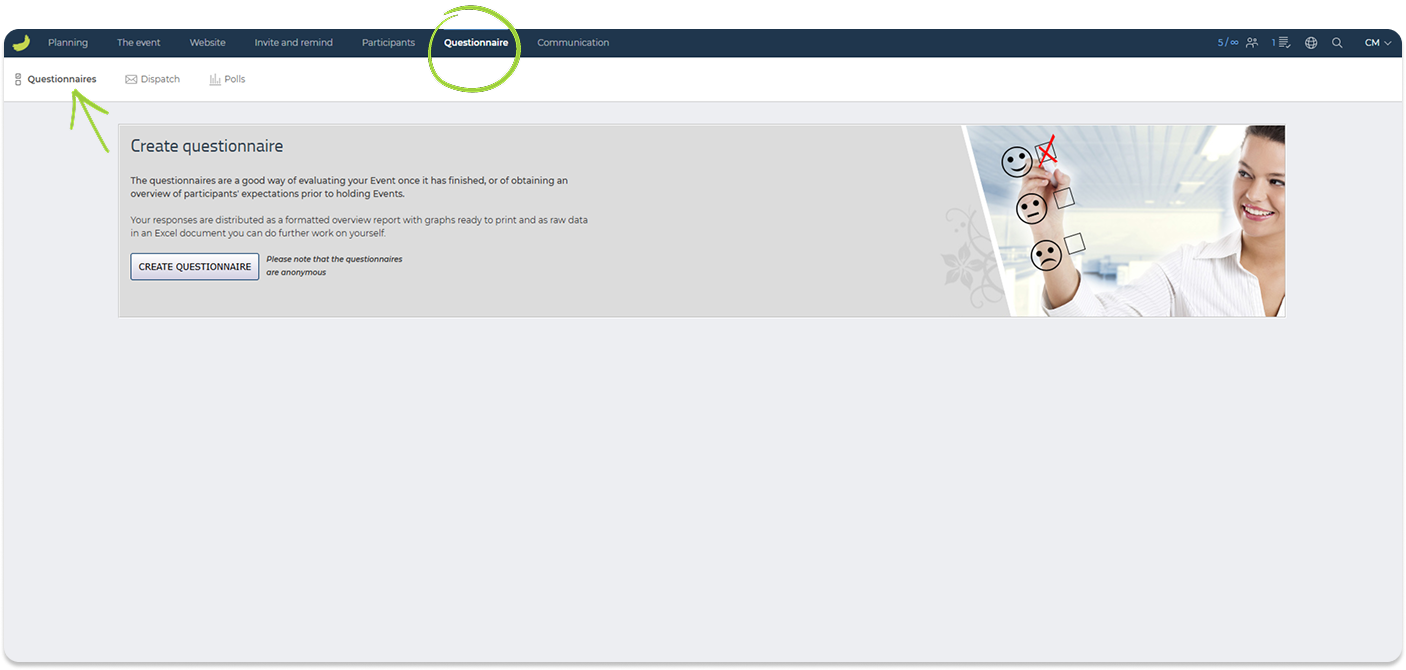
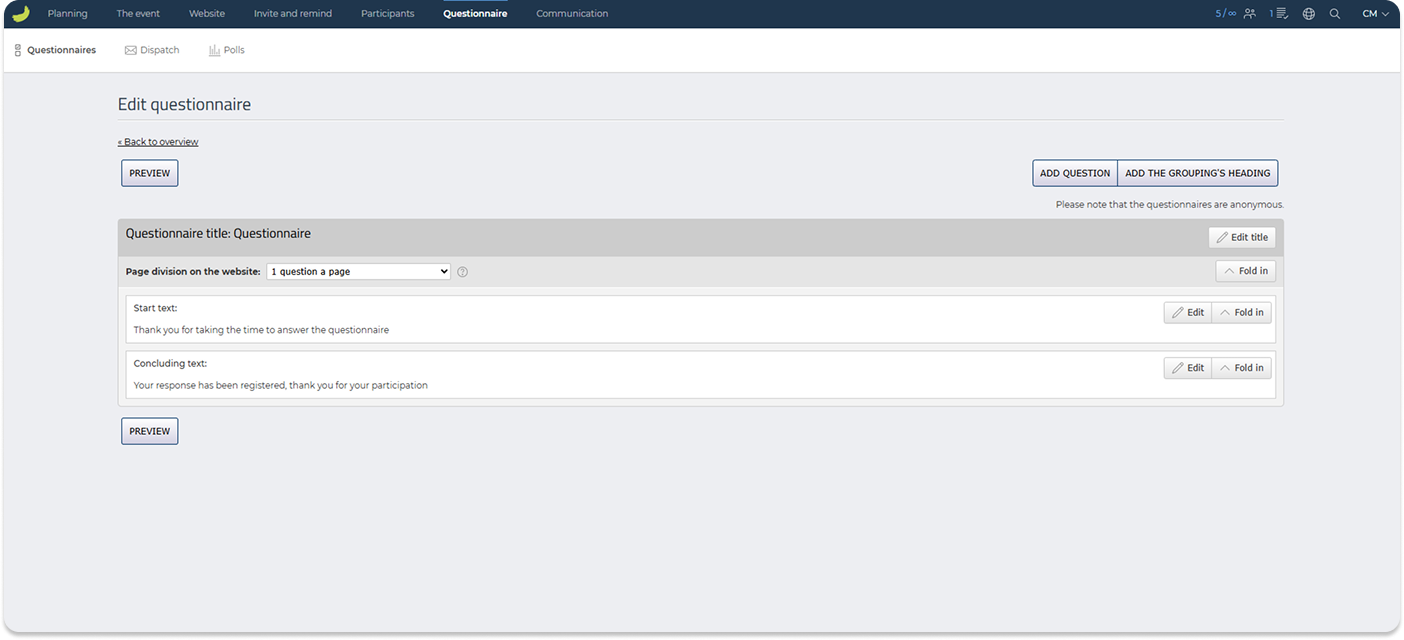
When editing a questionnaire, you can add questions and group headings. You can also edit the questionnaire title, start text, and concluding text.
You can also choose how the questions should be divided on the website:
One question a page
Each question is shown on a separate page. This can be useful if the questionnaire contains longer questions or if you want participants to focus on one question at a time.
All questions on one page
All questions are shown on the same page. This is useful for shorter questionnaires where participants should be able to answer everything quickly in one view.
Groupings’ headings divide the pages
Questions are divided into pages based on the group headings you have added. Each group heading starts a new page. This can be useful if your questionnaire contains different sections or themes.
Click Add question to add a new question.
When adding a question, you can choose between different response types:
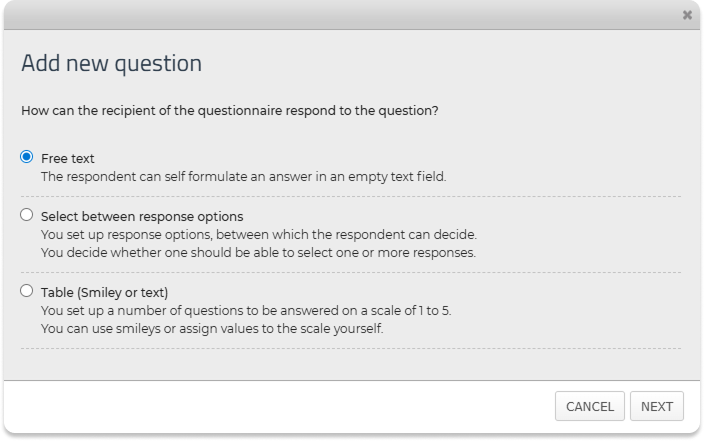
Free text
The participant writes their own answer in a text field.
Response options
The participant chooses between predefined answer options. You can decide whether the participant may select only one response option or several response options.
Table
The participant answers using a scale, for example with smileys or custom text values.
For each question, you can also choose whether the response should be required or optional.
For questions with response options, you can also add sub-questions to individual response options.
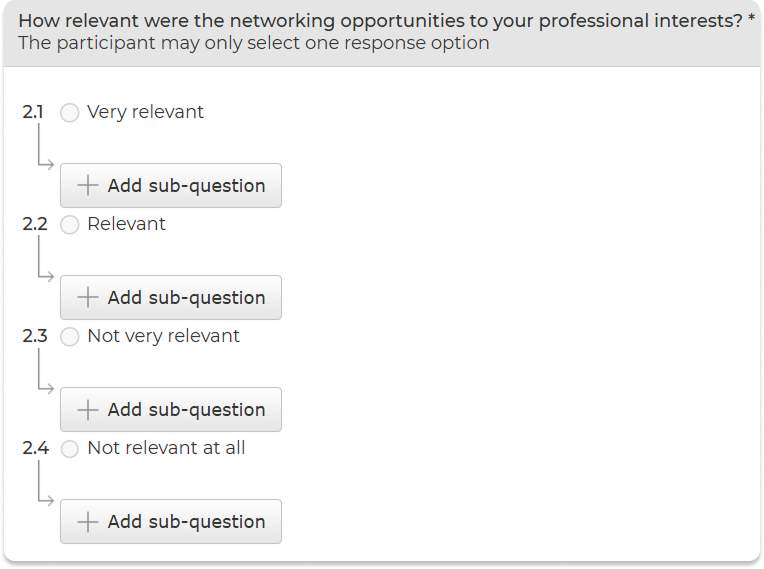
A sub-question is linked to a specific answer option and can be used to ask for additional information if the participant selects that answer. This is useful if you want to collect more details based on a participant’s response.
Use Preview to check how the questionnaire will look before sending it to participants.
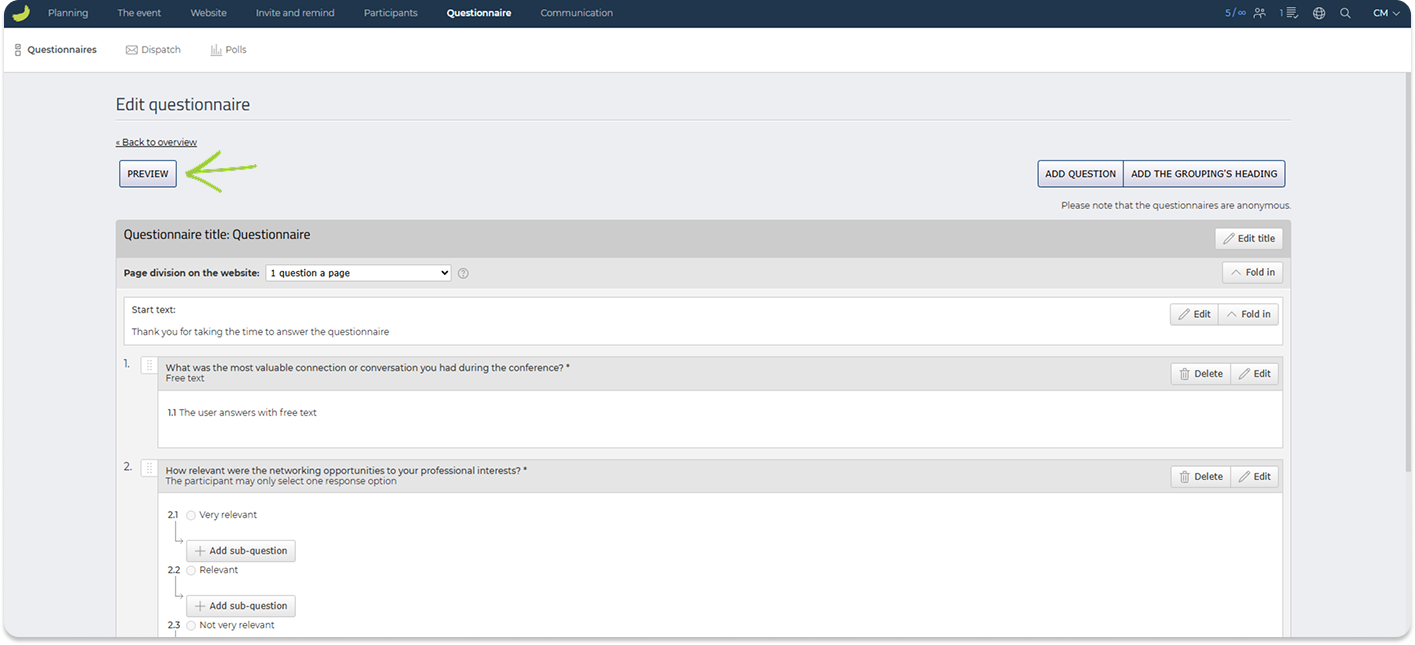
Please note that questionnaires are anonymous.
Dispatches
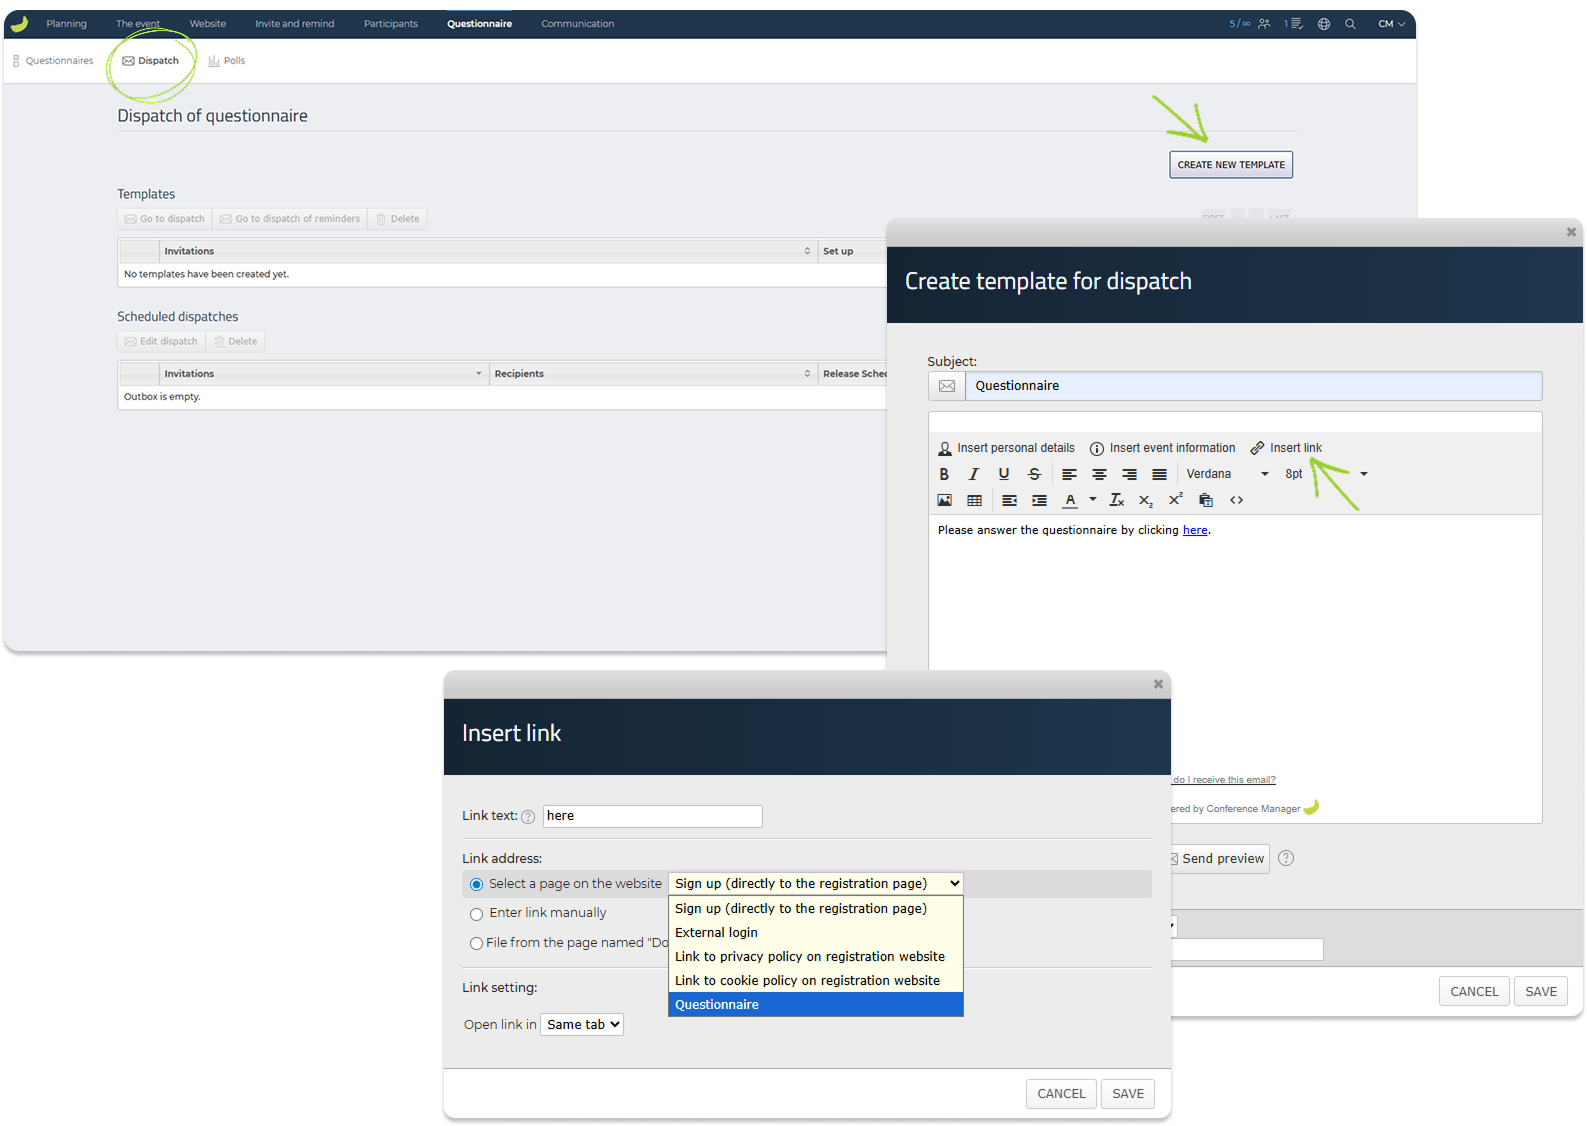
Under Questionnaire → Dispatches, you can create and manage dispatch templates for questionnaires.
Use this section when you want to send a questionnaire to participants by email.
Click Create new template to create a questionnaire email template. In the template, you can add a subject, write the email text, insert personal details or event information, and insert a link to Questionnaire: Click Insert link and choose Questionnaire under Select a page on the website.
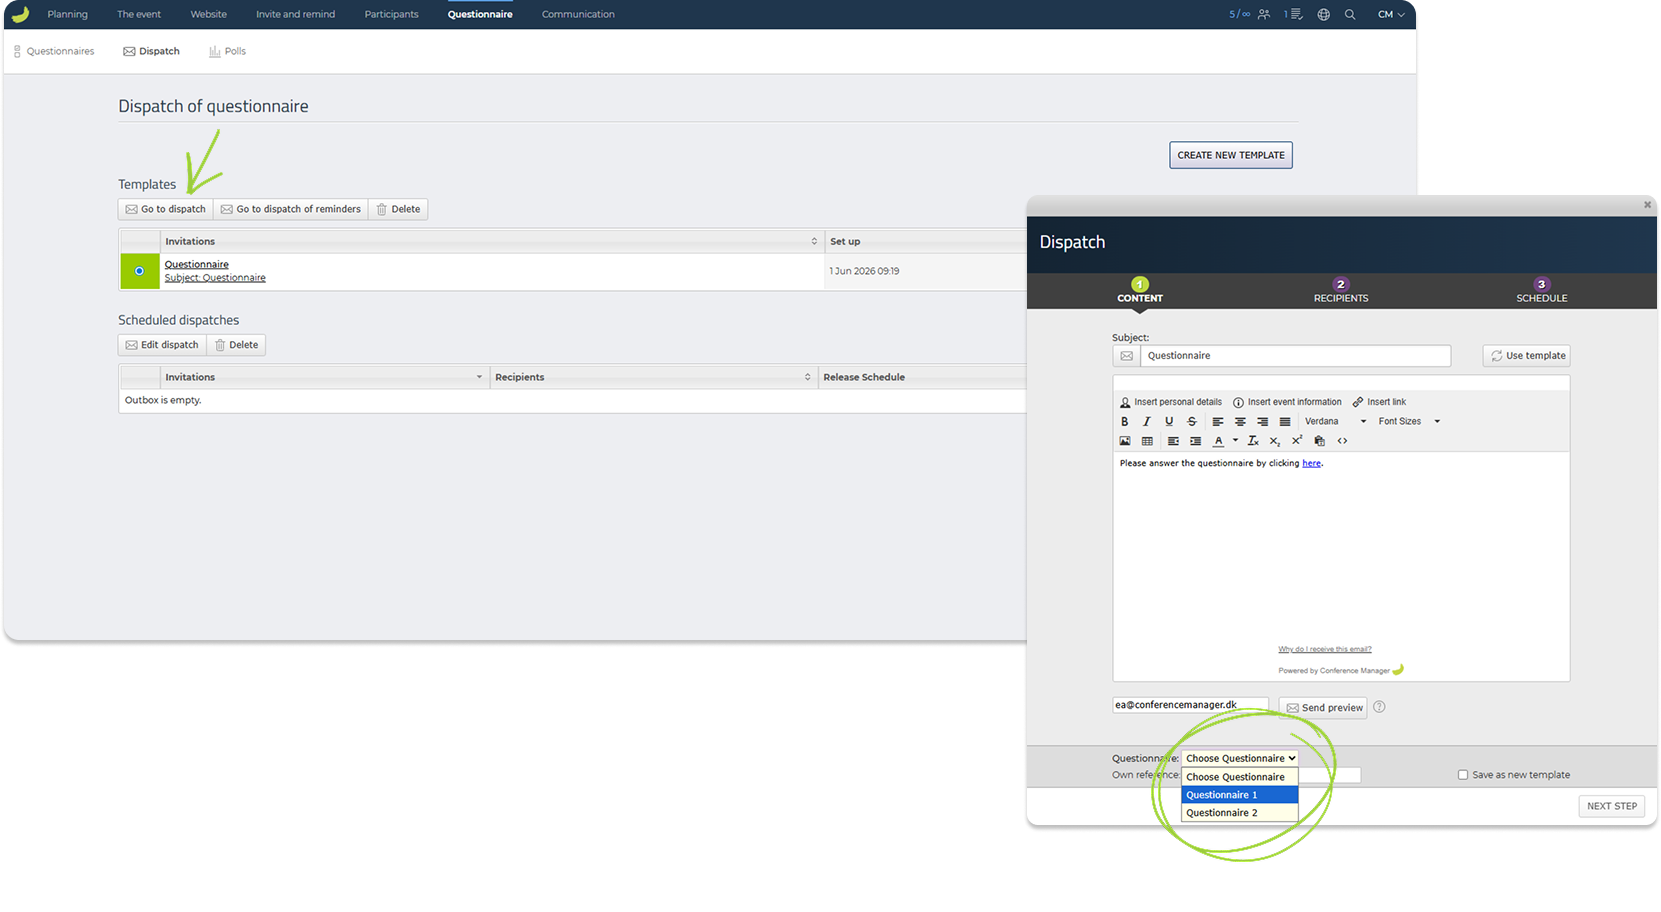
To send the questionnaire, select the template and click Go to dispatch.
The dispatch flow lets you review the content, select recipients, and choose whether the questionnaire should be sent now or scheduled for later. In the first step, remember to select the specific questionnaire you want to dispatch if you have several.
Scheduled questionnaire dispatches will appear under Scheduled dispatches, where you can review or manage planned dispatches.
Read more about scheduled dispatches here:
How do I schedule an email dispatch?
Polls
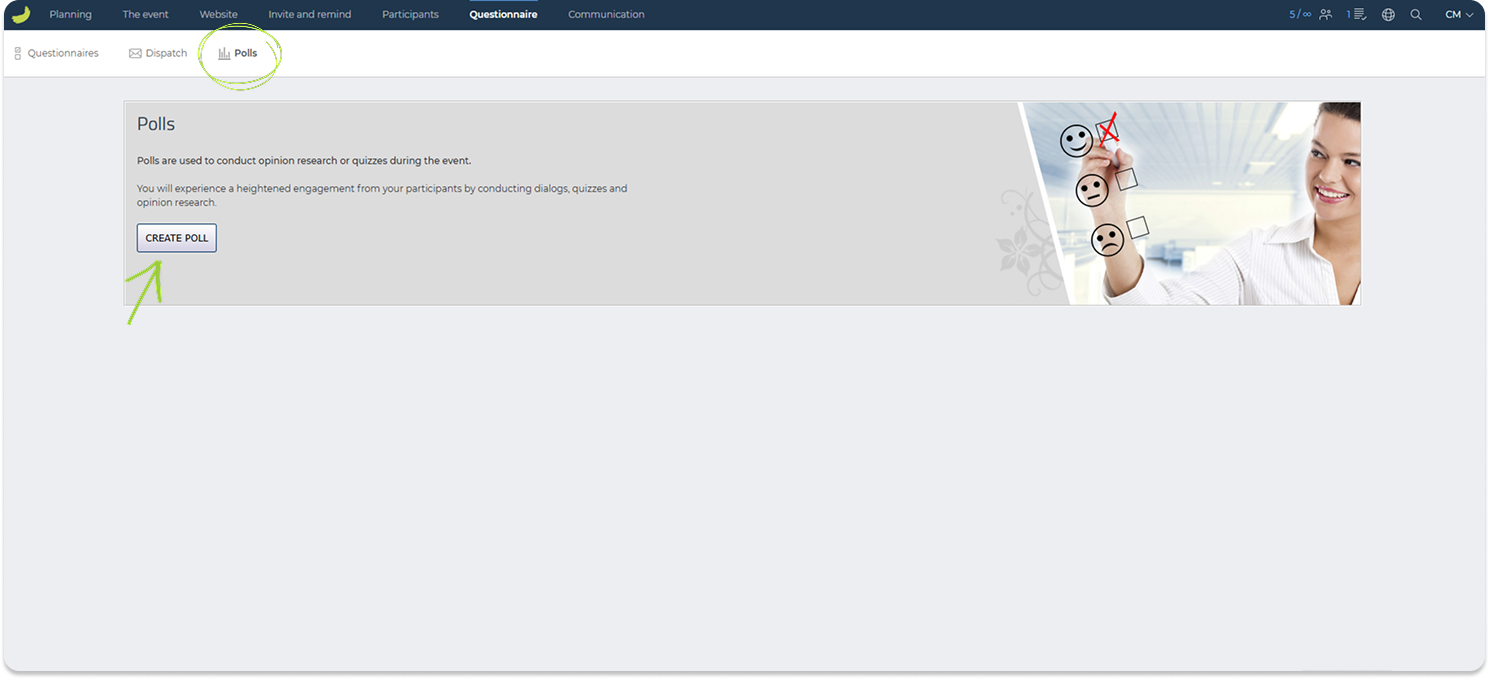
Under Questionnaire → Polls, you can create and manage polls or quizzes for your event.
Polls and quizzes can be used to collect quick answers from participants, for example during a session, presentation, webinar, or live activity.
Click Create poll to create a new poll or quiz.
When setting up a poll or quiz, you can add questions, answer options, images, time limits, and define whether it should be used as a poll or as a quiz with points.
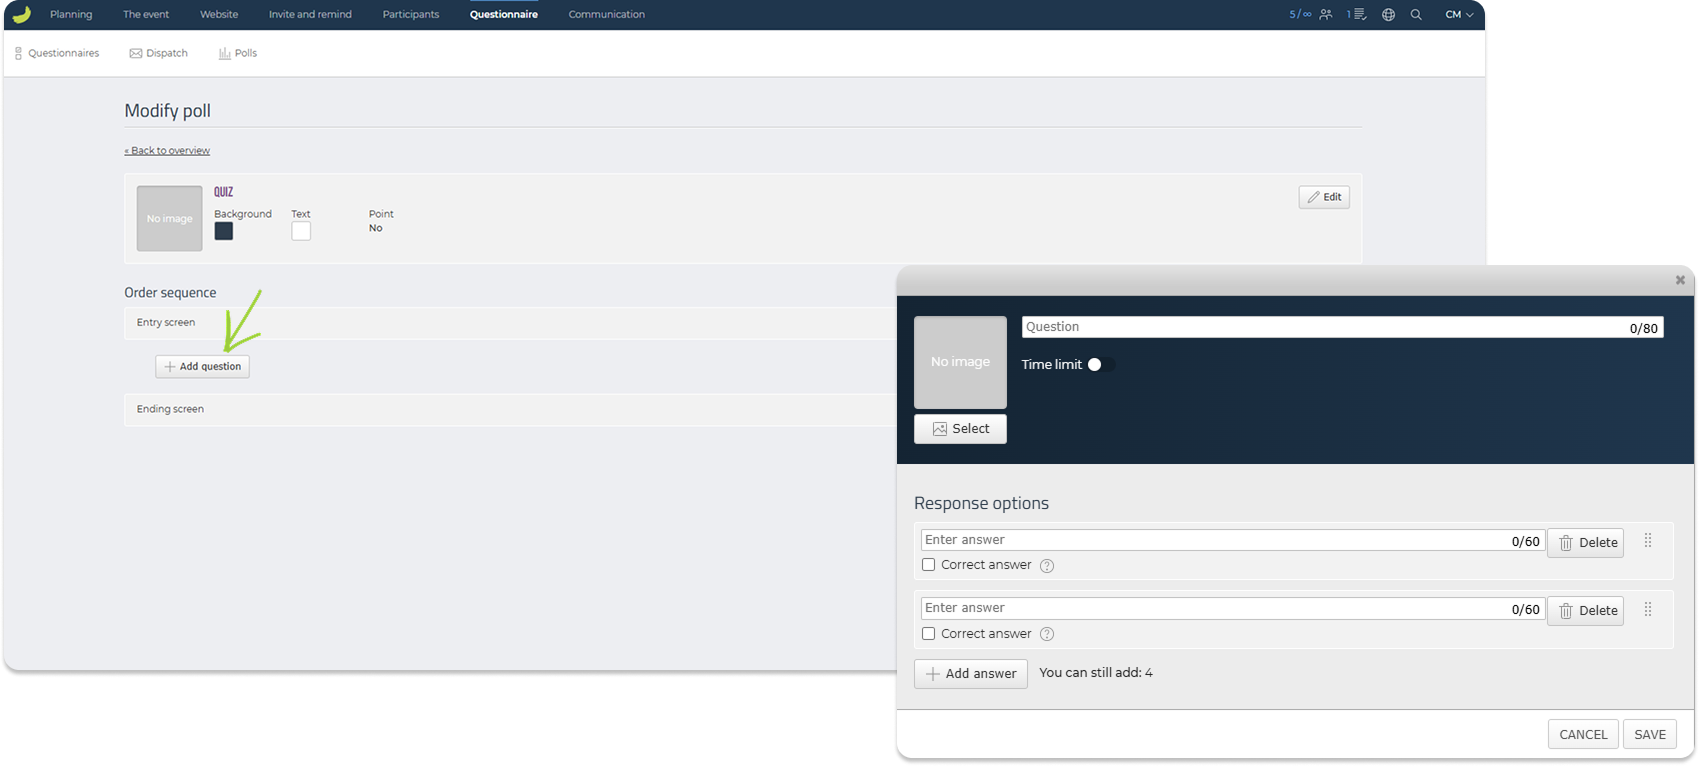
Once it has been created, it will appear in the overview. From here, you can edit, copy, or delete it.
To run a poll or quiz during the event, you can use an external login with access to the relevant poll. Participants can then join and answer from their own device.
For a more detailed guide, see:
How to create and run a poll or quiz
You can also set up a Live Q&A if participants should be able to ask questions during the event.
A guide can be found here:
How to run a Live Q&A
Communication
Under Communication, you can create and send emails and text messages to participants, review sent messages, and manage automatic emails.
This section is used for general event communication. For example, you can use it to send practical information before the event, updates about changes to the programme, reminders to bring tickets, parking information, follow-up emails after the event, or urgent messages by SMS. You can also see all sent emails and edit automatic emails.
This section contains the following areas: Emails, Sent emails, Text message, Sent text messages, and Automatic emails.
When you open the Communication tab, you first see a quick overview of email delivery, including delivered and failed emails.

Emails
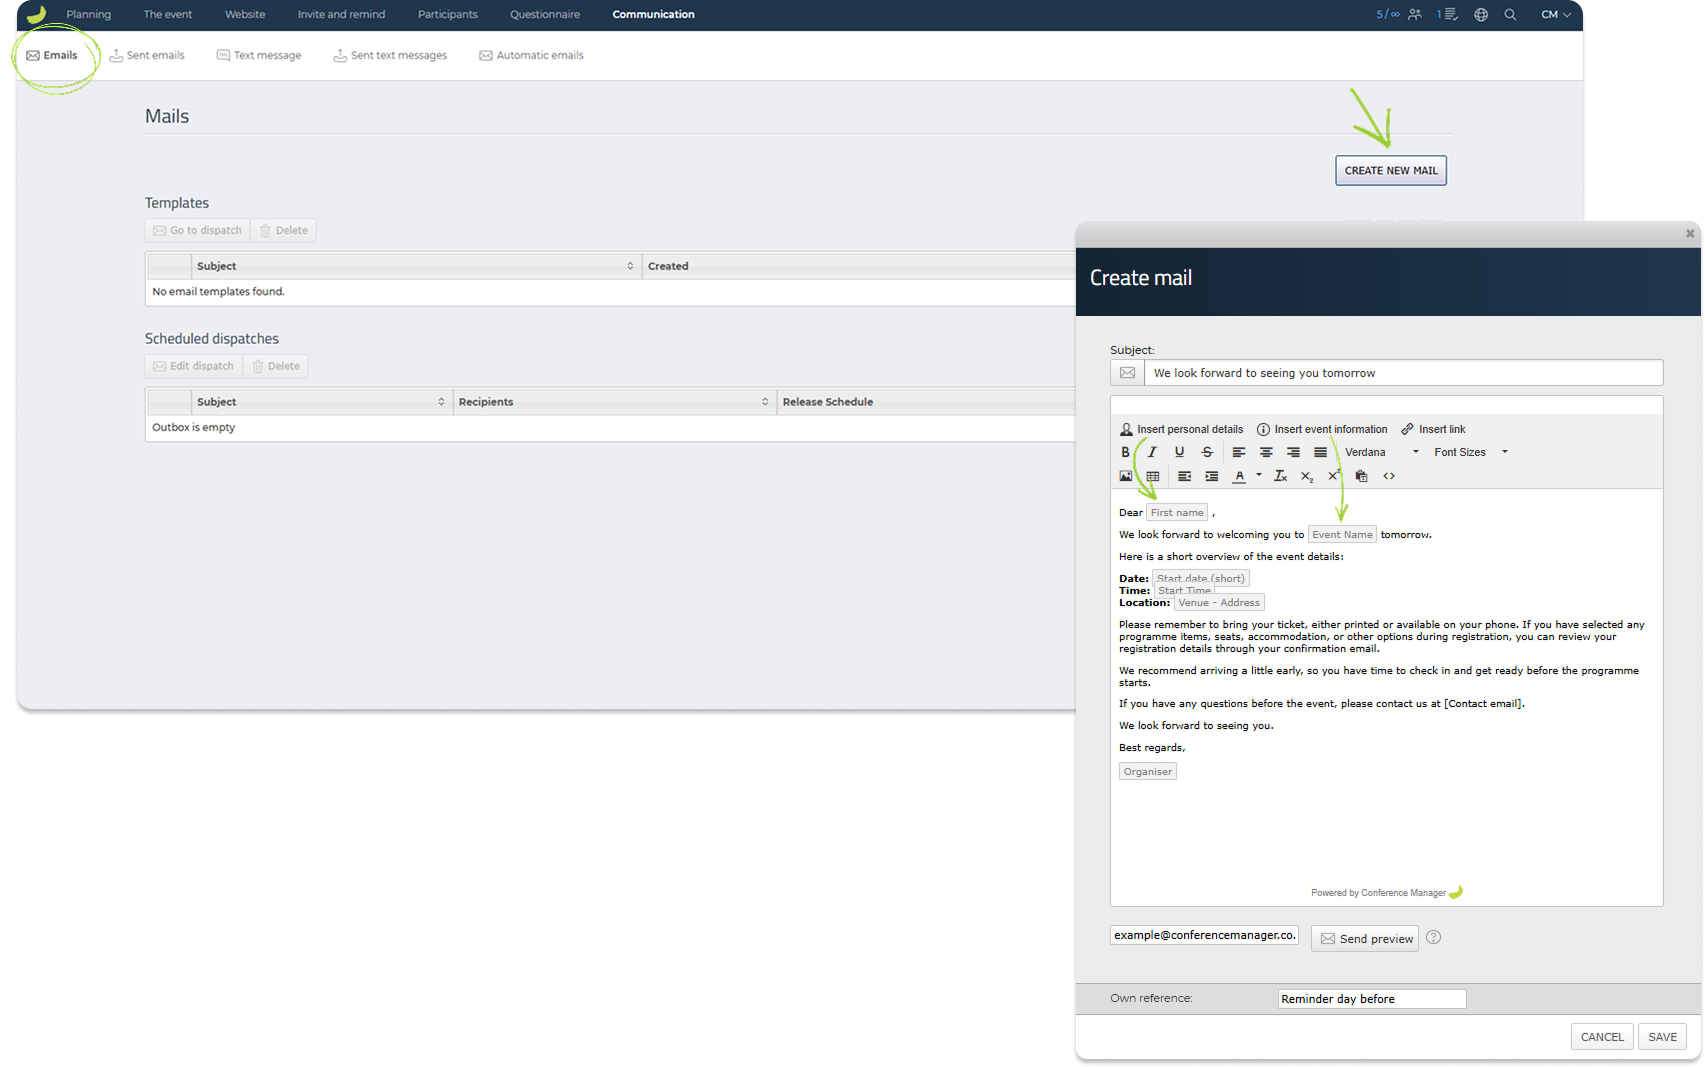
Under Communication → Emails, you can create and manage email templates that can be sent to participants.
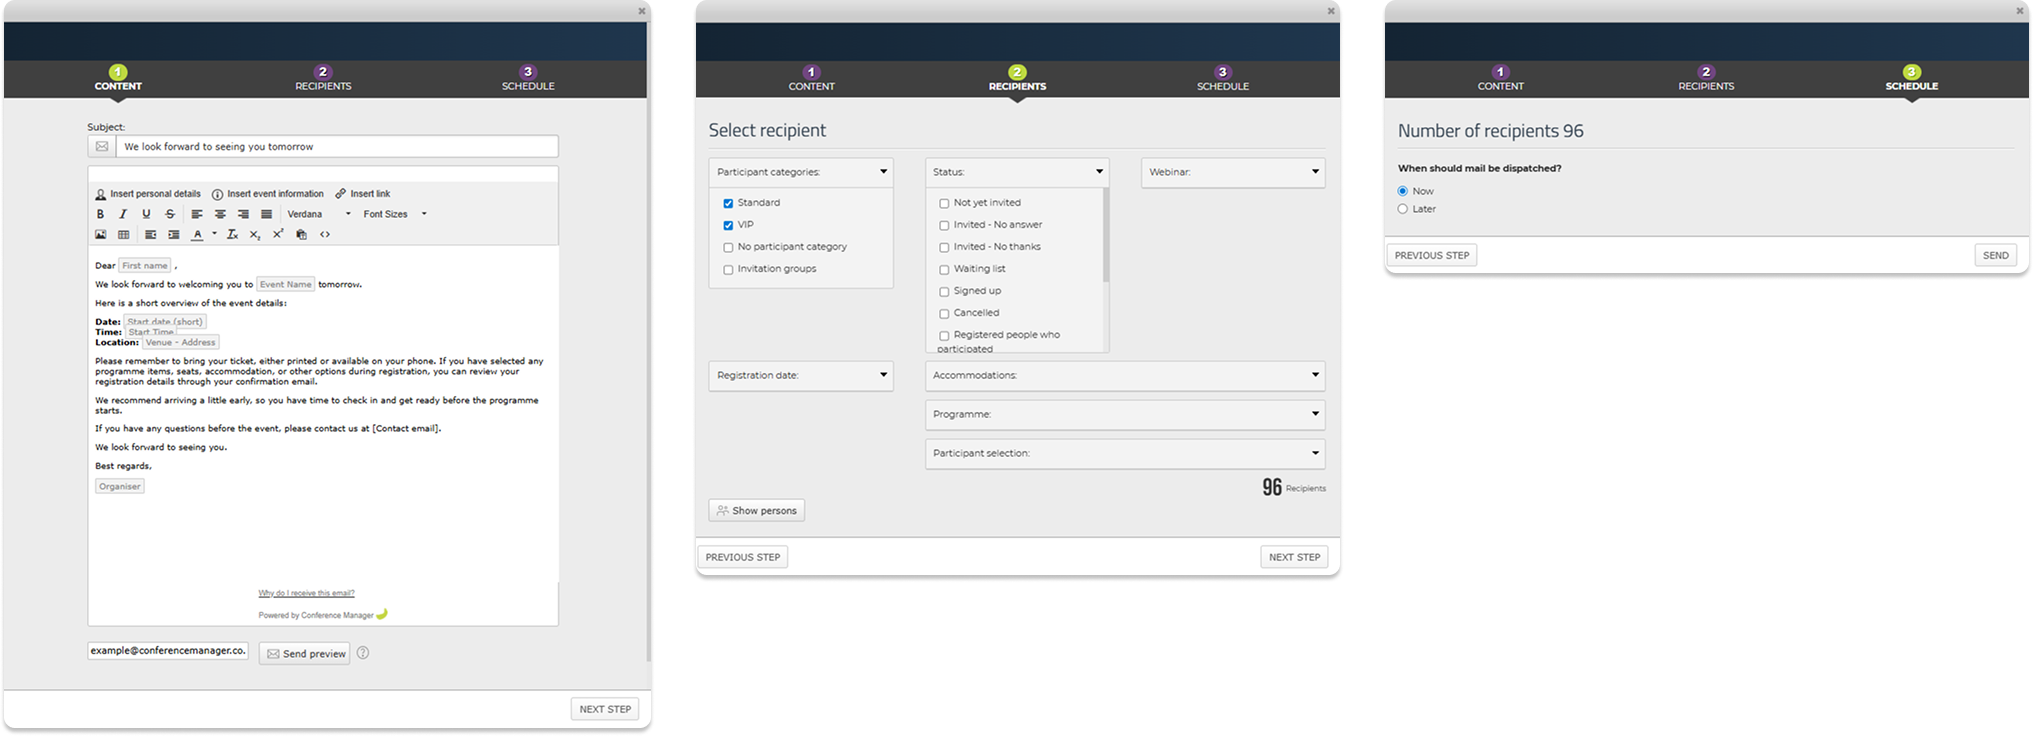
Click Create new mail to create a new email template. You can write the subject and body text, add links, e.g. to different pages on your event website, or external links.
Read more about how to link to files here:
Send files via email
You can also insert placeholders such as personal details and event information. These placeholders are automatically replaced with the relevant information when the email is sent, based on the participant’s registration details and the event setup.
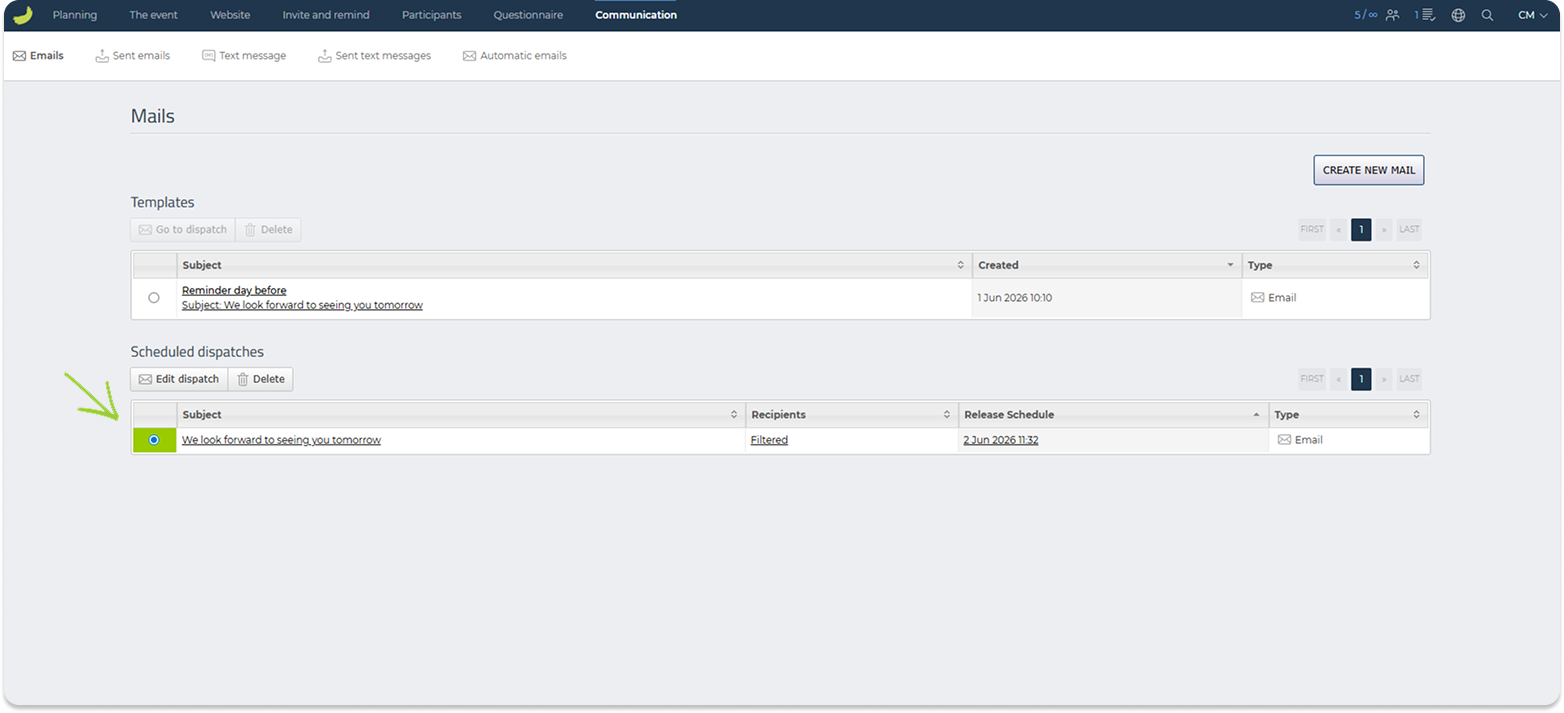
Once an email template has been created, it will appear under Templates. From here, you can select the template and send it using Go to dispatch.
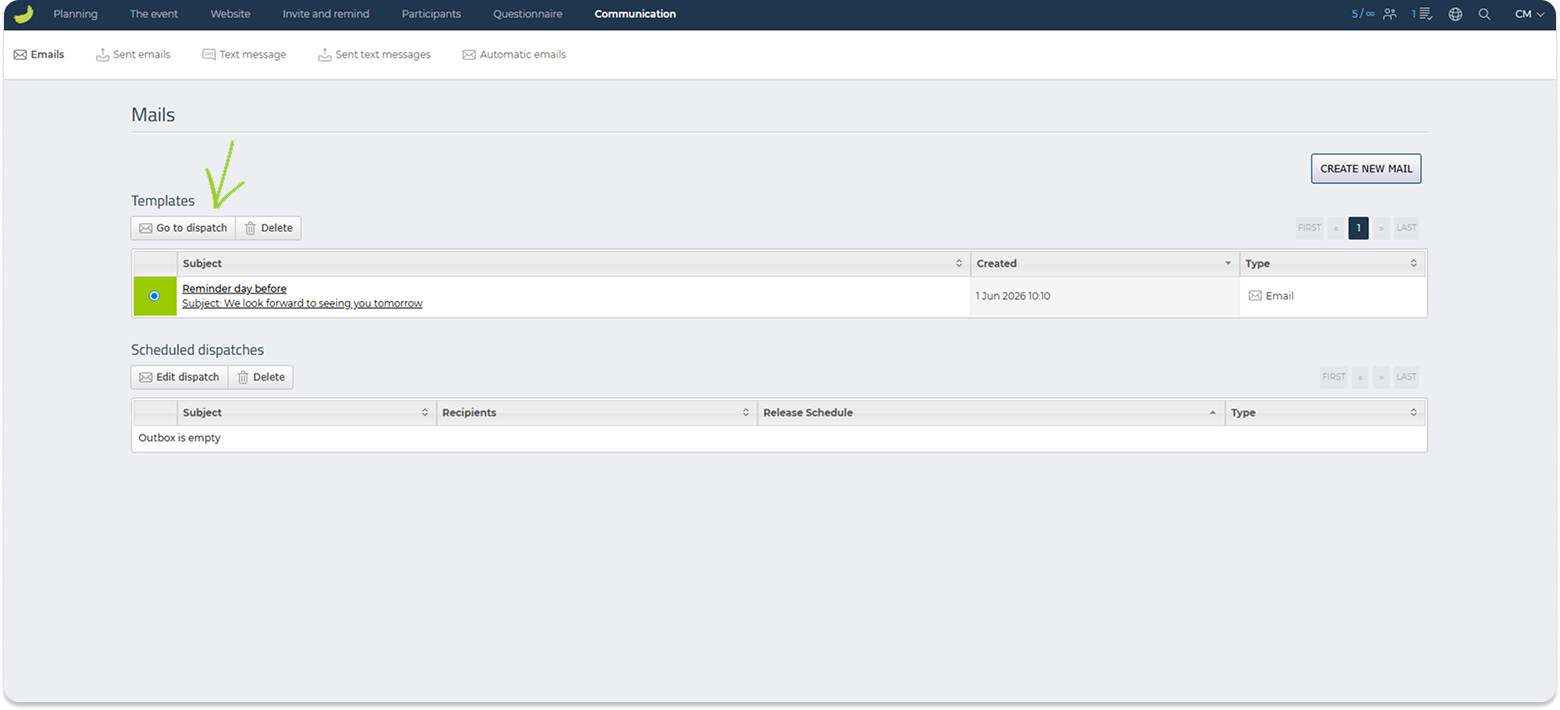
The dispatch flow lets you review the content, select recipients, and choose whether the email should be sent now or scheduled for later.
Scheduled email dispatches will appear under Scheduled dispatches, where you can review or manage planned dispatches.
Read more about scheduled dispatches here:
How do I schedule an email dispatch?
Sent emails
Under Communication → Sent emails, you can view emails that have already been sent from the event.
You can search by recipient email address and use filters to narrow down the list.
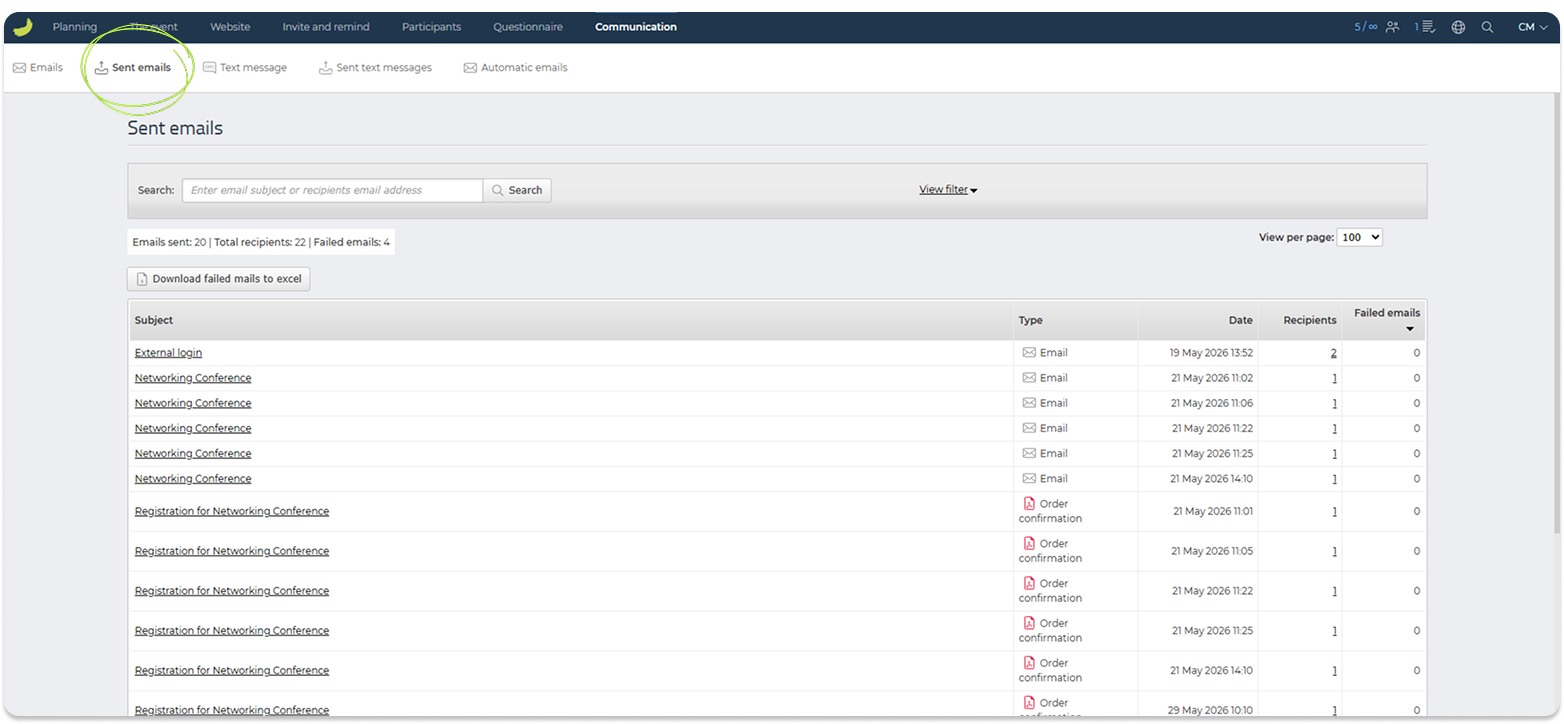
This section is useful if you need to check whether an email was sent, see how many recipients received it, or review failed emails.
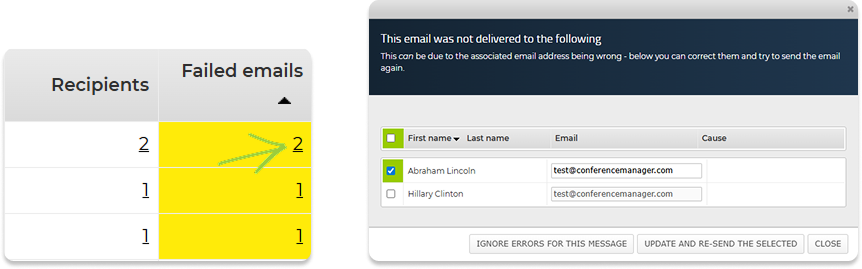
If an email has failed recipients, you can click the number in the Failed emails column to see which recipients the email was not delivered to. From here, you can review the email addresses, correct them if needed, and try sending the email again.
Text message
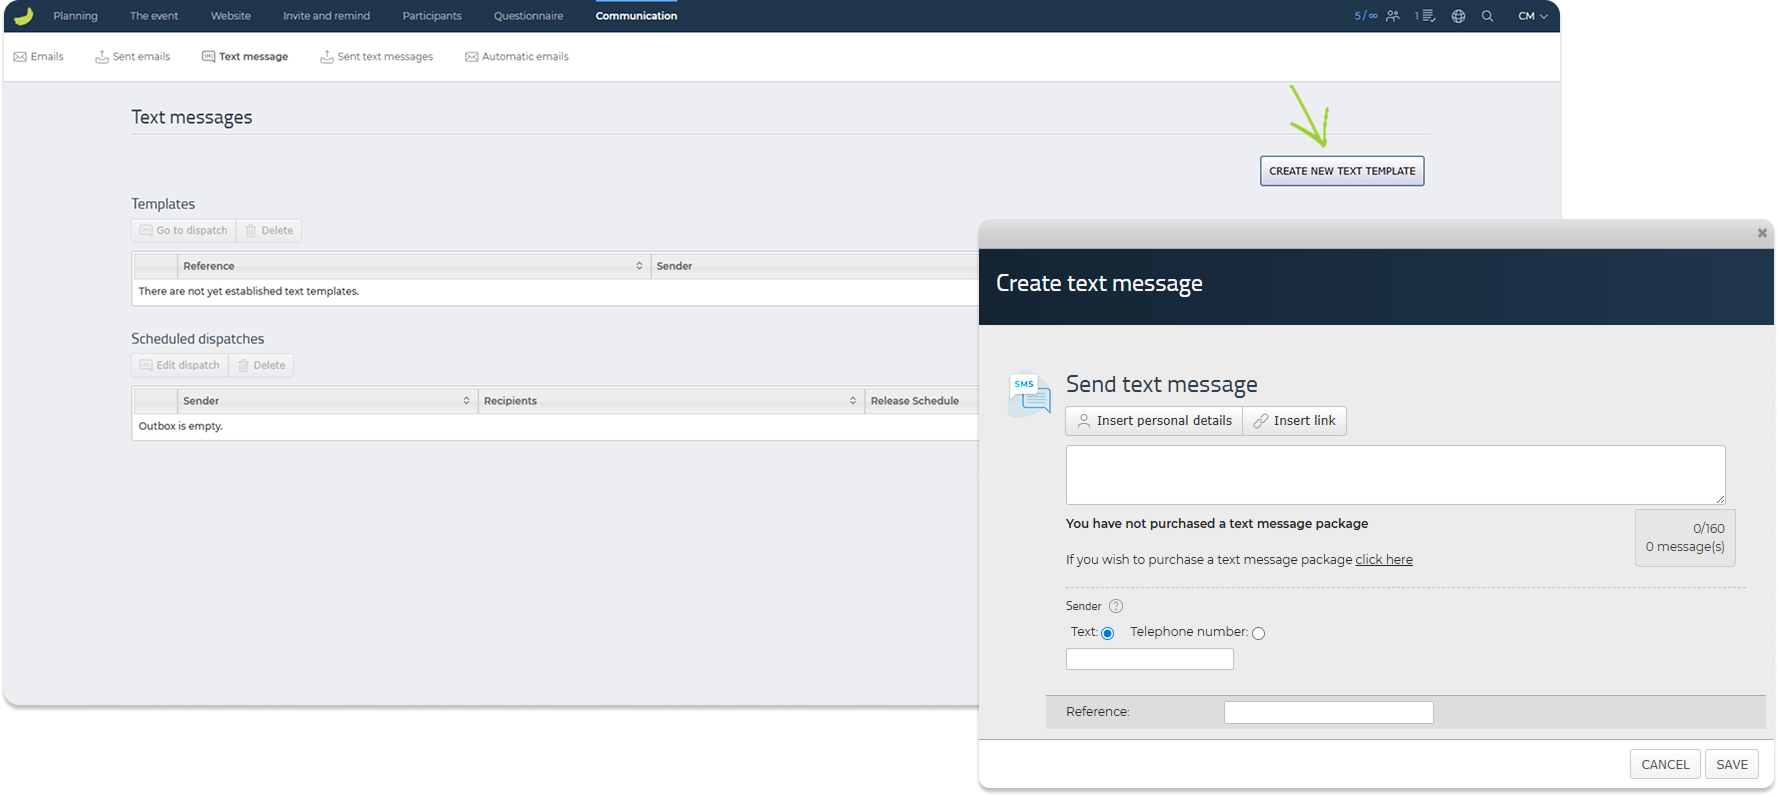
Under Communication → Text message, you can create and send text messages.
Click Create new text message template to create a new SMS template. Once the template has been created, it will appear under Templates.
From here, you can select the template and send it using the dispatch flow. As with emails, you can select recipients and choose whether the text message should be sent now or scheduled for later.
To send SMS messages to participants, their phone numbers must be registered in the standard information field Mobile phone. SMS messages cannot be sent using a custom free text field. Please note that there are costs associated with sending SMS messages. To view the applicable fees, click your name in the top-right corner of Conference Manager and go to Modules.
Scheduled text message dispatches will appear under Scheduled dispatches.
Sent text messages
Under Communication → Sent text messages, you can view text messages that have already been sent from the event.
You can search for sent text messages and review details such as setup, dispatch time, number of recipients, and number of failed messages.
This section is useful for checking whether text messages were sent successfully.
Automatic emails
Under Communication → Automatic emails, you can manage emails that are sent automatically in specific situations.
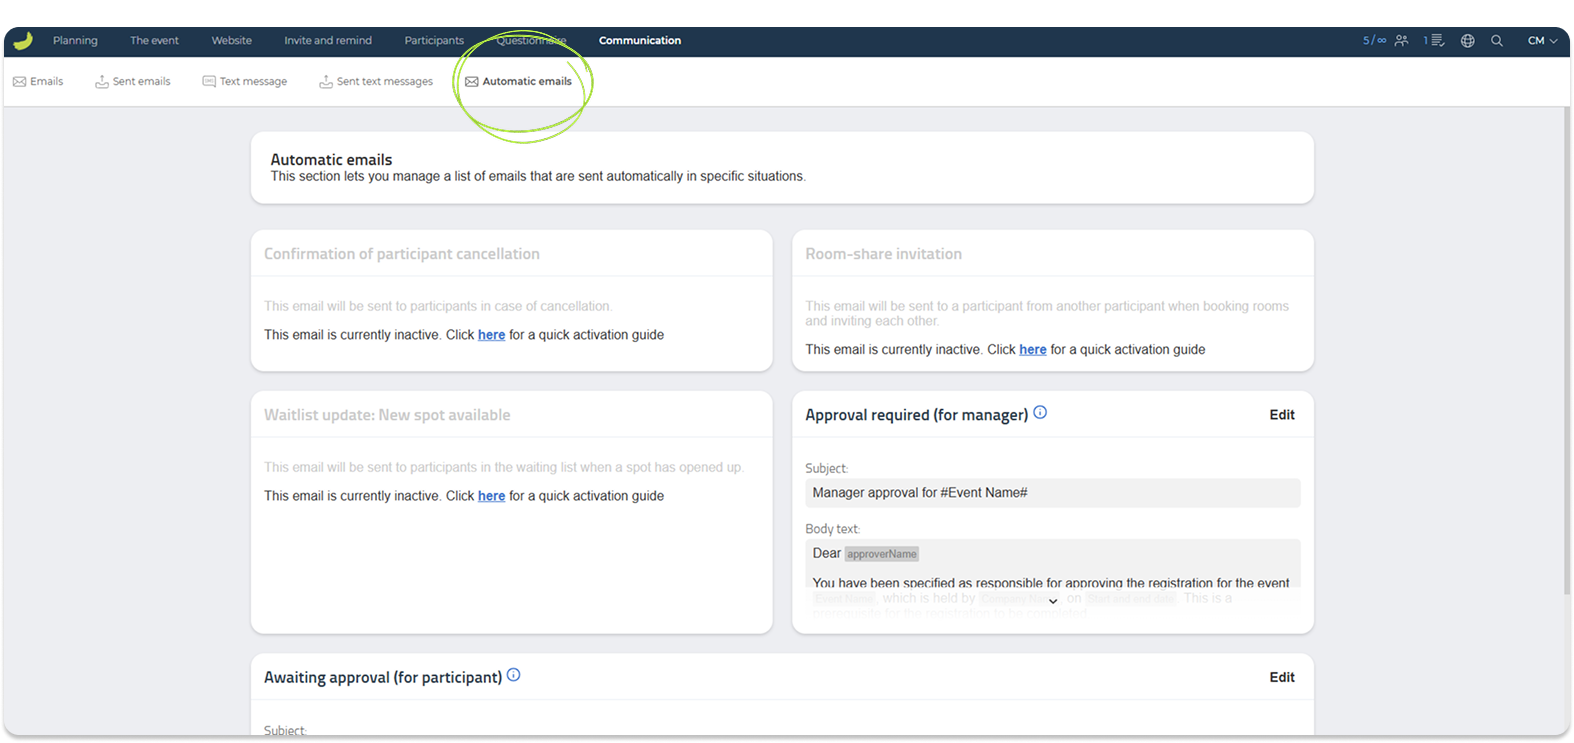
Automatic emails can be used for event-related workflows such as participant cancellation, waiting list updates, room-share invitations, or approval-related messages.
Each automatic email can be activated and configured individually. If an automatic email is inactive, it will not be sent until the necessary settings are active.
If an automatic email is inactive, you can click the guide link shown in that section to open a quick activation guide that explains how to set up and activate that specific email.
Use this section to review which automatic emails are relevant for your event setup and activate only the ones you need.
Finance
The Finance tab is only available if your event uses both invoicing through Conference Manager and Conference Manager Payment Management (CMPM).
Use this tab to get an overview of the financial side of the event. It helps you review revenue development, check accounting figures for a selected period, and follow up on settlement statements generated through CMPM.
The Finance tab contains the following areas: Accounting and Settlement statements.
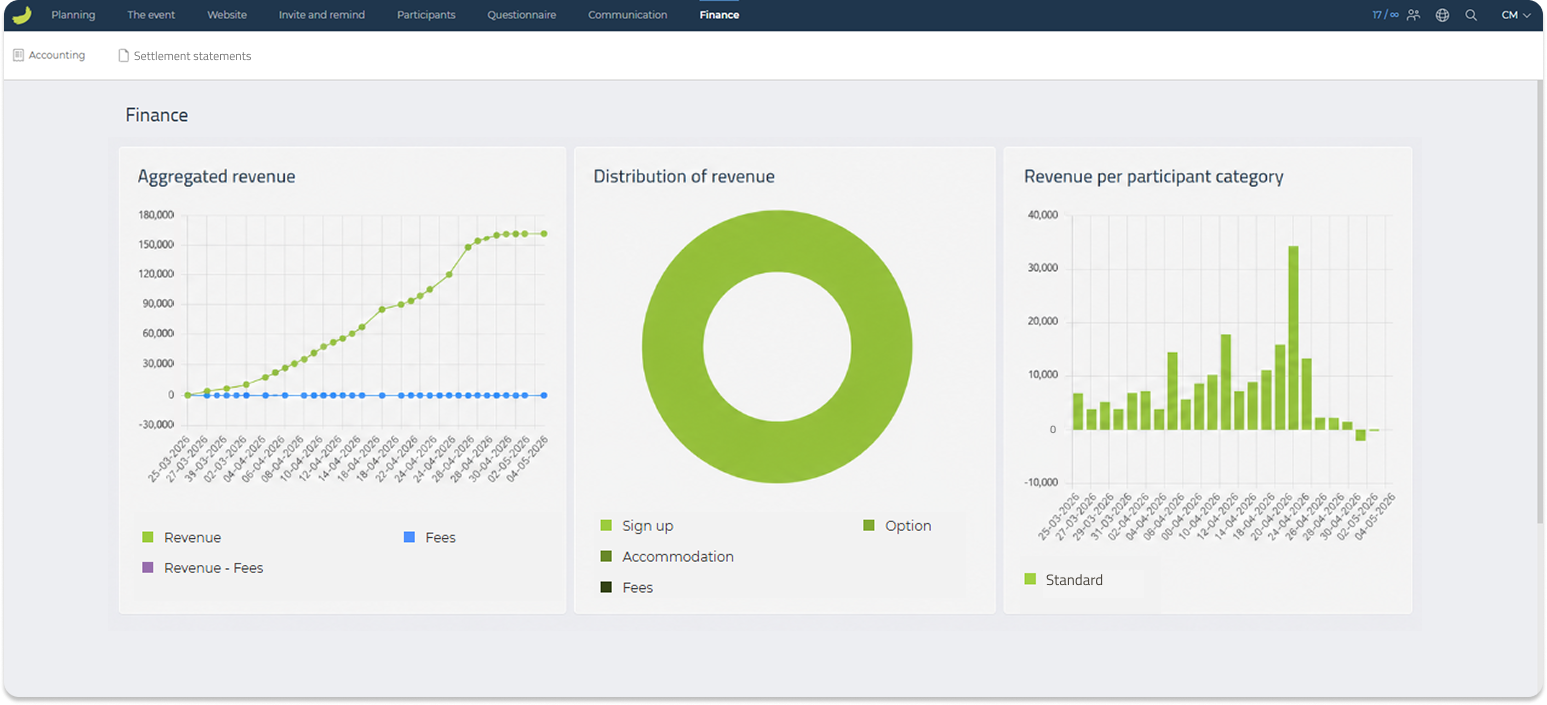
When you open the Finance tab, you first see a visual overview of the event’s revenue. This includes aggregated revenue over time, the distribution of revenue, and revenue per participant category.
This overview can be used to get a quick impression of how revenue is developing and where the revenue comes from, for example sign-ups, options, accommodation, or fees.
Accounting
In Accounting, you can view a more detailed accounting overview for a selected period.
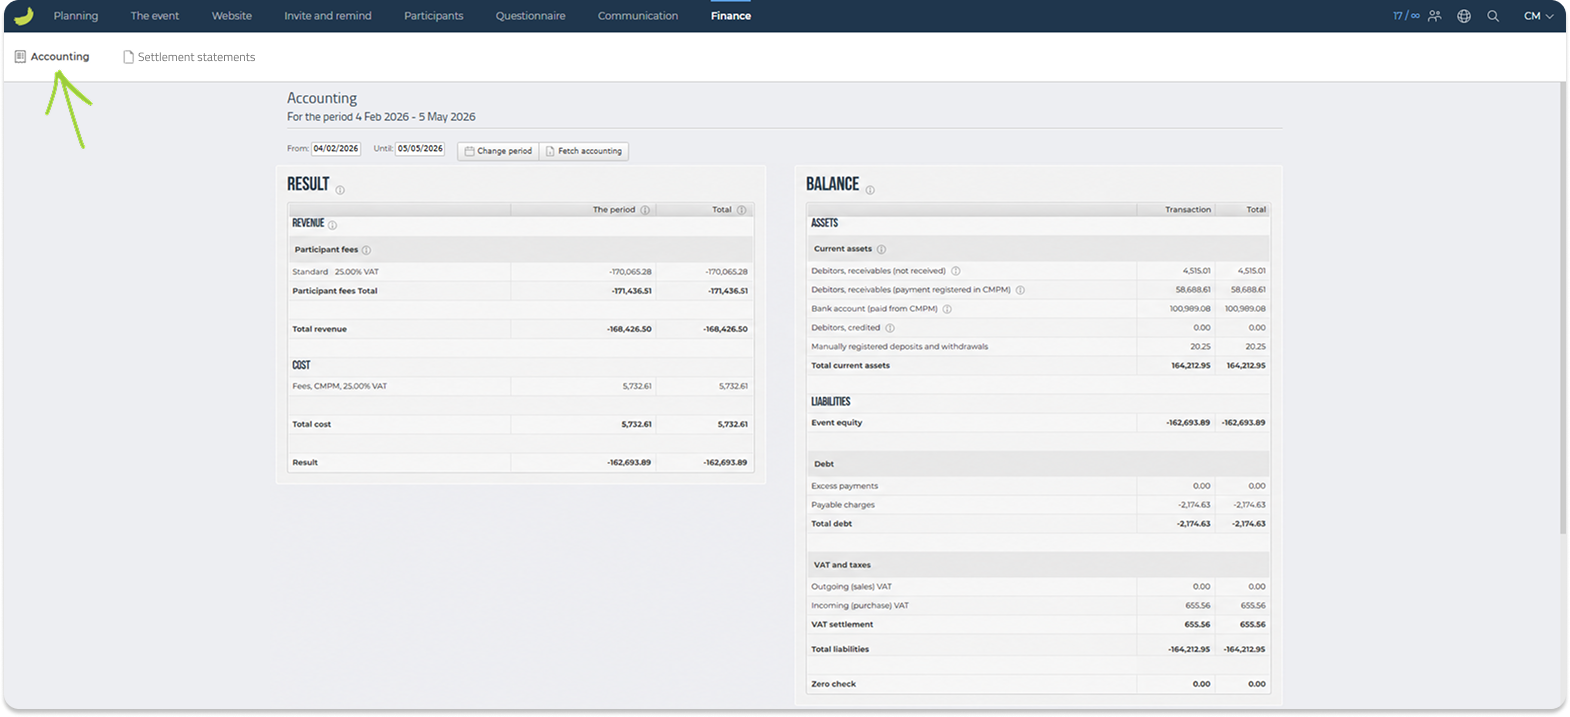
The overview is divided into Result and Balance.
Result shows the revenue, costs, and overall result for the selected period. This can include participant fees, VAT, CMPM fees, and other accounting-related amounts connected to the event.
Balance shows assets and liabilities connected to the event. This can include receivables, payments registered in CMPM, credited amounts, manual deposits and withdrawals, debt, VAT settlement, and other entries related to invoicing and CMPM.
The zero check is used to check whether the accounting balance adds up correctly for the selected period. It should normally be 0.
You can change the accounting period by selecting a new date range and clicking Change period.
If you need to export the accounting overview, click Fetch accounting. This downloads the accounting data as an Excel file.
Settlement statements
In Settlement statements, you can view sent settlement statements for the event, if any have been created.
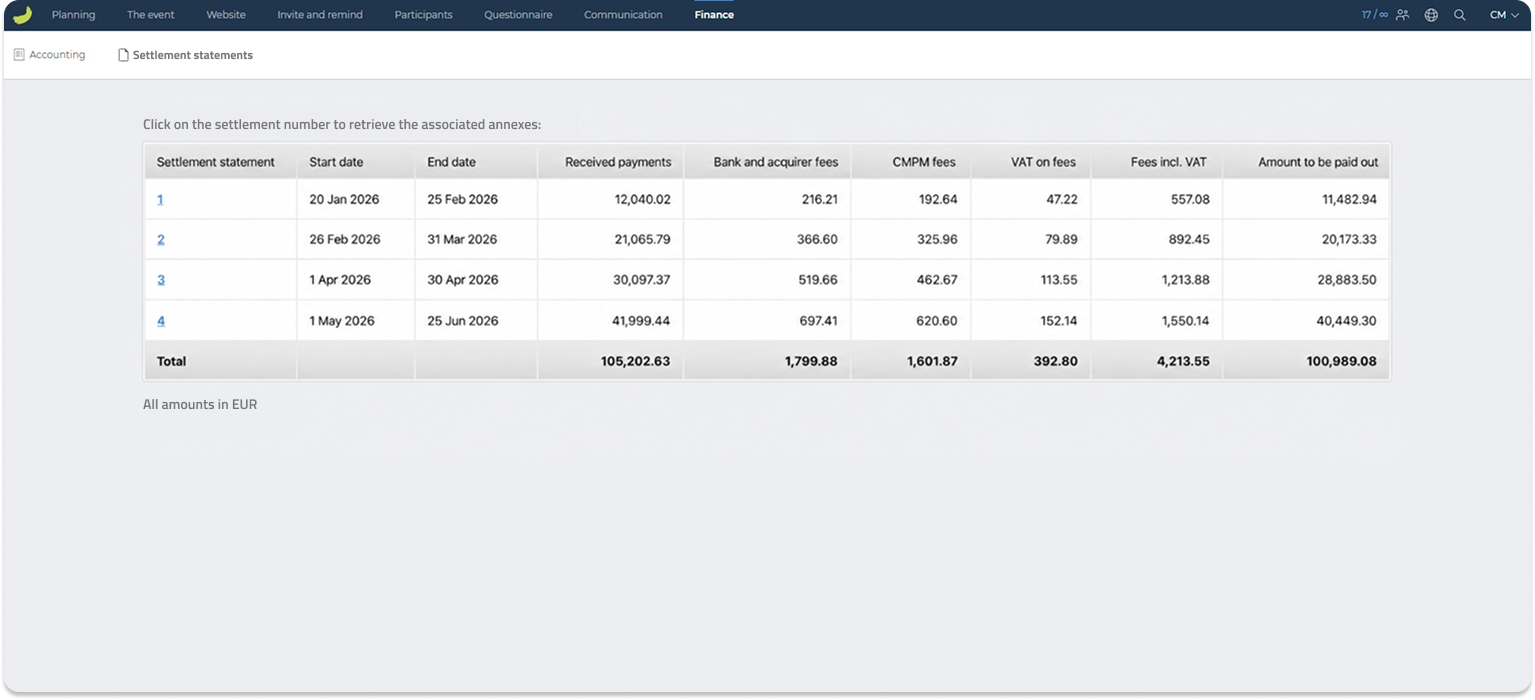
Settlement statements are always generated when using CMPM. They are also sent to the contact email specified as the recipient of settlement statements in the event’s payment setup.
To learn how to read and understand settlement statements, see:
Settlement statements explainer